ILSVRC2012数据集处理
- 解压图像
- 处理标签和图像
解压图像
先解压
tar -xvf ILSVRC2012_img_train.tar

解压之后其实还是1000个tar压缩包(对应1000个类别),需要再次解压,解压脚本unzip.sh如下(PS:可能需要自己改一下目录 dir ):
(这里也可以用解压软件一键解压)
批量解压脚本
dir=./train
for x in `ls $dir/*tar` do
  filename=`basename $x .tar`
  mkdir $dir/$filename
  tar -xvf $x -C $dir/$filename
done
rm *.tar
执行 sh 脚本
chmod 777 unzip.sh
./ unzip.sh
报错:./unzip.sh: line 3: syntax error near unexpected token filename=basename $x .tar`’
直接使用指令ls *.tar | xargs -n1 tar xvf
将当前文件夹下的tar解压linux批量解压方法
或者:
python批量解压zip文件
import os
import shutil
import zipfile

# 首先引入需要的工具包
# shutil为后期移动文件所需,可以忽略此项
# 路径改这里!
#parent_path = r'输入路径,会解压该路径下的所有zip压缩文件'
parent_path = r'E:\py\python3.7\test\test99\zip'
# 文件类型选择
# 可以自行更改压缩文件类型,需要引入其它工具包,如tarfile等
# 这里是因为在自己的windows上,zip比较常见,其他类型请自行更改
file_flag = '.zip'   #修改需解压的格式 例如:.rar
# 删除已解压的zip文件
# 不建议初次使用,在确定程序无误后可以添加使用
def del_old_zip(file_path):
    os.remove(file_path)
# 解压
def decompress(file_path, root):
    # 开始
    # zipfile打开zip文件
    z = zipfile.ZipFile(f'{file_path}', 'r')
    # 解压
    z.extractall(path=f"{root}")    # path为解压路径,解包后位于该路径下
    # 判断是否需要重复解包
    for names in z.namelist():
        if names.endswith(file_flag):
            z.close()
            return 1
    # 结束
    z.close()
    return 0

# 因为我在使用过程中发现有些zip解包后会混在一起
# 在平时大家手动解压时可能也会遇到提示是否覆盖的问题
# 下面的两个函数解决这一问题
# 开始要先创建一个大文件夹  与压缩包名字相同
# 避免后期混乱和麻烦
def start_dir_make(root, dirname):
    os.chdir(root)
    os.mkdir(dirname)
    return os.path.join(root, dirname)
# 去除多余文件夹
def rem_dir_extra(root, father_dir_name):
    # 递归要注意信息的正常处理  搞不好上一个调用已经改变了东西  而下面的调用还是使用之前的数据
    try:
       # 判断文件夹重名  开始
        for item in os.listdir(os.path.join(root, father_dir_name)):
            # 第一步判断是不是一个文件夹,如果不是则跳过本次循环
            if not os.path.isdir(os.path.join(root, father_dir_name, item)):
                continue
            # 判断是否要脱掉一层目录结构
            # 文件夹名字要相同,且子目录中只有单独的一个文件夹
            if item == father_dir_name and len(
                    os.listdir(os.path.join(root, father_dir_name))) == 1:
                # 改变工作目录
                os.chdir(root)
                # 将无用文件夹重命名,因为直接移动会有重名错误
                os.rename(father_dir_name, father_dir_name + '-old')
                # 移动文件后删除空文件夹
                shutil.move(os.path.join(root, father_dir_name + '-old', item), os.path.join(root))
                os.rmdir(os.path.join(root, father_dir_name + '-old'))
                # 将去掉一层目录结构后的文件夹继续作为父本递归处理下去
                # 这里要注意,上面已经发生过数据的改动,所以下面递归传参一定要正确!
                rem_dir_extra(root, item)
            else:
                # 处理那些不满足上面条件的文件夹
                rem_dir_extra(os.path.join(root, father_dir_name), item)
    except Exception as e:
        # 打印错误信息
        print("清除文件夹出错" + str(e))
# 入口
if __name__ == '__main__':
    flag = 1
    while flag:
        #  循环遍历文件夹
        for root, dirs, files in os.walk(parent_path):
            # 读取文件名
            for name in files:
                if name.endswith(file_flag):
                    # 创建文件夹
                    new_ws = start_dir_make(root, name.replace(file_flag, ''))
                    # zip文件地址
                    zip_path = os.path.join(root, name)
                    # 解压
                    flag = decompress(zip_path, new_ws)
                    # 删除解压后的文件
                    # 有点危险
                    # 但不删除又可能会重复运行
                     # 一定要备份或先测试,不然可能会凉,自己选择修改
                    del_old_zip(zip_path)
                    # 去掉多余的文件结构
                    rem_dir_extra(root, name.replace(file_flag, ''))
                    print(f'{root}\\{name}'.join(['文件:', '\n解压完成\n']))

    # 由于解压可能解了好几次 所以可能会有已经解压好的父级目录重名无法处理 这里要再处理一次
    rem_dir_extra(os.path.split(parent_path)[0], os.path.split(parent_path)[1])
    print("解压完成啦,记得检查有没有zip格式之外的呀!\n\n其他格式需要自己改一下了")
查看文件夹下文件数量
ls -l|grep "^-" |wc -l
统计文件名中包含某个名称(n15075141_)的文件的文件总数
find -name "n15075141_*" | wc -l
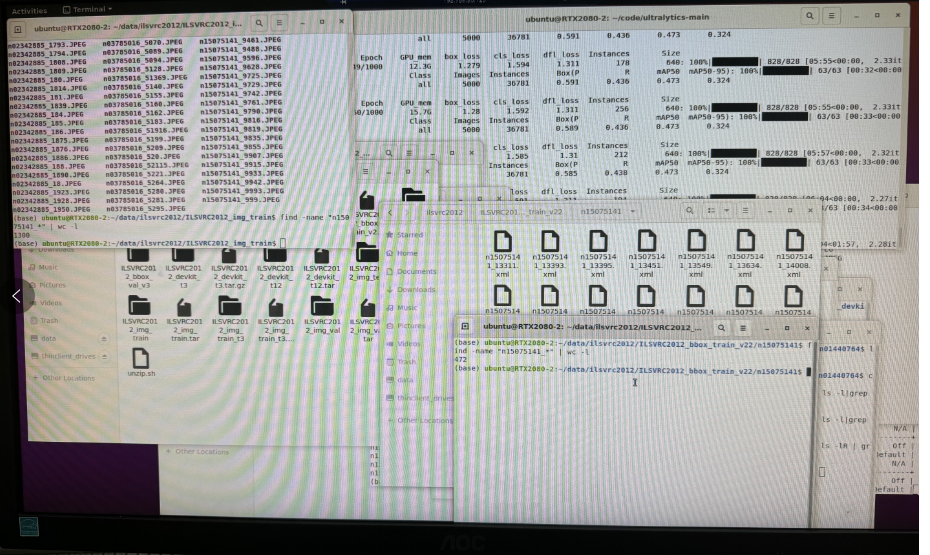
这里我使用这官方提供的脚本文件
#!/bin/bash
#
# script to extract ImageNet dataset
# ILSVRC2012_img_train.tar (about 138 GB)
# ILSVRC2012_img_val.tar (about 6.3 GB)
# make sure ILSVRC2012_img_train.tar & ILSVRC2012_img_val.tar in your current directory
#
#  Adapted from:
#  https://github.com/facebook/fb.resnet.torch/blob/master/INSTALL.md
#  https://gist.github.com/BIGBALLON/8a71d225eff18d88e469e6ea9b39cef4
#
#  imagenet/train/
#  ├── n01440764
#  │   ├── n01440764_10026.JPEG
#  │   ├── n01440764_10027.JPEG
#  │   ├── ......
#  ├── ......
#  imagenet/val/
#  ├── n01440764
#  │   ├── ILSVRC2012_val_00000293.JPEG
#  │   ├── ILSVRC2012_val_00002138.JPEG
#  │   ├── ......
#  ├── ......
#
#
# Make imagnet directory
#
mkdir imagenet
#
# Extract the training data:
#
# Create train directory; move .tar file; change directory
mkdir imagenet/train && mv ILSVRC2012_img_train.tar imagenet/train/ && cd imagenet/train
# Extract training set; remove compressed file
tar -xvf ILSVRC2012_img_train.tar && rm -f ILSVRC2012_img_train.tar
#
# At this stage imagenet/train will contain 1000 compressed .tar files, one for each category
#
# For each .tar file:
#   1. create directory with same name as .tar file
#   2. extract and copy contents of .tar file into directory
#   3. remove .tar file
find . -name "*.tar" | while read NAME ; do mkdir -p "${NAME%.tar}"; tar -xvf "${NAME}" -C "${NAME%.tar}"; rm -f "${NAME}"; done
#
# This results in a training directory like so:
#
#  imagenet/train/
#  ├── n01440764
#  │   ├── n01440764_10026.JPEG
#  │   ├── n01440764_10027.JPEG
#  │   ├── ......
#  ├── ......
#
# Change back to original directory
cd ../..
#
# Extract the validation data and move images to subfolders:
#
# Create validation directory; move .tar file; change directory; extract validation .tar; remove compressed file
mkdir imagenet/val && mv ILSVRC2012_img_val.tar imagenet/val/ && cd imagenet/val && tar -xvf ILSVRC2012_img_val.tar && rm -f ILSVRC2012_img_val.tar
# get script from soumith and run; this script creates all class directories and moves images into corresponding directories
wget -qO- https://raw.githubusercontent.com/soumith/imagenetloader.torch/master/valprep.sh | bash
#
# This results in a validation directory like so:
#
#  imagenet/val/
#  ├── n01440764
#  │   ├── ILSVRC2012_val_00000293.JPEG
#  │   ├── ILSVRC2012_val_00002138.JPEG
#  │   ├── ......
#  ├── ......
#
#
# Check total files after extract
#
#  $ find train/ -name "*.JPEG" | wc -l
#  1281167
#  $ find val/ -name "*.JPEG" | wc -l
#  50000
#
参考文章
具体类别如下1000类信息
处理标签和图像
因为标签很少,图像较多,只有部分图像有标签对应,所以需要删除多余的图像。
数据集目录结构如下
数据集介绍
数据集介绍


