编辑:OAK中国
首发:A. hyh@CSDN
喜欢的话,请多多👍⭐️✍
内容来自用户的分享,如有疑问请与原作者交流!
▌前言
Hello,大家好,这里是OAK中国,我是助手君。
近期在CSDN刷到一篇教程,感觉不错的呦,分享给大家!
更多资源和教程,可在我的主页搜索哦。

▌一、运行stereo_node.launch实例
查看双目摄像头发布的话题,并修改orb-slam2摄像头节点。
gagaga@ubuntu:~$ cd catkin_ws/
gagaga@ubuntu:~/catkin_ws$ source devel/setup.bash
gagaga@ubuntu:~/catkin_ws$ roslaunch depthai_examples stereo_node.launch
▌二、查看摄像机话题
gagaga@ubuntu:~/catkin_ws$ rostopic list
#我选择的是这两个
/stereo_publisher/left/image
/stereo_publisher/right/image
▌三、查看相机内外参
rostopic echo -n 1 /stereo_publisher/left/camera_info
rostopic echo -n 1 /stereo_publisher/right/camera_info
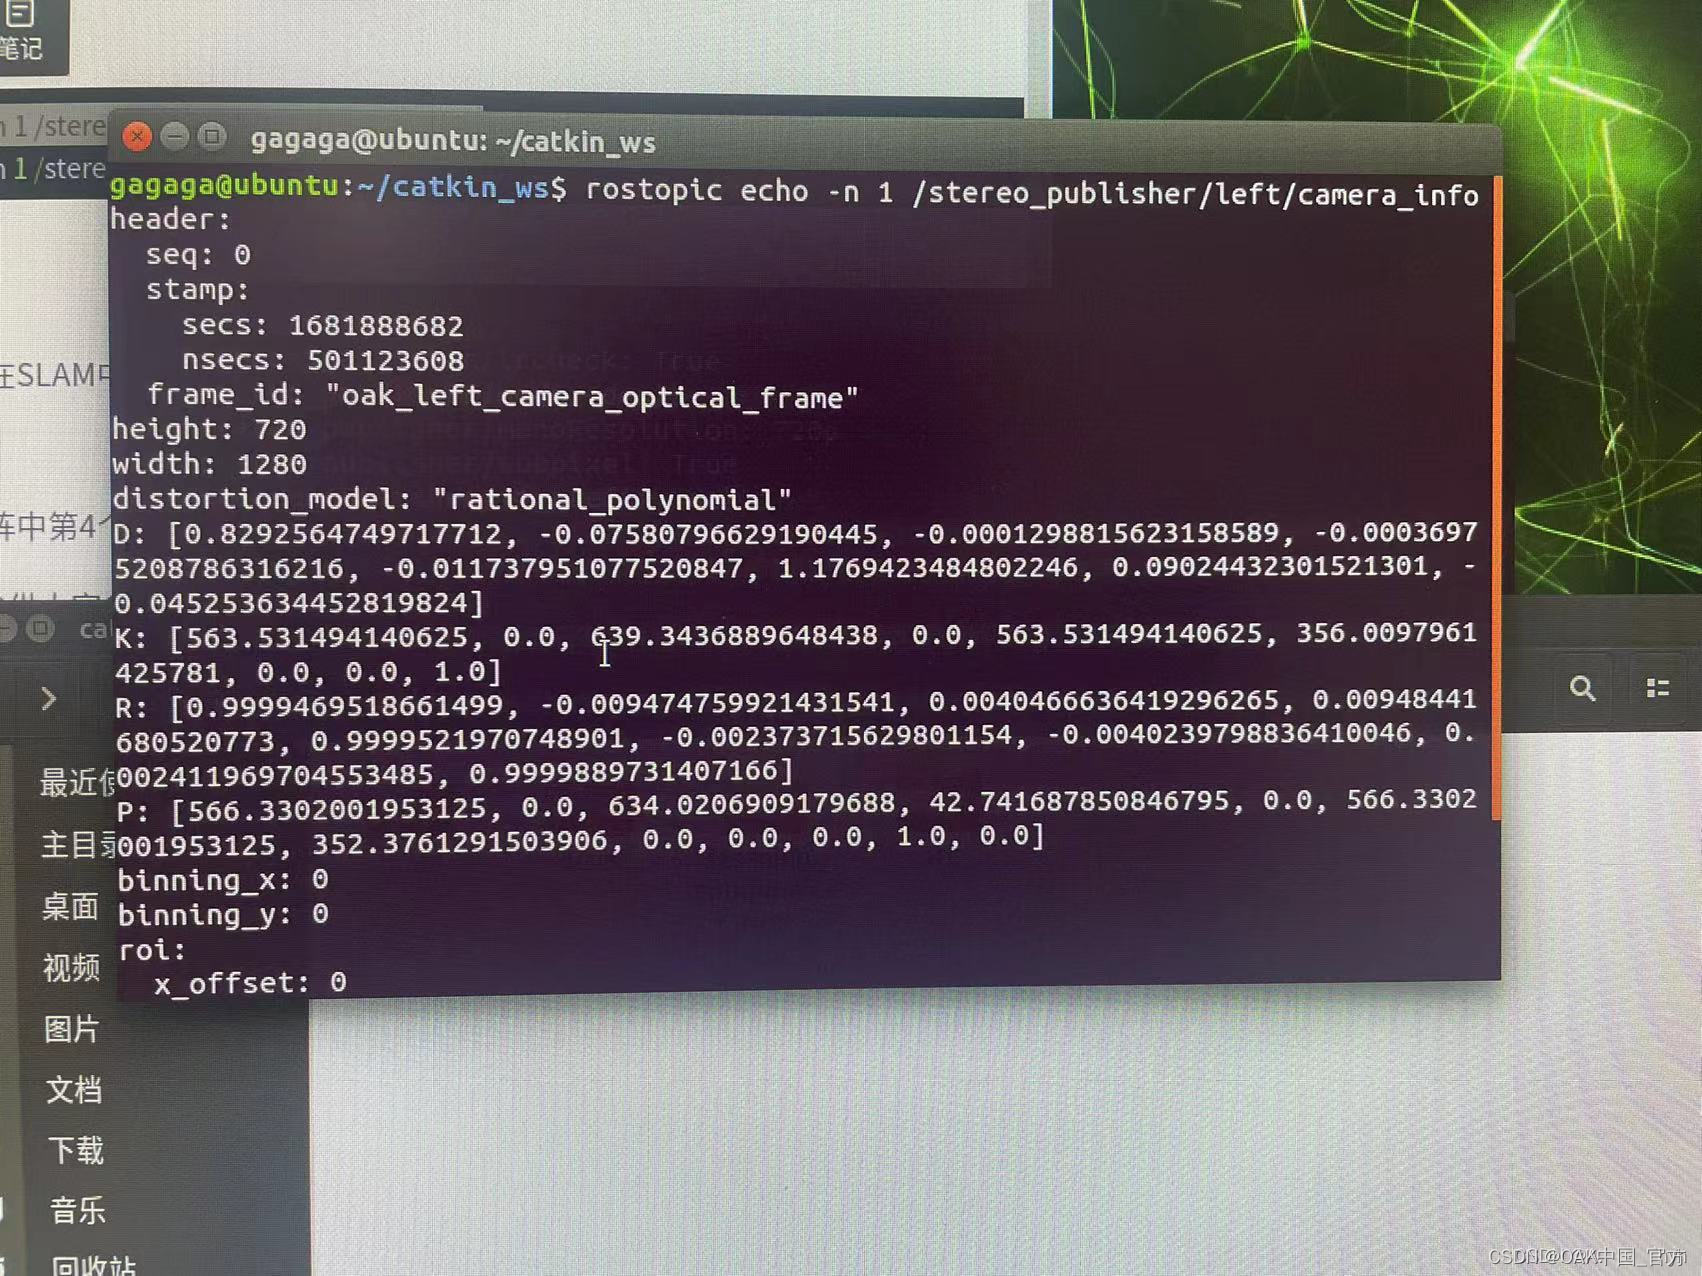
-n 1指消息只打印1次
参数如下
D:相机的畸变系数,在SLAM中一般用到前5位[k1,k2,p1,p2,k3]
K:相机内参矩阵
R:相机旋转矩阵
P:相机投影矩阵,矩阵中第4个数字42.741687850846795对应ORB-SLAM2配置文件中的bf参数
▌四、更改相机节点
ros_stereo.cc文件位置在/home/gagaga/catkin_ws/src/ORB_SLAM2/Examples/ROS/ORB_SLAM2/src 在这里修改订阅话题,再重新编译一遍。
    message_filters::Subscriber<sensor_msgs::Image> left_sub(nh, "/stereo_publisher/left/image", 1);
    message_filters::Subscriber<sensor_msgs::Image> right_sub(nh, "/stereo_publisher/right/image", 1);
gagaga@ubuntu:~/catkin_ws/src/ORB_SLAM2$ ./build_ros.sh
▌五、更改相机参数
以下是我查到的相机内参
//左目
header:
  seq: 0
  stamp:
    secs: 1681488843
    nsecs: 696887012
  frame_id: "oak_left_camera_optical_frame"
height: 720
width: 1280
distortion_model: "rational_polynomial"
D: [0.8292564749717712, -0.07580796629190445, -0.0001298815623158589, -0.00036975208786316216, -0.011737951077520847, 1.1769423484802246, 0.09024432301521301, -0.045253634452819824]
K: [563.531494140625, 0.0, 639.3436889648438, 0.0, 563.531494140625, 356.0097961425781, 0.0, 0.0, 1.0]
R: [0.9999469518661499, -0.009474759921431541, 0.0040466636419296265, 0.00948441680520773, 0.9999521970748901, -0.002373715629801154, -0.0040239798836410046, 0.002411969704553485, 0.9999889731407166]
P: [566.3302001953125, 0.0, 634.0206909179688, 42.741687850846795, 0.0, 566.3302001953125, 352.3761291503906, 0.0, 0.0, 0.0, 1.0, 0.0]
binning_x: 0
binning_y: 0
roi:
  x_offset: 0
  y_offset: 0
  height: 0
  width: 0
  do_rectify: False
//右目
header:
  seq: 0
  stamp:
    secs: 1681488882
    nsecs: 431191493
  frame_id: "oak_right_camera_optical_frame"
height: 720
width: 1280
distortion_model: "rational_polynomial"
D: [1.209637999534607, -0.026369793340563774, -0.0002514233929105103, -0.0004901287029497325, -0.016096703708171844, 1.5596858263015747, 0.2600933015346527, -0.053905777633190155]
K: [566.3302001953125, 0.0, 634.0206909179688, 0.0, 566.3302001953125, 352.3761291503906, 0.0, 0.0, 1.0]
R: [0.9998436570167542, -0.007231925614178181, 0.016135742887854576, 0.007193292956799269, 0.9999711513519287, 0.0024510070215910673, -0.0161530040204525, -0.0023345546796917915, 0.999866783618927]
P: [566.3302001953125, 0.0, 634.0206909179688, 0.0, 0.0, 566.3302001953125, 352.3761291503906, 0.0, 0.0, 0.0, 1.0, 0.0]
binning_x: 0
binning_y: 0
roi:
  x_offset: 0
  y_offset: 0
  height: 0
  width: 0
  do_rectify: False
Camera fx = K矩阵(1)
Camera fy = K矩阵(5)
Camera cx = K矩阵(3)
Camera cy = K矩阵(6)
Camera.bf = P矩阵(4)
Camera.width = 相机查到的宽度
Camera.height = 相机查到的高度
D矩阵中data 第一位 = D矩阵(1)——k1
D矩阵中data 第二位 = D矩阵(2)——k2
D矩阵中data 第三位 = D矩阵(6)——p1
D矩阵中data 第四位 = D矩阵(7)——p2
D矩阵中data 第五位 = D矩阵(5)——k3
R矩阵中data全部替换为相机内参的R矩阵中的数
K矩阵中data全部替换为相机内参的K矩阵中的数
P矩阵中data全部替换为相机内参的P矩阵中的数
以下是我修改的EuRoc.yaml
%YAML:1.0

#--------------------------------------------------------------------------------------------
# Camera Parameters. Adjust them!
#--------------------------------------------------------------------------------------------

# Camera calibration and distortion parameters (OpenCV)
Camera.fx: 566.3302001953125
Camera.fy: 566.3302001953125
Camera.cx: 634.0206909179688
Camera.cy: 352.3761291503906

Camera.k1: 0
Camera.k2: 0
Camera.p1: 0
Camera.p2: 0

Camera.width: 1280
Camera.height: 720

# Camera frames per second
Camera.fps: 20.0

# stereo baseline times fx
Camera.bf: 42.741687850846795

# Color order of the images (0: BGR, 1: RGB. It is ignored if images are grayscale)
Camera.RGB: 1

# Close/Far threshold. Baseline times.
ThDepth: 35

#--------------------------------------------------------------------------------------------
# Stereo Rectification. Only if you need to pre-rectify the images.
# Camera.fx, .fy, etc must be the same as in LEFT.P
#--------------------------------------------------------------------------------------------
LEFT.height: 720
LEFT.width: 1280
LEFT.D: !!opencv-matrix
   rows: 1
   cols: 5
   dt: d
   data: [-0.28368365, 0.07451284, -0.00010473, -3.555907e-05, 0.0]
LEFT.K: !!opencv-matrix
   rows: 3
   cols: 3
   dt: d
   data: [563.531494140625, 0.0, 639.3436889648438, 0.0, 563.531494140625, 356.0097961425781, 0.0, 0.0, 1.0]
LEFT.R:  !!opencv-matrix
   rows: 3
   cols: 3
   dt: d
   data: [0.9999469518661499, -0.009474759921431541, 0.0040466636419296265, 0.00948441680520773, 0.9999521970748901, -0.002373715629801154, -0.0040239798836410046, 0.002411969704553485, 0.9999889731407166]
LEFT.P:  !!opencv-matrix
   rows: 3
   cols: 4
   dt: d
   data: [566.3302001953125, 0.0, 634.0206909179688, 42.741687850846795, 0.0, 566.3302001953125, 352.3761291503906, 0.0, 0.0, 0.0, 1.0, 0.0]

RIGHT.height: 720
RIGHT.width: 1280
RIGHT.D: !!opencv-matrix
   rows: 1
   cols: 5
   dt: d
   data: [-0.28368365, 0.07451284, -0.00010473, -3.555907e-05, 0.0]
RIGHT.K: !!opencv-matrix
   rows: 3
   cols: 3
   dt: d
   data: [566.3302001953125, 0.0, 634.0206909179688, 0.0, 566.3302001953125, 352.3761291503906, 0.0, 0.0, 1.0]
RIGHT.R:  !!opencv-matrix
   rows: 3
   cols: 3
   dt: d
   data: [0.9998436570167542, -0.007231925614178181, 0.016135742887854576, 0.007193292956799269, 0.9999711513519287, 0.0024510070215910673, -0.0161530040204525, -0.0023345546796917915, 0.999866783618927]
RIGHT.P:  !!opencv-matrix
   rows: 3
   cols: 4
   dt: d
   data: [566.3302001953125, 0.0, 634.0206909179688, 0.0, 0.0, 566.3302001953125, 352.3761291503906, 0.0, 0.0, 0.0, 1.0, 0.0]


#--------------------------------------------------------------------------------------------
# ORB Parameters
#--------------------------------------------------------------------------------------------

# ORB Extractor: Number of features per image
ORBextractor.nFeatures: 1200

# ORB Extractor: Scale factor between levels in the scale pyramid
ORBextractor.scaleFactor: 1.2

# ORB Extractor: Number of levels in the scale pyramid
ORBextractor.nLevels: 8

# ORB Extractor: Fast threshold
# Image is divided in a grid. At each cell FAST are extracted imposing a minimum response.
# Firstly we impose iniThFAST. If no corners are detected we impose a lower value minThFAST
# You can lower these values if your images have low contrast
ORBextractor.iniThFAST: 20
ORBextractor.minThFAST: 7

#--------------------------------------------------------------------------------------------
# Viewer Parameters
#--------------------------------------------------------------------------------------------
Viewer.KeyFrameSize: 0.05
Viewer.KeyFrameLineWidth: 1
Viewer.GraphLineWidth: 0.9
Viewer.PointSize: 2
Viewer.CameraSize: 0.08
Viewer.CameraLineWidth: 3
Viewer.ViewpointX: 0
Viewer.ViewpointY: -0.7
Viewer.ViewpointZ: -1.8
Viewer.ViewpointF: 500
▌六、运行ORB-SLAM2
1、roscore
2、roslaunch depthai_examples stereo_node.launch
启动 depthai_examples 包中的 stereo_node 节点。这个节点用于从 DepthAI 设备中获取输入图像。
depthai_examples/stereo_node.launch 为 roslaunch 提供的启动文件
执行 roslaunch depthai_examples stereo_node.launch 后,将启动一个 ROS 节点实例,它将服务于 DepthAI 设备中的立体视觉算法。
3、rosrun ORB_SLAM2 Stereo ~/catkin_ws/src/ORB_SLAM2/Vocabulary/ORBvoc.txt ~/catkin_ws/src/ORB_SLAM2/Examples/Stereo/EuRoC.yaml false(true)
使用rosrun命令来启动 ORBSLAM2 包中的 Stereo 节点,同时给出了该节点运行所需参数,如词汇文件、相机参数文件等。具体参数解释如下:
ORBvoc.txt 文件路径:相当于 ORB 特征点检测的词汇表,它用于提取匹配双目图像中的特征点;
EuRoC.yaml 文件路径:包含与 Euroc 数据集相关的相机内部参数、双目图像的位置和方向等;
false:这个参数指示 SLAM 系统运行时是否执行保存地图的操作。
图一:选择true的时候会出现“已放弃"(可能是运行内存不够等)
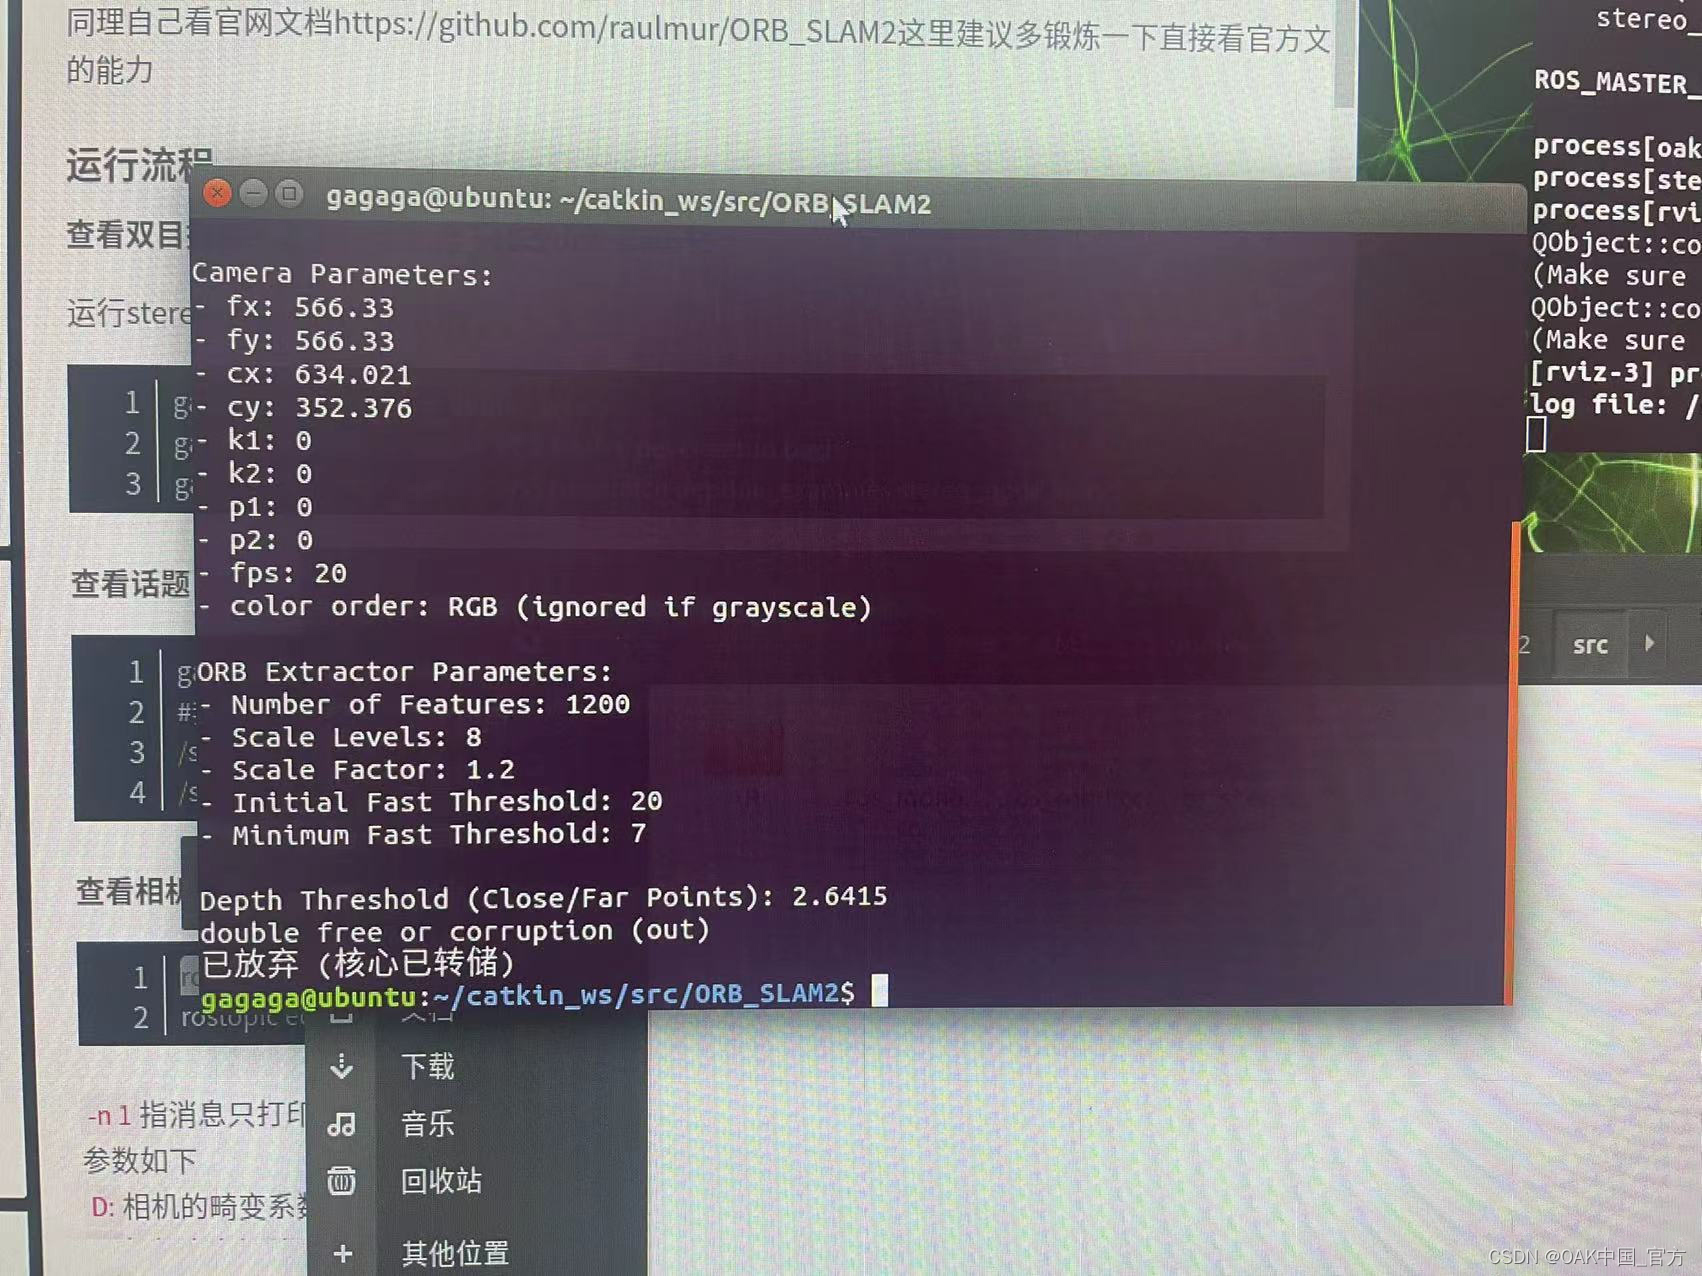
图二:选择false的时候,但是存在畸变

▌参考资料
https://docs.oakchina.cn/en/latest/
OAK中国
| OpenCV AI Kit在中国区的官方代理商和技术服务商
| 追踪AI技术和产品新动态
戳「+关注」获取最新资讯↗↗

