在单体的应用开发场景中涉及并发同步时,大家往往采用Synchronized(同步)或同一个JVM内Lock机制来解决多线程间的同步问题。而在分布式集群工作的开发场景中,就需要一种更加高级的锁机制来处理跨机器的进程之间的数据同步问题,这种跨机器的锁就是分布式锁。接下来本文将为大家分享分布式锁的最佳实践。
一、超卖问题复现
1.1 现象
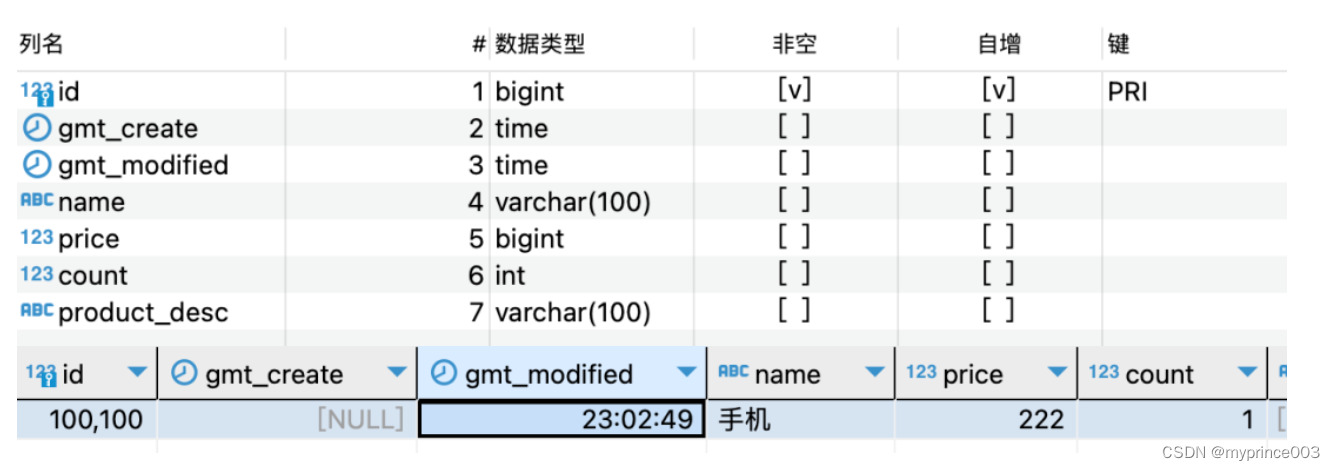
存在如下的几张表:
商品表
订单表

订单item表

商品的库存为1,但是并发高的时候有多笔订单。
错误案例一:数据库update相互覆盖
直接在内存中判断是否有库存,计算扣减之后的值更新数据库,并发的情况下会导致相互覆盖发生:
@Transactional(rollbackFor = Exception.class)
public Long createOrder() throws Exception {
    Product product = productMapper.selectByPrimaryKey(purchaseProductId);
    // ... 忽略校验逻辑

    //商品当前库存
    Integer currentCount = product.getCount();
    //校验库存
    if (purchaseProductNum > currentCount) {
        throw new Exception("商品" + purchaseProductId + "仅剩" + currentCount + "件,无法购买");
    }
    // 计算剩余库存
    Integer leftCount = currentCount - purchaseProductNum;
    // 更新库存
    product.setCount(leftCount);
    product.setGmtModified(new Date());
    productMapper.updateByPrimaryKeySelective(product);

    Order order = new Order();
    // ... 省略 Set
    orderMapper.insertSelective(order);

    OrderItem orderItem = new OrderItem();
    orderItem.setOrderId(order.getId());
    // ... 省略 Set
    return order.getId();
}
错误案例二:扣减串行执行,但是库存被扣减为负数
在 SQL 中加入运算避免值的相互覆盖,但是库存的数量变为负数,因为校验库存是否足够还是在内存中执行的,并发情况下都会读到有库存:
@Transactional(rollbackFor = Exception.class)
public Long createOrder() throws Exception {
    Product product = productMapper.selectByPrimaryKey(purchaseProductId);
    // ... 忽略校验逻辑

    //商品当前库存
    Integer currentCount = product.getCount();
    //校验库存
    if (purchaseProductNum > currentCount) {
        throw new Exception("商品" + purchaseProductId + "仅剩" + currentCount + "件,无法购买");
    }
    // 使用 set count =  count - #{purchaseProductNum,jdbcType=INTEGER}, 更新库存
    productMapper.updateProductCount(purchaseProductNum,new Date(),product.getId());
    Order order = new Order();
    // ... 省略 Set
    orderMapper.insertSelective(order);

    OrderItem orderItem = new OrderItem();
    orderItem.setOrderId(order.getId());
    // ... 省略 Set
    return order.getId();
}
错误案例三:使用 synchronized 实现内存中串行校验,但是依旧扣减为负数
因为我们使用的是事务的注解,synchronized加在方法上,方法执行结束的时候锁就会释放,此时的事务还没有提交,另一个线程拿到这把锁之后就会有一次扣减,导致负数。
@Transactional(rollbackFor = Exception.class)
public synchronized Long createOrder() throws Exception {
    Product product = productMapper.selectByPrimaryKey(purchaseProductId);
    // ... 忽略校验逻辑

    //商品当前库存
    Integer currentCount = product.getCount();
    //校验库存
    if (purchaseProductNum > currentCount) {
        throw new Exception("商品" + purchaseProductId + "仅剩" + currentCount + "件,无法购买");
    }
    // 使用 set count =  count - #{purchaseProductNum,jdbcType=INTEGER}, 更新库存
    productMapper.updateProductCount(purchaseProductNum,new Date(),product.getId());
    Order order = new Order();
    // ... 省略 Set
    orderMapper.insertSelective(order);

    OrderItem orderItem = new OrderItem();
    orderItem.setOrderId(order.getId());
    // ... 省略 Set
    return order.getId();
}
1.2 解决办法
从上面造成问题的原因来看,只要是扣减库存的动作,不是原子性的。多个线程同时操作就会有问题。
单体应用:使用本地锁 + 数据库中的行锁解决

分布式应用:

使用数据库中的乐观锁,加一个 version 字段,利用CAS来实现,会导致大量的 update 失败

使用数据库维护一张锁的表 + 悲观锁 select,使用 select for update 实现

使用Redis 的 setNX实现分布式锁

使用zookeeper的watcher + 有序临时节点来实现可阻塞的分布式锁

使用Redisson框架内的分布式锁来实现

使用curator 框架内的分布式锁来实现
二、单体应用解决超卖的问题
正确示例:将事务包含在锁的控制范围内
保证在锁释放之前,事务已经提交。
//@Transactional(rollbackFor = Exception.class)
public synchronized Long createOrder() throws Exception {
    TransactionStatus transaction1 = platformTransactionManager.getTransaction(transactionDefinition);
    Product product = productMapper.selectByPrimaryKey(purchaseProductId);
    if (product == null) {
        platformTransactionManager.rollback(transaction1);
        throw new Exception("购买商品:" + purchaseProductId + "不存在");
    }

    //商品当前库存
    Integer currentCount = product.getCount();
    //校验库存
    if (purchaseProductNum > currentCount) {
        platformTransactionManager.rollback(transaction1);
        throw new Exception("商品" + purchaseProductId + "仅剩" + currentCount + "件,无法购买");
    }

    productMapper.updateProductCount(purchaseProductNum, new Date(), product.getId());

    Order order = new Order();
    // ... 省略 Set
    orderMapper.insertSelective(order);

    OrderItem orderItem = new OrderItem();
    orderItem.setOrderId(order.getId());
    // ... 省略 Set
    return order.getId();
    platformTransactionManager.commit(transaction1);
}
正确示例:使用synchronized的代码块
public Long createOrder() throws Exception {
    Product product = null;
    //synchronized (this) {
    //synchronized (object) {
    synchronized (DBOrderService2.class) {
        TransactionStatus transaction1 = platformTransactionManager.getTransaction(transactionDefinition);
        product = productMapper.selectByPrimaryKey(purchaseProductId);
        if (product == null) {
            platformTransactionManager.rollback(transaction1);
            throw new Exception("购买商品:" + purchaseProductId + "不存在");
        }

        //商品当前库存
        Integer currentCount = product.getCount();
        System.out.println(Thread.currentThread().getName() + "库存数:" + currentCount);
        //校验库存
        if (purchaseProductNum > currentCount) {
            platformTransactionManager.rollback(transaction1);
            throw new Exception("商品" + purchaseProductId + "仅剩" + currentCount + "件,无法购买");
        }

        productMapper.updateProductCount(purchaseProductNum, new Date(), product.getId());
        platformTransactionManager.commit(transaction1);
    }

    TransactionStatus transaction2 = platformTransactionManager.getTransaction(transactionDefinition);

    Order order = new Order();
    // ... 省略 Set
    orderMapper.insertSelective(order);

    OrderItem orderItem = new OrderItem();
    // ... 省略 Set
    orderItemMapper.insertSelective(orderItem);
    platformTransactionManager.commit(transaction2);
    return order.getId();
正确示例:使用Lock
private Lock lock = new ReentrantLock();

public Long createOrder() throws Exception{
    Product product = null;

    lock.lock();

    TransactionStatus transaction1 = platformTransactionManager.getTransaction(transactionDefinition);
    try {
        product = productMapper.selectByPrimaryKey(purchaseProductId);
        if (product==null){
            throw new Exception("购买商品:"+purchaseProductId+"不存在");
        }

        //商品当前库存
        Integer currentCount = product.getCount();
        System.out.println(Thread.currentThread().getName()+"库存数:"+currentCount);
        //校验库存
        if (purchaseProductNum > currentCount){
            throw new Exception("商品"+purchaseProductId+"仅剩"+currentCount+"件,无法购买");
        }

        productMapper.updateProductCount(purchaseProductNum,new Date(),product.getId());
        platformTransactionManager.commit(transaction1);
    } catch (Exception e) {
        platformTransactionManager.rollback(transaction1);
    } finally {
        // 注意抛异常的时候锁释放不掉,分布式锁也一样,都要在这里删掉
        lock.unlock();
    }

    TransactionStatus transaction = platformTransactionManager.getTransaction(transactionDefinition);
    Order order = new Order();
    // ... 省略 Set
    orderMapper.insertSelective(order);

    OrderItem orderItem = new OrderItem();
    // ... 省略 Set
    orderItemMapper.insertSelective(orderItem);
    platformTransactionManager.commit(transaction);
    return order.getId();
}
三、常见分布式锁的使用
上面使用的方法只能解决单体项目,当部署多台机器的时候就会失效,因为锁本身就是单机的锁,所以需要使用分布式锁来实现。
3.1 数据库乐观锁
数据库中的乐观锁,加一个version字段,利用CAS来实现,乐观锁的方式支持多台机器并发安全。但是并发量大的时候会导致大量的update失败
3.2 数据库分布式锁
db操作性能较差,并且有锁表的风险,一般不考虑。
3.2.1 简单的数据库锁
select for update
直接在数据库新建一张表:

锁的code预先写到数据库中,抢锁的时候,使用select for update查询锁对应的key,也就是这里的code,阻塞就说明别人在使用锁。
// 加上事务就是为了 for update 的锁可以一直生效到事务执行结束
// 默认回滚的是 RunTimeException
@Transactional(rollbackFor = Exception.class)
public String singleLock() throws Exception {
    log.info("我进入了方法!");
    DistributeLock distributeLock = distributeLockMapper.
        selectDistributeLock("demo");
    if (distributeLock==null) {
        throw new Exception("分布式锁找不到");
    }
    log.info("我进入了锁!");
    try {
        Thread.sleep(1000);
    } catch (InterruptedException e) {
        e.printStackTrace();
    }
    return "我已经执行完成!";
}


<select id="selectDistributeLock" resultType="com.deltaqin.distribute.model.DistributeLock">
  select * from distribute_lock
  where businessCode = #{businessCode,jdbcType=VARCHAR}
  for update
</select>
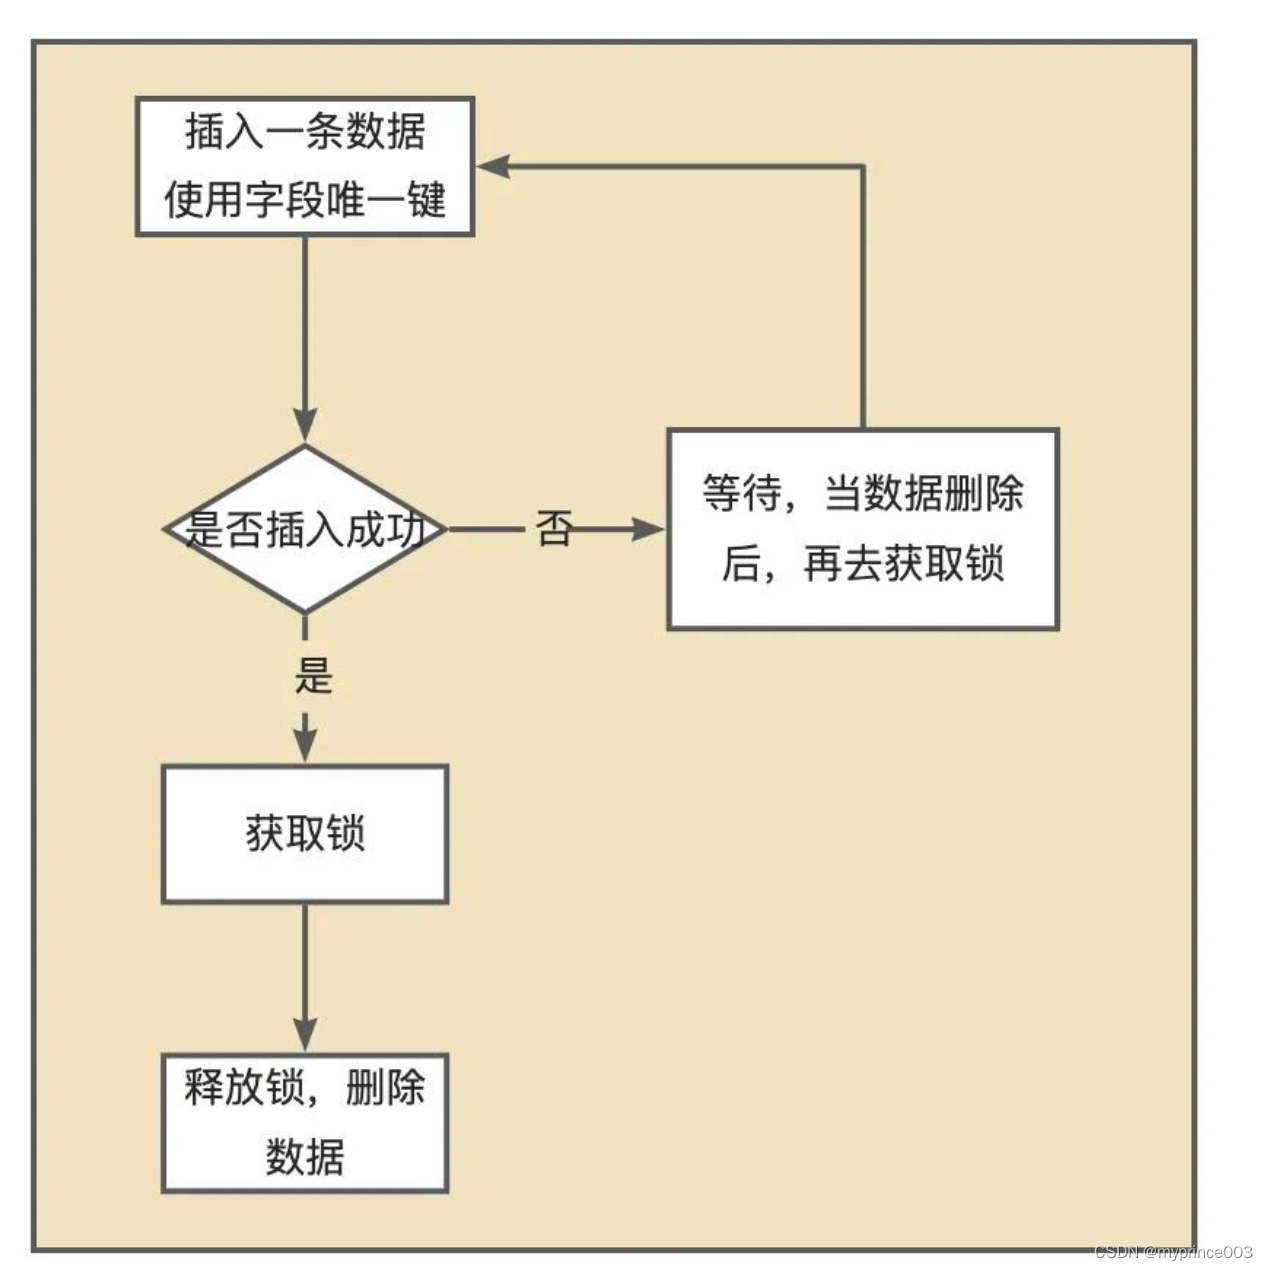
使用唯一键作为限制,插入一条数据,其他待执行的SQL就会失败,当数据删除之后再去获取锁 ,这是利用了唯一索引的排他性。
insert lock
直接维护一张锁表:
@Autowired
private MethodlockMapper methodlockMapper;

@Override
public boolean tryLock() {
    try {
        //插入一条数据   insert into
        methodlockMapper.insert(new Methodlock("lock"));
    }catch (Exception e){
        //插入失败
        return false;
    }
    return true;
}

@Override
public void waitLock() {
    try {
        Thread.sleep(10);
    } catch (InterruptedException e) {
        e.printStackTrace();
    }
}

@Override
public void unlock() {
    //删除数据   delete
    methodlockMapper.deleteByMethodlock("lock");
    System.out.println("-------释放锁------");
3.3 Redis setNx
Redis 原生支持的,保证只有一个会话可以设置成功,因为Redis自己就是单线程串行执行的。
<dependency>
  <groupId>org.springframework.boot</groupId>
  <artifactId>spring-boot-starter-data-redis</artifactId>
</dependency>
spring.redis.host=localhost
封装一个锁对象:
@Slf4j
public class RedisLock implements AutoCloseable {

    private RedisTemplate redisTemplate;
    private String key;
    private String value;
    //单位:秒
    private int expireTime;

    /**
     * 没有传递 value,因为直接使用的是随机值
     */
    public RedisLock(RedisTemplate redisTemplate,String key,int expireTime){
        this.redisTemplate = redisTemplate;
        this.key = key;
        this.expireTime=expireTime;
        this.value = UUID.randomUUID().toString();
    }

    /**
     * JDK 1.7 之后的自动关闭的功能
     */
    @Override
    public void close() throws Exception {
        unLock();
    }

    /**
     * 获取分布式锁
     * SET resource_name my_random_value NX PX 30000
     * 每一个线程对应的随机值 my_random_value 不一样,用于释放锁的时候校验
     * NX 表示 key 不存在的时候成功,key 存在的时候设置不成功,Redis 自己是单线程,串行执行的,第一个执行的才可以设置成功
     * PX 表示过期时间,没有设置的话,忘记删除,就会永远不过期
     */
    public boolean getLock(){
        RedisCallback<Boolean> redisCallback = connection -> {
            //设置NX
            RedisStringCommands.SetOption setOption = RedisStringCommands.SetOption.ifAbsent();
            //设置过期时间
            Expiration expiration = Expiration.seconds(expireTime);
            //序列化key
            byte[] redisKey = redisTemplate.getKeySerializer().serialize(key);
            //序列化value
            byte[] redisValue = redisTemplate.getValueSerializer().serialize(value);
            //执行setnx操作
            Boolean result = connection.set(redisKey, redisValue, expiration, setOption);
            return result;
        };

        //获取分布式锁
        Boolean lock = (Boolean)redisTemplate.execute(redisCallback);
        return lock;
    }

    /**
     * 释放锁的时候随机数相同的时候才可以释放,避免释放了别人设置的锁(自己的已经过期了所以别人才可以设置成功)
     * 释放的时候采用 LUA 脚本,因为 delete 没有原生支持删除的时候校验值,证明是当前线程设置进去的值
     * 脚本是在官方文档里面有的
     */
    public boolean unLock() {
        // key 是自己才可以释放,不是就不能释放别人的锁
        String script = "if redis.call(\"get\",KEYS[1]) == ARGV[1] then\n" +
                "    return redis.call(\"del\",KEYS[1])\n" +
                "else\n" +
                "    return 0\n" +
                "end";
        RedisScript<Boolean> redisScript = RedisScript.of(script,Boolean.class);
        List<String> keys = Arrays.asList(key);

        // 执行脚本的时候传递的 value 就是对应的值
        Boolean result = (Boolean)redisTemplate.execute(redisScript, keys, value);
        log.info("释放锁的结果:"+result);
        return result;
    }
}


每次获取的时候,自己线程需要new对应的RedisLock:
public String redisLock(){
    log.info("我进入了方法!");
    try (RedisLock redisLock = new RedisLock(redisTemplate,"redisKey",30)){
        if (redisLock.getLock()) {
            log.info("我进入了锁!!");
            Thread.sleep(15000);
        }
    } catch (InterruptedException e) {
        e.printStackTrace();
    } catch (Exception e) {
        e.printStackTrace();
    }
    log.info("方法执行完成");
    return "方法执行完成";
}
3.4 zookeeper 瞬时znode节点 + watcher监听机制
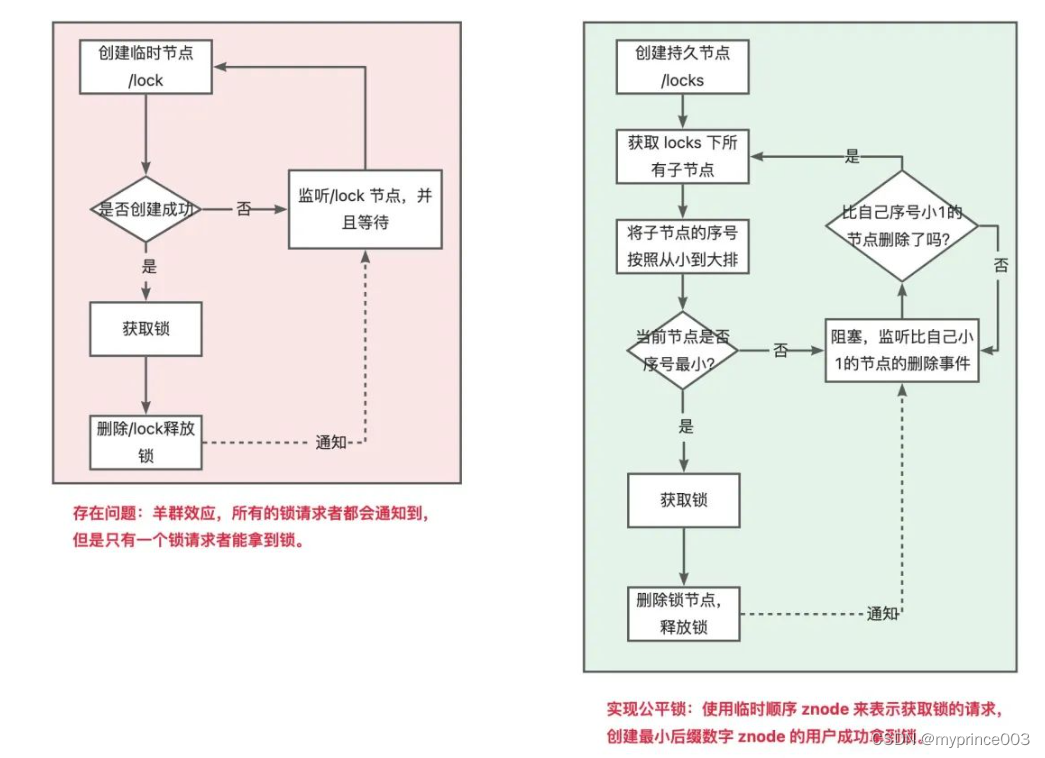
临时节点具备数据自动删除的功能。当client与ZooKeeper连接和session断掉时,相应的临时节点就会被删除。zk有瞬时和持久节点,瞬时节点不可以有子节点。会话结束之后瞬时节点就会消失,基于zk的瞬时有序节点实现分布式锁:
多线程并发创建瞬时节点的时候,得到有序的序列,序号最小的线程可以获得锁;
其他的线程监听自己序号的前一个序号。前一个线程执行结束之后删除自己序号的节点;
下一个序号的线程得到通知,继续执行;
以此类推,创建节点的时候,就确认了线程执行的顺序。
<dependency>
  <groupId>org.apache.zookeeper</groupId>
  <artifactId>zookeeper</artifactId>
  <version>3.4.14</version>
  <exclusions>
    <exclusion>
      <groupId>org.slf4j</groupId>
      <artifactId>slf4j-log4j12</artifactId>
    </exclusion>
  </exclusions>
</dependency>
zk 的观察器只可以监控一次,数据发生变化之后可以发送给客户端,之后需要再次设置监控。exists、create、getChildren三个方法都可以添加watcher ,也就是在调用方法的时候传递true就是添加监听。注意这里Lock 实现了Watcher和AutoCloseable:
当前线程创建的节点是第一个节点就获得锁,否则就监听自己的前一个节点的事件:
/**
 * 自己本身就是一个 watcher,可以得到通知
 * AutoCloseable 实现自动关闭,资源不使用的时候
 */
@Slf4j
public class ZkLock implements AutoCloseable, Watcher {

    private ZooKeeper zooKeeper;

    /**
     * 记录当前锁的名字
     */
    private String znode;

    public ZkLock() throws IOException {
        this.zooKeeper = new ZooKeeper("localhost:2181",
                10000,this);
    }

    public boolean getLock(String businessCode) {
        try {
            //创建业务 根节点
            Stat stat = zooKeeper.exists("/" + businessCode, false);
            if (stat==null){
                zooKeeper.create("/" + businessCode,businessCode.getBytes(),
                        ZooDefs.Ids.OPEN_ACL_UNSAFE,
                        CreateMode.PERSISTENT);
            }

            //创建瞬时有序节点  /order/order_00000001
            znode = zooKeeper.create("/" + businessCode + "/" + businessCode + "_", businessCode.getBytes(),
                    ZooDefs.Ids.OPEN_ACL_UNSAFE,
                    CreateMode.EPHEMERAL_SEQUENTIAL);

            //获取业务节点下 所有的子节点
            List<String> childrenNodes = zooKeeper.getChildren("/" + businessCode, false);
            //获取序号最小的(第一个)子节点
            Collections.sort(childrenNodes);
            String firstNode = childrenNodes.get(0);
            //如果创建的节点是第一个子节点,则获得锁
            if (znode.endsWith(firstNode)){
                return true;
            }
            //如果不是第一个子节点,则监听前一个节点
            String lastNode = firstNode;
            for (String node:childrenNodes){
                if (znode.endsWith(node)){
                    zooKeeper.exists("/"+businessCode+"/"+lastNode,true);
                    break;
                }else {
                    lastNode = node;
                }
            }
            synchronized (this){
                wait();
            }
            return true;
        } catch (Exception e) {
            e.printStackTrace();
        }
        return false;
    }

    @Override
    public void close() throws Exception {
        zooKeeper.delete(znode,-1);
        zooKeeper.close();
        log.info("我已经释放了锁!");
    }

    @Override
    public void process(WatchedEvent event) {
        if (event.getType() == Event.EventType.NodeDeleted){
            synchronized (this){
                notify();
            }
        }
    }
}
3.5 zookeeper curator
在实际的开发中,不建议去自己“重复造轮子”,而建议直接使用Curator客户端中的各种官方实现的分布式锁,例如其中的InterProcessMutex可重入锁。
<dependency>
  <groupId>org.apache.curator</groupId>
  <artifactId>curator-recipes</artifactId>
  <version>4.2.0</version>
  <exclusions>
    <exclusion>
      <artifactId>slf4j-api</artifactId>
      <groupId>org.slf4j</groupId>
    </exclusion>
  </exclusions>
</dependency>
@Bean(initMethod="start",destroyMethod = "close")
public CuratorFramework getCuratorFramework() {
    RetryPolicy retryPolicy = new ExponentialBackoffRetry(1000, 3);
    CuratorFramework client = CuratorFrameworkFactory.
        newClient("localhost:2181", retryPolicy);
    return client;
}
框架已经实现了分布式锁。zk的Java客户端升级版。使用的时候直接指定重试的策略就可以。
官网中分布式锁的实现是在curator-recipes依赖中,不要引用错了。
@Autowired
private CuratorFramework client;

@Test
public void testCuratorLock(){
    InterProcessMutex lock = new InterProcessMutex(client, "/order");
    try {
        if ( lock.acquire(30, TimeUnit.SECONDS) ) {
            try  {
                log.info("我获得了锁!!!");
            }
            finally  {
                lock.release();
            }
        }
    } catch (Exception e) {
        e.printStackTrace();
    }
    client.close();
}
3.6 Redission
重新实现了Java并发包下处理并发的类,让其可以跨JVM使用,例如CHM等。
3.6.1 非SpringBoot项目引入
https://redisson.org/
引入Redisson的依赖,然后配置对应的XML即可:
<dependency>
  <groupId>org.redisson</groupId>
  <artifactId>redisson</artifactId>
  <version>3.11.2</version>
  <exclusions>
    <exclusion>
      <artifactId>slf4j-api</artifactId>
      <groupId>org.slf4j</groupId>
    </exclusion>
  </exclusions>
</dependency>
编写相应的redisson.xml
<beans xmlns="http://www.springframework.org/schema/beans"
       xmlns:xsi="http://www.w3.org/2001/XMLSchema-instance"
       xmlns:context="http://www.springframework.org/schema/context"
       xmlns:redisson="http://redisson.org/schema/redisson"
       xsi:schemaLocation="
       http://www.springframework.org/schema/beans
       http://www.springframework.org/schema/beans/spring-beans.xsd
       http://www.springframework.org/schema/context
       http://www.springframework.org/schema/context/spring-context.xsd
       http://redisson.org/schema/redisson
       http://redisson.org/schema/redisson/redisson.xsd
">

    <redisson:client>
        <redisson:single-server address="redis://127.0.0.1:6379"/>
    </redisson:client>
</beans>
配置对应@ImportResource(“classpath*:redisson.xml”)资源文件。
3.6.2 SpringBoot项目引入
或者直接使用springBoot的starter即可。
https://github.com/redisson/redisson/tree/master/redisson-spring-boot-starter
<dependency>
  <groupId>org.redisson</groupId>
  <artifactId>redisson-spring-boot-starter</artifactId>
  <version>3.19.1</version>
</dependency>
修改application.properties即可:#spring.redis.host=
3.6.3 设置配置类
@Bean
public RedissonClient getRedissonClient() {
    Config config = new Config();
    config.useSingleServer().setAddress("redis://127.0.0.1:6379");
    return Redisson.create(config);
}
3.6.4 使用
@Test
public void testRedissonLock() {
    RLock rLock = redisson.getLock("order");
    try {
        rLock.lock(30, TimeUnit.SECONDS);
        log.info("我获得了锁!!!");
        Thread.sleep(10000);
    } catch (InterruptedException e) {
        e.printStackTrace();
    }finally {
        log.info("我释放了锁!!");
        rLock.unlock();
    }
}



![[修订版][工控]SIEMENS S7-200 控制交通红绿灯程序编写与分析](https://img-blog.csdnimg.cn/c083578db624468cb4d51463b8aeb5e8.png)


