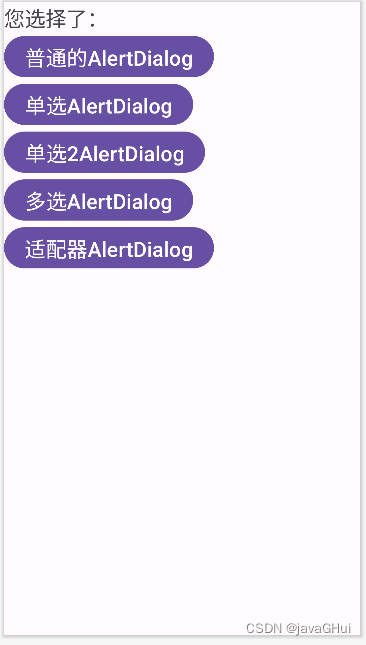
示例图:
1
:创建
AlertDialog.Builder
对象;
2
:调用
setIcon()
设置图标,
setTitle()
或
setCustomTitle()
设置标题;
3
:设置对话框的内容:
setMessage()
还有其他方法来指定显示的内容;
4
:调用
setPositive/Negative/NeutralButton()
设置:确定,取消,中立按钮;
5
:调用
create()
方法创建这个对象,再调用
show()
方法将对话框显示出来;
MainActivity.java
package com.example.myalertdialog;

import androidx.appcompat.app.AppCompatActivity;

import android.app.AlertDialog;
import android.content.Context;
import android.content.DialogInterface;
import android.os.Bundle;
import android.view.View;
import android.widget.Button;
import android.widget.TextView;
import android.widget.Toast;

import java.util.ArrayList;
import java.util.List;

// AlertDialog对话框 应用
public class MainActivity extends AppCompatActivity implements View.OnClickListener {
    //组件
    private Button btnOne,btnTwo,btnThree,btnFour,btnFive;
    private TextView textView;

    private Context context;

    //对话框
    private AlertDialog.Builder builder =null;

    @Override
    protected void onCreate(Bundle savedInstanceState) {
        super.onCreate(savedInstanceState);
        setContentView(R.layout.activity_main);
        context =this;

        btnOne = findViewById(R.id.btn_one);
        btnTwo = findViewById(R.id.btn_Two);
        btnThree = findViewById(R.id.btn_three);
        btnFour =findViewById(R.id.btn_four);
        btnFive = findViewById(R.id.btn_five);

        textView = findViewById(R.id.btn_tv);

        //设置事件
        btnOne.setOnClickListener(this);
        btnTwo.setOnClickListener(this);
        btnThree.setOnClickListener(this);
        btnFour.setOnClickListener(this);
        btnFive.setOnClickListener(this);
    }

    @Override
    public void onClick(View v) {

        if(v.getId() == R.id.btn_one){
            //普通对话框
            builder = new AlertDialog.Builder(context);
            //标题
            builder.setTitle("游戏提示:");
            //logo
            builder.setIcon(R.mipmap.a);
            //内容
            builder.setMessage("您确认要开始游戏吗?");
            //确定按钮
            builder.setPositiveButton("开始", new DialogInterface.OnClickListener() {
                @Override
                public void onClick(DialogInterface dialog, int which) {
                    Toast.makeText(context ,"开始游戏",Toast.LENGTH_SHORT).show();
                }
            });
            //取消按钮  null 表示什么都不做
            builder.setNegativeButton("取消",null);
            //中立按钮
            builder.setNeutralButton("中立", new DialogInterface.OnClickListener() {
                @Override
                public void onClick(DialogInterface dialog, int which) {
                    Toast.makeText(context,"中立您选择了"+which,Toast.LENGTH_SHORT).show();

                }
            });
            //创建 显示
            builder.create().show();
        }else if (R.id.btn_Two == v.getId()) {
            //单选对话框 1 只能选一次
            //数据源
            final String[] arr = new String[]{"校长","老师","学生","家长"};
            //单选对话框
            builder = new AlertDialog.Builder(context);
            //标题
            builder.setTitle("请选择您的身份:");
            //图标
            builder.setIcon(R.mipmap.a);
            //内容
            builder.setItems(arr, new DialogInterface.OnClickListener() {
                @Override
                public void onClick(DialogInterface dialog, int which) {
                    Toast.makeText(context,"您选择了"+arr[which],Toast.LENGTH_SHORT).show();
                    textView.setText(arr[which]);
                }
            });
            //取消按钮
            builder.setNegativeButton("取消",null);

            //创建 显示
            builder.create().show();

        } else if (v.getId() == R.id.btn_three) {
            // 单选对话框2 可反复选择
            builder = new AlertDialog.Builder(context);
            //数据源 2
            final String[] arr = new String[]{"java","php","android","c++"};

            //标题
            builder.setTitle("请选择课程:");
            //图标
            builder.setIcon(R.mipmap.a);

            //内容   默认选择项 -1表示不选择  0表示选中第一个
            builder.setSingleChoiceItems(arr, -1, new DialogInterface.OnClickListener() {
                @Override
                public void onClick(DialogInterface dialog, int which) {
                    Toast.makeText(context,"您选择了"+arr[which],Toast.LENGTH_SHORT).show();
                    textView.setText(arr[which]);
                }
            });
            //取消按钮
            builder.setNegativeButton("取消",null);

            //创建 显示
            builder.create().show();
        } else if (v.getId() == R.id.btn_four) {

            // 多选对话框
            builder = new AlertDialog.Builder(context);
            //选择后的集合
            List<String> datas = new ArrayList<>();

            //数据源
            final String[] arr = {"胡萝卜炒肉","辣椒炒蛋","水煮活鱼","清蒸龙虾"};

            //标题
            builder.setTitle("请选择菜单:");
            //图标
            builder.setIcon(R.mipmap.a);

            //内容 setMultiChoiceItems
            // 数据源,默认选中哪几个, null 表示一个都不选
            // new boolean[]{false, false, true, true}
            builder.setMultiChoiceItems(arr, null, new DialogInterface.OnMultiChoiceClickListener() {
                @Override
                public void onClick(DialogInterface dialog, int which, boolean isChecked) {
                    if(isChecked){
                        datas.add(arr[which]);
                    }else{
                        datas.remove(arr[which]);
                    }
                }
            });

            //确定按钮 setPositiveButton
            builder.setPositiveButton("确认", new DialogInterface.OnClickListener() {
                @Override
                public void onClick(DialogInterface dialog, int which) {
                    Toast.makeText(context,"您选择了"+datas.toString(),Toast.LENGTH_SHORT).show();
                    textView.setText(datas.toString());
                }
            });
            //取消
            builder.setNeutralButton("取消",null);

            //创建 显示
            builder.create().show();


        }if(v.getId() == R.id.btn_five){
            // 适配器对话框 调用写的方法
            builder = AlertSimplAdapter.getAlertBuilder(context);
            //创建 显示
            builder.create().show();
        }


    }

}
写一个方法类 AlertSimplAdapter.java
package com.example.myalertdialog;

import android.app.AlertDialog;
import android.content.Context;
import android.content.DialogInterface;
import android.widget.SimpleAdapter;
import android.widget.Toast;

import java.util.ArrayList;
import java.util.HashMap;
import java.util.List;
import java.util.Map;

public class AlertSimplAdapter {
    //图片
    private static final int[] arrImg = new int[]{

           R.mipmap.a, R.mipmap.b, R.mipmap.c,
            R.mipmap.d, R.mipmap.e, R.mipmap.f,
            R.mipmap.g, R.mipmap.h, R.mipmap.i,
            R.mipmap.a,  R.mipmap.a, R.mipmap.a,
            R.mipmap.a,  R.mipmap.a, R.mipmap.a
    };
    //标题
    private static final String[] arrTitle = {
            "张三","李四","张三丰",
            "小学群聊","周芷若","周先生",
            "老领导","玖龙玺","阿道夫",
            "张三","李四","张三丰",
            "张三","李四","张三丰"
    };

    //内容
    private static String[] arrContent =new String[]{
            "早啊!","你在干啥","你最近在练什么武功",
            "呼叫XXX家长","最近咋样","吃饭了吗?",
            "啥时候有空喝茶呀?",".....","小伙子,学魔法吗?",
            "早啊!","你在干啥","你最近在练什么武功",
            "早啊!","你在干啥","你最近在练什么武功"
    };

    //时间
    private static String[] arrTime = {
            "刚刚","昨天","11-20",
            "10-1","2023-11-20","17:30",
            "9:00","10-1","2000-01-01",
            "刚刚","昨天","11-20",
            "刚刚","昨天","11-20"
    };

    public static AlertDialog.Builder getAlertBuilder(Context context){
        AlertDialog.Builder builder = new AlertDialog.Builder(context);
        //标题
        builder.setTitle("**通讯信息**");
        //logo
        builder.setIcon(R.mipmap.a);

        //设置数据源  List<? extends Map<String, ?>> data
        List<Map<String, Object>> datas = new ArrayList<>();
        for(int i =0 ; i<arrImg.length;i++) {
            //各项数据
            Map<String, Object> itemData = new HashMap<>();

            itemData.put("item_img", arrImg[i]);
            itemData.put("item_title", arrTitle[i]);
            itemData.put("item_content", arrContent[i]);
            itemData.put("item_time", arrTime[i]);

            //添加到List
            datas.add(itemData);
        }

        //    第1个参数: Context
//    第2个参数: 数据 List<map<String,Object>> datas
//    第3个参数: xml资源文件 R.layout....
//    第4个参数: 控制从datas中取出哪些数据 与map中的 key一致
//    第5个参数: 布局文件的id  控制取出的数据要填充哪些界面元素。
        SimpleAdapter simpleAdapter = new SimpleAdapter(context,datas,R.layout.content_layout,
                new String[]{"item_img","item_title","item_content","item_time"},
                new int[]{R.id.btn_image_view,R.id.btn_title_view,R.id.btn_tv_content,R.id.btn_time});

        //内容 设置适配器
        builder.setAdapter(simpleAdapter, new DialogInterface.OnClickListener() {
            @Override
            public void onClick(DialogInterface dialog, int which) {
                Toast.makeText(context, "您选择了"+which, Toast.LENGTH_SHORT).show();
            }
        });
        //取消
        builder.setPositiveButton("取消",null);

        return builder;
    }
}
主布局文件 activity_main.xml
<?xml version="1.0" encoding="utf-8"?>
<LinearLayout xmlns:android="http://schemas.android.com/apk/res/android"
    xmlns:app="http://schemas.android.com/apk/res-auto"
    xmlns:tools="http://schemas.android.com/tools"
    android:layout_width="match_parent"
    android:orientation="vertical"
    android:layout_height="match_parent"
    tools:context=".MainActivity">

    <TextView
        android:id="@+id/btn_tv"
        android:text="您选择了:"
        android:textSize="24sp"
        android:layout_width="wrap_content"
        android:layout_height="wrap_content"/>

    <Button
        android:id="@+id/btn_one"
        android:layout_width="wrap_content"
        android:layout_height="wrap_content"
        android:textSize="24sp"
        android:text="普通的AlertDialog"
        />

    <Button
        android:id="@+id/btn_Two"
        android:layout_width="wrap_content"
        android:layout_height="wrap_content"
        android:textSize="24sp"
        android:text="单选AlertDialog"
        />

    <Button
        android:id="@+id/btn_three"
        android:layout_width="wrap_content"
        android:layout_height="wrap_content"
        android:textSize="24sp"
        android:text="单选2AlertDialog"
        />

    <Button
        android:id="@+id/btn_four"
        android:layout_width="wrap_content"
        android:layout_height="wrap_content"
        android:textSize="24sp"
        android:text="多选AlertDialog"
        />

    <Button
        android:id="@+id/btn_five"
        android:layout_width="wrap_content"
        android:layout_height="wrap_content"
        android:textSize="24sp"
        android:text="适配器AlertDialog"
        />


</LinearLayout>
适配器中的布局 content_layout.xml
<?xml version="1.0" encoding="utf-8"?>
<RelativeLayout xmlns:android="http://schemas.android.com/apk/res/android"
    android:layout_width="match_parent"
    android:layout_height="match_parent">
    <!-- RelativeLayout 相对布局-->
    <ImageView
        android:id="@+id/btn_image_view"
        android:layout_width="50dp"
        android:layout_height="50dp"

        android:layout_marginLeft="10dp"
        />

    <!-- 标题
    在图片的右边
    -->
    <TextView
        android:layout_marginLeft="10dp"
        android:layout_toRightOf="@+id/btn_image_view"
        android:id="@+id/btn_title_view"
        android:layout_width="wrap_content"
        android:layout_height="wrap_content"
        android:textSize="22sp"

        android:textStyle="bold"
        />

    <!-- 画条线
    在图片的右边
    在文字的下面
    -->
    <TextView
        android:id="@+id/btn_tv_line"
        android:layout_below="@+id/btn_title_view"
        android:layout_marginLeft="10dp"
        android:layout_toRightOf="@+id/btn_image_view"
        android:layout_width="match_parent"
        android:layout_height="wrap_content"
        android:background="#ccc"
        android:minHeight="1dp"
        android:maxHeight="1dp"
        />
    <!-- 内容
    在图片的右边
    在线的下面
    -->
    <TextView
        android:layout_below="@+id/btn_tv_line"
        android:layout_marginLeft="10dp"
        android:layout_toRightOf="@+id/btn_image_view"
        android:id="@+id/btn_tv_content"
        android:layout_width="match_parent"
        android:layout_height="wrap_content"
        android:textSize="20sp"

        />
    <!-- 时间提示
    在最右边显示
    在父元素内右边
    -->
    <TextView
        android:id="@+id/btn_time"
        android:layout_width="wrap_content"
        android:layout_height="wrap_content"
        android:textSize="20sp"
        android:layout_alignParentRight="true"
        />

</RelativeLayout>