Spring 的两大核心思想 : IoC 和 AOP
我们要将对象的控制权交给Spring ,我们就需要告诉 Spring 哪些对象是需要帮我们进行创建的,这里有两类注解可以实现 :
类注解(@Controller @Service @Repository @Component @Configuration)和方法注解(@Bean)
这五大注解都表示把这个对象交给 Spring 进行管理和创建
五大注解和实际项目开发的关系 :
@Controller @Service @Repository 和三层架构有关系
Controller : 接收请求并返回响应
Service : 接收完请求具体要做些什么样的事情,真正业务的逻辑处理是什么都是 Service 做的
Dao : 对数据进行处理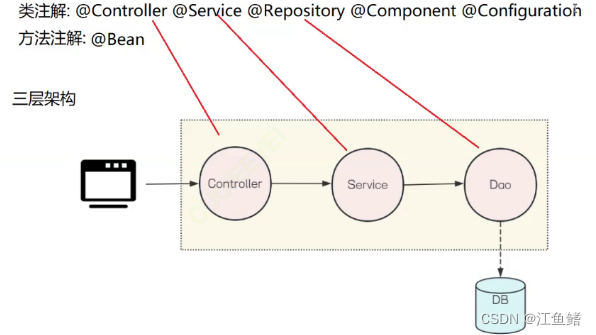
@Component 存储组件相关,@Configuration 存储配置相关
我们查看五个类注解的原码 : @Controller @Service @Repository @Component @Configuration

这四个注解都是基于 @Component 实现的,可以认为是 @Component 的衍生类
但是是不是说我们所有程序都使用 @Component 就行呢,那是当然不行的,那搞这么多注解就没意义了
我们用代码尝试一下能否使用 @Service 代替 @Controller 呢?@Controller 是接收请求返回响应,看看换成 @Service 是否还能接收请求返回响应
package com.example.ioc.controller;

import org.springframework.stereotype.Controller;
import org.springframework.web.bind.annotation.RequestBody;
import org.springframework.web.bind.annotation.RequestMapping;
import org.springframework.web.bind.annotation.ResponseBody;

@Controller
@ResponseBody
public class TestController {
    @RequestMapping("/test")
    public String test(){
        return "测试Controller 和其他注解的区别";
    }
}
现在我们把 @Controller 换成 @Service ,我们发现报错了

这是因为 Spring 对 Controller 进行了一些处理,我们想接收请求就只能使用 Controller ,就是说Controller必须作为我们程序的第一关,这是规范,不能使用其他注解
那么 @Service 这些可以使用 @Component 来代替呢? 这是可以的,但是并不建议
但是明明 @Service 和 @Controller 的原码明明差不多,为什么应用上有区别呢?这是因为原码只是注解的声明,只是声明了一个注解,但是 Spring 对于这个注解还会赋予一些别的功能,这些功能在 Spring 的原码里面
五大注解只能加在类上,并且只能加在自己的代码上,如果我引入了一个 jar包,也希望交给Spring 管理,这是没有办法加五大注解的,这时候就要使用 @Bean
@Bean 是方法注解 , @Bean 需要搭配五大注解来使用
使用 @Bean 注解时,bean 的名称是方法名
五大注解是,bean 的名称是类名的首字母转为小写,如果前两个字母都为大写,bean 的名称就是类名
还有另一个场景可以使用 @Bean ,对于一个类,我们需要定义多个对象时,比如数据库操作,定义多个数据源
因为当我们用别的注解的时候,拿到的是同一个数据,地址都一样,我们拿 @Configuration 举例
package com.example.ioc.config;
import org.springframework.context.annotation.Configuration;

@Configuration
public class UserConfig {
    public void doConfig(){
        System.out.println("do configurarion...");
    }
}
UserConfig userConfig = context.getBean(UserConfig.class);
userConfig.doConfig();
System.out.println("userConfig:"+userConfig);
UserConfig userConfig1 = context.getBean(UserConfig.class);
System.out.println("userConfig:"+userConfig1);
System.out.println("userConfig == userConfig1"+(userConfig==userConfig1));
我们发现,两个数据的地址是完全相同的,它们是否相等的判定返回也是 true

接下来我们用 @Bean 试试看
package com.example.ioc.config;
import lombok.Data;

@Data
//假如这是第三方包下的一个类
//现在我在我的项目中用到了 UserInfo,并且我需要用它定义多个对象
public class UserInfo {
    private Integer id;
    private String name;
    private Integer age;
}
package com.example.ioc.config;
import org.springframework.context.annotation.Bean;
import org.springframework.context.annotation.Configuration;
@Configuration
public class BeanConfig {
@Bean
public UserInfo userInfo(){
UserInfo userInfo = new UserInfo();
userInfo.setId(1);
userInfo.setName("zhangsan");
userInfo.setAge(12);
return userInfo;
}
@Bean
public UserInfo userInfo2(){
UserInfo userInfo = new UserInfo();
userInfo.setId(2);
userInfo.setName("wangwu");
userInfo.setAge(13);
return userInfo;
}
}package com.example.ioc;
import com.example.ioc.component.UserComponent;
import com.example.ioc.config.UserConfig;
import com.example.ioc.config.UserInfo;
import com.example.ioc.controller.UserController;
import com.example.ioc.repo.UserRepository;
import com.example.ioc.service.UserService;
import org.springframework.boot.SpringApplication;
import org.springframework.boot.autoconfigure.SpringBootApplication;
import org.springframework.context.ApplicationContext;
import org.springframework.context.annotation.Bean;
@SpringBootApplication
public class DemoApplication {
public static void main(String[] args) {
//Spring 上下文
ApplicationContext context = SpringApplication.run(DemoApplication.class, args);
//返回的就是 Spring 的运行环境
//@Bean演示
UserInfo userInfo = (UserInfo) context.getBean("userInfo");
System.out.println(userInfo);
UserInfo userInfo2 = (UserInfo) context.getBean("userInfo2");
System.out.println(userInfo2);
}
}这样就能返回两个不一样的内容了

当一个类型存在多个 bean 时,我们就不能使用类型来获取对象了,就要使用名称进行获取了,或者是名称+类型进行获取
 UserInfo userInfo1 = context.getBean("userInfo",UserInfo.class);
        System.out.println(userInfo1);
这样依然可以拿到

当我们想进行传参,代码改为 :
package com.example.ioc.config;

import org.springframework.context.annotation.Bean;
import org.springframework.context.annotation.Configuration;

@Configuration
public class BeanConfig {
    @Bean
    public String name(){
        return "wangwu";
    }
    @Bean
    public UserInfo userInfo(String name){
        UserInfo userInfo = new UserInfo();
        userInfo.setId(1);
        userInfo.setName(name);
        userInfo.setAge(12);
        return userInfo;
    }

}
运行结果如下

上面代码我把 public String name 改为 public String name2 依然可以被拿到,但是如果name和name2都存在,那么就根据名称去匹配,需要哪个就把名称放进传参的括号里
DI 依赖注入也可以叫做"属性装配"或者"依赖装配"
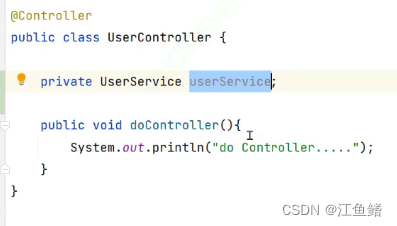
依赖可以简单认为是属性,比如下面代码中,userService 可以看做是 UserController 的属性
我们该如何完成依赖注入呢?
1.属性注入
我们用 @Autowired,这样就能把 Service 给引进来
@Controller
//用 @Controller 告诉 Spring 帮我们管理这个对象
public class UserController {
    @Autowired
    private UserService userService;
    public void doController(){
        userService.doService();
        System.out.println("do Controller...");
    }
}


@Service
public class UserService {
    public void doService(){
        System.out.println("do service....");
    }
}


@SpringBootApplication
public class DemoApplication {

    public static void main(String[] args) {
        //Spring 上下文
        ApplicationContext context = SpringApplication.run(DemoApplication.class, args);
        //返回的就是 Spring 的运行环境

        UserController bean = context.getBean(UserController.class);
        bean.doController();
    }
}
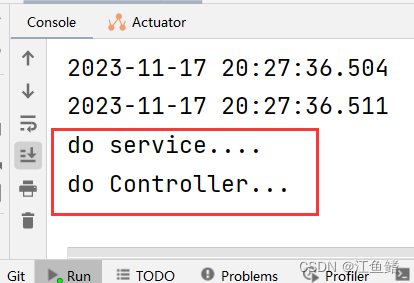
运行结果如下
2.构造方法注入
如果存只有一个构造函数,@Autowired 可以省略,当有多个构造函数的时候,默认使用无参的构造函数,如果没有无参的构造函数,我们要告诉 Spring 我们用哪个构造函数,在那个构造函数上面添加 @Autowired 就行
package com.example.ioc.controller;

import com.example.ioc.config.UserInfo;
import com.example.ioc.service.UserService;
import org.springframework.beans.factory.annotation.Autowired;
import org.springframework.stereotype.Controller;

@Controller
//用 @Controller 告诉 Spring 帮我们管理这个对象
public class UserController {
    //属性注入
    //@Autowired
    //private UserService userService;

    //构造方法注入
    private UserService userService;
    private UserInfo userInfo;

//    public UserController() {
//
//    }

    public UserController(UserService userService) {
        this.userService = userService;
    }

    @Autowired
    public UserController(UserService userService, UserInfo userInfo) {
        this.userService = userService;
        this.userInfo = userInfo;
    }

    public void doController(){
        userService.doService();
        System.out.println("do Controller...");
    }
}
3.Setter 方法注入

