文章目录
- 0 前言
- 1 数据集合
- 2 网络构建
- 3 模型训练
- 4 模型性能评估
- 5 文字预测
- 6 最后
0 前言
🔥 优质竞赛项目系列,今天要分享的是
🚩 深度学习中文汉字识别
该项目较为新颖,适合作为竞赛课题方向,学长非常推荐!
🥇学长这里给一个题目综合评分(每项满分5分)
- 难度系数:3分
- 工作量:3分
- 创新点:4分
🧿 更多资料, 项目分享:
https://gitee.com/dancheng-senior/postgraduate
1 数据集合
学长手有3755个汉字(一级字库)的印刷体图像数据集,我们可以利用它们进行接下来的3755个汉字的识别系统的搭建。
用深度学习做文字识别,用的网络当然是CNN,那具体使用哪个经典网络?VGG?RESNET?还是其他?我想了下,越深的网络训练得到的模型应该会更好,但是想到训练的难度以及以后线上部署时预测的速度,我觉得首先建立一个比较浅的网络(基于LeNet的改进)做基本的文字识别,然后再根据项目需求,再尝试其他的网络结构。这次任务所使用的深度学习框架是强大的Tensorflow。
2 网络构建
第一步当然是搭建网络和计算图
其实文字识别就是一个多分类任务,比如这个3755文字识别就是3755个类别的分类任务。我们定义的网络非常简单,基本就是LeNet的改进版,值得注意的是我们加入了batch
normalization。另外我们的损失函数选择sparse_softmax_cross_entropy_with_logits,优化器选择了Adam,学习率设为0.1
    #network: conv2d->max_pool2d->conv2d->max_pool2d->conv2d->max_pool2d->conv2d->conv2d->max_pool2d->fully_connected->fully_connected


    def build_graph(top_k):
        keep_prob = tf.placeholder(dtype=tf.float32, shape=[], name='keep_prob')
        images = tf.placeholder(dtype=tf.float32, shape=[None, 64, 64, 1], name='image_batch')
        labels = tf.placeholder(dtype=tf.int64, shape=[None], name='label_batch')
        is_training = tf.placeholder(dtype=tf.bool, shape=[], name='train_flag')
        with tf.device('/gpu:5'):
            #给slim.conv2d和slim.fully_connected准备了默认参数:batch_norm
            with slim.arg_scope([slim.conv2d, slim.fully_connected],
                                normalizer_fn=slim.batch_norm,
                                normalizer_params={'is_training': is_training}):
                conv3_1 = slim.conv2d(images, 64, [3, 3], 1, padding='SAME', scope='conv3_1')
                max_pool_1 = slim.max_pool2d(conv3_1, [2, 2], [2, 2], padding='SAME', scope='pool1')
                conv3_2 = slim.conv2d(max_pool_1, 128, [3, 3], padding='SAME', scope='conv3_2')
                max_pool_2 = slim.max_pool2d(conv3_2, [2, 2], [2, 2], padding='SAME', scope='pool2')
                conv3_3 = slim.conv2d(max_pool_2, 256, [3, 3], padding='SAME', scope='conv3_3')
                max_pool_3 = slim.max_pool2d(conv3_3, [2, 2], [2, 2], padding='SAME', scope='pool3')
                conv3_4 = slim.conv2d(max_pool_3, 512, [3, 3], padding='SAME', scope='conv3_4')
                conv3_5 = slim.conv2d(conv3_4, 512, [3, 3], padding='SAME', scope='conv3_5')
                max_pool_4 = slim.max_pool2d(conv3_5, [2, 2], [2, 2], padding='SAME', scope='pool4')

                flatten = slim.flatten(max_pool_4)
                fc1 = slim.fully_connected(slim.dropout(flatten, keep_prob), 1024,
                                           activation_fn=tf.nn.relu, scope='fc1')
                logits = slim.fully_connected(slim.dropout(fc1, keep_prob), FLAGS.charset_size, activation_fn=None,
                                              scope='fc2')
            # 因为我们没有做热编码,所以使用sparse_softmax_cross_entropy_with_logits
            loss = tf.reduce_mean(tf.nn.sparse_softmax_cross_entropy_with_logits(logits=logits, labels=labels))
            accuracy = tf.reduce_mean(tf.cast(tf.equal(tf.argmax(logits, 1), labels), tf.float32))

            update_ops = tf.get_collection(tf.GraphKeys.UPDATE_OPS)
            if update_ops:
                updates = tf.group(*update_ops)
                loss = control_flow_ops.with_dependencies([updates], loss)

            global_step = tf.get_variable("step", [], initializer=tf.constant_initializer(0.0), trainable=False)
            optimizer = tf.train.AdamOptimizer(learning_rate=0.1)
            train_op = slim.learning.create_train_op(loss, optimizer, global_step=global_step)
            probabilities = tf.nn.softmax(logits)

            # 绘制loss accuracy曲线
            tf.summary.scalar('loss', loss)
            tf.summary.scalar('accuracy', accuracy)
            merged_summary_op = tf.summary.merge_all()
            # 返回top k 个预测结果及其概率;返回top K accuracy
            predicted_val_top_k, predicted_index_top_k = tf.nn.top_k(probabilities, k=top_k)
            accuracy_in_top_k = tf.reduce_mean(tf.cast(tf.nn.in_top_k(probabilities, labels, top_k), tf.float32))

        return {'images': images,
                'labels': labels,
                'keep_prob': keep_prob,
                'top_k': top_k,
                'global_step': global_step,
                'train_op': train_op,
                'loss': loss,
                'is_training': is_training,
                'accuracy': accuracy,
                'accuracy_top_k': accuracy_in_top_k,
                'merged_summary_op': merged_summary_op,
                'predicted_distribution': probabilities,
                'predicted_index_top_k': predicted_index_top_k,
                'predicted_val_top_k': predicted_val_top_k}
3 模型训练
训练之前我们应设计好数据怎么样才能高效地喂给网络训练。
首先,我们先创建数据流图,这个数据流图由一些流水线的阶段组成,阶段间用队列连接在一起。第一阶段将生成文件名,我们读取这些文件名并且把他们排到文件名队列中。第二阶段从文件中读取数据(使用Reader),产生样本,而且把样本放在一个样本队列中。根据你的设置,实际上也可以拷贝第二阶段的样本,使得他们相互独立,这样就可以从多个文件中并行读取。在第二阶段的最后是一个排队操作,就是入队到队列中去,在下一阶段出队。因为我们是要开始运行这些入队操作的线程,所以我们的训练循环会使得样本队列中的样本不断地出队。
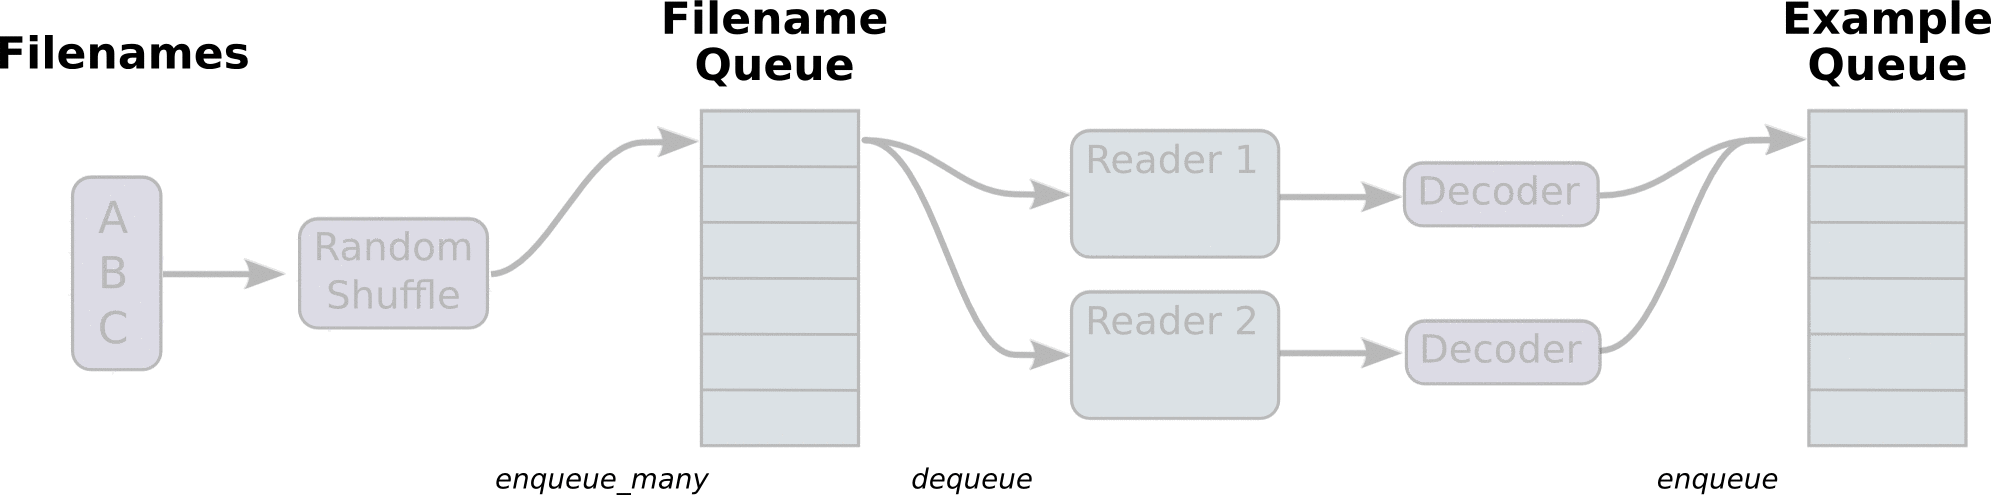
入队操作都在主线程中进行,Session中可以多个线程一起运行。 在数据输入的应用场景中,入队操作是从硬盘中读取输入,放到内存当中,速度较慢。
使用QueueRunner可以创建一系列新的线程进行入队操作,让主线程继续使用数据。如果在训练神经网络的场景中,就是训练网络和读取数据是异步的,主线程在训练网络,另一个线程在将数据从硬盘读入内存。
# batch的生成
def input_pipeline(self, batch_size, num_epochs=None, aug=False):
    # numpy array 转 tensor
    images_tensor = tf.convert_to_tensor(self.image_names, dtype=tf.string)
    labels_tensor = tf.convert_to_tensor(self.labels, dtype=tf.int64)
    # 将image_list ,label_list做一个slice处理
    input_queue = tf.train.slice_input_producer([images_tensor, labels_tensor], num_epochs=num_epochs)

    labels = input_queue[1]
    images_content = tf.read_file(input_queue[0])
    images = tf.image.convert_image_dtype(tf.image.decode_png(images_content, channels=1), tf.float32)
    if aug:
        images = self.data_augmentation(images)
    new_size = tf.constant([FLAGS.image_size, FLAGS.image_size], dtype=tf.int32)
    images = tf.image.resize_images(images, new_size)
    image_batch, label_batch = tf.train.shuffle_batch([images, labels], batch_size=batch_size, capacity=50000,
                                                      min_after_dequeue=10000)
    # print 'image_batch', image_batch.get_shape()
    return image_batch, label_batch
训练时数据读取的模式如上面所述,那训练代码则根据该架构设计如下:
def train():
    print('Begin training')
    # 填好数据读取的路径
    train_feeder = DataIterator(data_dir='./dataset/train/')
    test_feeder = DataIterator(data_dir='./dataset/test/')
    model_name = 'chinese-rec-model'
    with tf.Session(config=tf.ConfigProto(gpu_options=gpu_options, allow_soft_placement=True)) as sess:
        # batch data 获取
        train_images, train_labels = train_feeder.input_pipeline(batch_size=FLAGS.batch_size, aug=True)
        test_images, test_labels = test_feeder.input_pipeline(batch_size=FLAGS.batch_size)
        graph = build_graph(top_k=1)  # 训练时top k = 1
        saver = tf.train.Saver()
        sess.run(tf.global_variables_initializer())
        # 设置多线程协调器
        coord = tf.train.Coordinator()
        threads = tf.train.start_queue_runners(sess=sess, coord=coord)

        train_writer = tf.summary.FileWriter(FLAGS.log_dir + '/train', sess.graph)
        test_writer = tf.summary.FileWriter(FLAGS.log_dir + '/val')
        start_step = 0
        # 可以从某个step下的模型继续训练
        if FLAGS.restore:
            ckpt = tf.train.latest_checkpoint(FLAGS.checkpoint_dir)
            if ckpt:
                saver.restore(sess, ckpt)
                print("restore from the checkpoint {0}".format(ckpt))
                start_step += int(ckpt.split('-')[-1])

        logger.info(':::Training Start:::')
        try:
            i = 0
            while not coord.should_stop():
                i += 1
                start_time = time.time()
                train_images_batch, train_labels_batch = sess.run([train_images, train_labels])
                feed_dict = {graph['images']: train_images_batch,
                             graph['labels']: train_labels_batch,
                             graph['keep_prob']: 0.8,
                             graph['is_training']: True}
                _, loss_val, train_summary, step = sess.run(
                    [graph['train_op'], graph['loss'], graph['merged_summary_op'], graph['global_step']],
                    feed_dict=feed_dict)
                train_writer.add_summary(train_summary, step)
                end_time = time.time()
                logger.info("the step {0} takes {1} loss {2}".format(step, end_time - start_time, loss_val))
                if step > FLAGS.max_steps:
                    break
                if step % FLAGS.eval_steps == 1:
                    test_images_batch, test_labels_batch = sess.run([test_images, test_labels])
                    feed_dict = {graph['images']: test_images_batch,
                                 graph['labels']: test_labels_batch,
                                 graph['keep_prob']: 1.0,
                                 graph['is_training']: False}
                    accuracy_test, test_summary = sess.run([graph['accuracy'], graph['merged_summary_op']],
                                                           feed_dict=feed_dict)
                    if step > 300:
                        test_writer.add_summary(test_summary, step)
                    logger.info('===============Eval a batch=======================')
                    logger.info('the step {0} test accuracy: {1}'
                                .format(step, accuracy_test))
                    logger.info('===============Eval a batch=======================')
                if step % FLAGS.save_steps == 1:
                    logger.info('Save the ckpt of {0}'.format(step))
                    saver.save(sess, os.path.join(FLAGS.checkpoint_dir, model_name),
                               global_step=graph['global_step'])
        except tf.errors.OutOfRangeError:
            logger.info('==================Train Finished================')
            saver.save(sess, os.path.join(FLAGS.checkpoint_dir, model_name), global_step=graph['global_step'])
        finally:
            # 达到最大训练迭代数的时候清理关闭线程
            coord.request_stop()
        coord.join(threads)
执行以下指令进行模型训练。因为我使用的是TITAN
X,所以感觉训练时间不长,大概1个小时可以训练完毕。训练过程的loss和accuracy变换曲线如下图所示
然后执行指令,设置最大迭代步数为16002,每100步进行一次验证,每500步存储一次模型。
python Chinese_OCR.py --mode=train --max_steps=16002 --eval_steps=100 --save_steps=500

4 模型性能评估
我们的需要对模模型进行评估,我们需要计算模型的top 1 和top 5的准确率。
执行指令
python Chinese_OCR.py --mode=validation

def validation():
    print('Begin validation')
    test_feeder = DataIterator(data_dir='./dataset/test/')

    final_predict_val = []
    final_predict_index = []
    groundtruth = []

    with tf.Session(config=tf.ConfigProto(gpu_options=gpu_options,allow_soft_placement=True)) as sess:
        test_images, test_labels = test_feeder.input_pipeline(batch_size=FLAGS.batch_size, num_epochs=1)
        graph = build_graph(top_k=5)
        saver = tf.train.Saver()

        sess.run(tf.global_variables_initializer())
        sess.run(tf.local_variables_initializer())  # initialize test_feeder's inside state

        coord = tf.train.Coordinator()
        threads = tf.train.start_queue_runners(sess=sess, coord=coord)

        ckpt = tf.train.latest_checkpoint(FLAGS.checkpoint_dir)
        if ckpt:
            saver.restore(sess, ckpt)
            print("restore from the checkpoint {0}".format(ckpt))

        logger.info(':::Start validation:::')
        try:
            i = 0
            acc_top_1, acc_top_k = 0.0, 0.0
            while not coord.should_stop():
                i += 1
                start_time = time.time()
                test_images_batch, test_labels_batch = sess.run([test_images, test_labels])
                feed_dict = {graph['images']: test_images_batch,
                             graph['labels']: test_labels_batch,
                             graph['keep_prob']: 1.0,
                             graph['is_training']: False}
                batch_labels, probs, indices, acc_1, acc_k = sess.run([graph['labels'],
                                                                       graph['predicted_val_top_k'],
                                                                       graph['predicted_index_top_k'],
                                                                       graph['accuracy'],
                                                                       graph['accuracy_top_k']], feed_dict=feed_dict)
                final_predict_val += probs.tolist()
                final_predict_index += indices.tolist()
                groundtruth += batch_labels.tolist()
                acc_top_1 += acc_1
                acc_top_k += acc_k
                end_time = time.time()
                logger.info("the batch {0} takes {1} seconds, accuracy = {2}(top_1) {3}(top_k)"
                            .format(i, end_time - start_time, acc_1, acc_k))

        except tf.errors.OutOfRangeError:
            logger.info('==================Validation Finished================')
            acc_top_1 = acc_top_1 * FLAGS.batch_size / test_feeder.size
            acc_top_k = acc_top_k * FLAGS.batch_size / test_feeder.size
            logger.info('top 1 accuracy {0} top k accuracy {1}'.format(acc_top_1, acc_top_k))
        finally:
            coord.request_stop()
        coord.join(threads)
    return {'prob': final_predict_val, 'indices': final_predict_index, 'groundtruth': groundtruth}
5 文字预测
刚刚做的那一步只是使用了我们生成的数据集作为测试集来检验模型性能,这种检验是不大准确的,因为我们日常需要识别的文字样本不会像是自己合成的文字那样的稳定和规则。那我们尝试使用该模型对一些实际场景的文字进行识别,真正考察模型的泛化能力。
首先先编写好预测的代码
def inference(name_list):
    print('inference')
    image_set=[]
    # 对每张图进行尺寸标准化和归一化
    for image in name_list:
        temp_image = Image.open(image).convert('L')
        temp_image = temp_image.resize((FLAGS.image_size, FLAGS.image_size), Image.ANTIALIAS)
        temp_image = np.asarray(temp_image) / 255.0
        temp_image = temp_image.reshape([-1, 64, 64, 1])
        image_set.append(temp_image)

    # allow_soft_placement 如果你指定的设备不存在,允许TF自动分配设备
    with tf.Session(config=tf.ConfigProto(gpu_options=gpu_options,allow_soft_placement=True)) as sess:
        logger.info('========start inference============')
        # images = tf.placeholder(dtype=tf.float32, shape=[None, 64, 64, 1])
        # Pass a shadow label 0. This label will not affect the computation graph.
        graph = build_graph(top_k=3)
        saver = tf.train.Saver()
        # 自动获取最后一次保存的模型
        ckpt = tf.train.latest_checkpoint(FLAGS.checkpoint_dir)
        if ckpt:
            saver.restore(sess, ckpt)
        val_list=[]
        idx_list=[]
        # 预测每一张图
        for item in image_set:
            temp_image = item
            predict_val, predict_index = sess.run([graph['predicted_val_top_k'], graph['predicted_index_top_k']],
                                              feed_dict={graph['images']: temp_image,
                                                         graph['keep_prob']: 1.0,
                                                         graph['is_training']: False})
            val_list.append(predict_val)
            idx_list.append(predict_index)
    #return predict_val, predict_index
    return val_list,idx_list
这里需要说明一下,我会把我要识别的文字图像存入一个叫做tmp的文件夹内,里面的图像按照顺序依次编号,我们识别时就从该目录下读取所有图片仅内存进行逐一识别。
# 获待预测图像文件夹内的图像名字
def get_file_list(path):
    list_name=[]
    files = os.listdir(path)
    files.sort()
    for file in files:
        file_path = os.path.join(path, file)
        list_name.append(file_path)
    return list_name
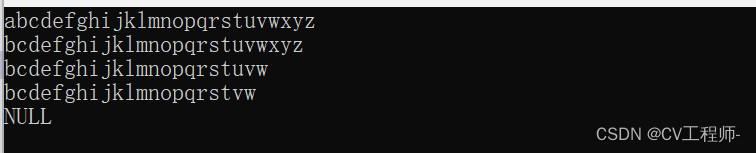
那我们使用训练好的模型进行汉字预测,观察效果。首先我从一篇论文pdf上用截图工具截取了一段文字,然后使用文字切割算法把文字段落切割为单字,如下图,因为有少量文字切割失败,所以丢弃了一些单字。
从一篇文章中用截图工具截取文字段落。

切割出来的单字,黑底白字。

最后将所有的识别文字按顺序组合成段落,可以看出,汉字识别完全正确,说明我们的基于深度学习的OCR系统还是相当给力!

至此,支持3755个汉字识别的OCR系统已经搭建完毕,经过测试,效果还是很不错。这是一个没有经过太多优化的模型,在模型评估上top
1的正确率达到了99.9%,这是一个相当优秀的效果了,所以说在一些比较理想的环境下的文字识别的效果还是比较给力,但是对于复杂场景的或是一些干扰比较大的文字图像,识别起来的效果可能不会太理想,这就需要针对特定场景做进一步优化。
6 最后
🧿 更多资料, 项目分享:
https://gitee.com/dancheng-senior/postgraduate


![23111706[含文档+PPT+源码等]计算机毕业设计SSM框架网上书城全套微信支付电商购物](https://img-blog.csdnimg.cn/img_convert/8e4fb2245d5c5847f514e415a873d82b.png)