1. 理解Bean的生命周期
1.1 生命周期的各个阶段
在Spring IOC容器中,Bean的生命周期大致如下:
- 实例化:当启动Spring应用时,IOC容器就会为在配置文件中声明的每个<bean>创建一个实例。
- 属性赋值:实例化后,Spring就通过反射机制给Bean的属性赋值。
- 调用初始化方法:如果Bean配置了初始化方法,Spring就会调用它。初始化方法是在Bean创建并赋值之后调用,可以在这个方法里面写一些业务处理代码或者做一些初始化的工作。
- Bean运行期:此时,Bean已经准备好被程序使用了,它已经被初始化并赋值完成。
- 应用程序关闭:当关闭IOC容器时,Spring会处理配置了销毁方法的Bean。
- 调用销毁方法:如果Bean配置了销毁方法,Spring会在所有Bean都已经使用完毕,且IOC容器关闭之前调用它,可以在销毁方法里面做一些资源释放的工作,比如关闭连接、清理缓存等。
这就是Spring IOC容器管理Bean的生命周期,帮助我们管理对象的创建和销毁,以及在适当的时机做适当的事情。
我们可以将生命周期的触发称为回调,因为生命周期的方法是我们自己定义的,但方法的调用是由框架内部帮我们完成的,所以可以称之为“回调”。
2. 理解init-method和destroy-method
让我们先了解一种最容易理解的生命周期阶段:初始化和销毁方法。这些方法可以在Bean的初始化和销毁阶段起作用,我们通过示例来演示这种方式。
为了方便演示XML和注解的方式,接下来我们会创建两个类来分别进行演示,分别为Lion和Elephant,让我们一步一步对比观察。
2.1 从XML配置创建Bean看生命周期
先创建一个类Lion
package com.example.demo.bean;
public class Lion {
 private String name;
 public void setName(String name) {
 this.name = name;
 }
 public void init() {
 System.out.println(name + " has been initialized...");
 }
 public void destroy() {
 System.out.println(name + " has been destroyed...");
 }
}
在XML中,我们使用<bean>标签来注册Lion:
applicationContext.xml
<?xml version="1.0" encoding="UTF-8"?>
<beans xmlns="http://www.springframework.org/schema/beans"
 xmlns:xsi="http://www.w3.org/2001/XMLSchema-instance"
 xsi:schemaLocation="http://www.springframework.org/schema/beans http://www.springframework.org/schema/beans/spring-beans.xsd">
 <bean class="com.example.demo.bean.Lion"
 init-method="init" destroy-method="destroy">
 <property name="name" value="simba"/>
 </bean>
</beans>
加上主程序
package com.example.demo.application;
import org.springframework.context.annotation.ComponentScan;
import org.springframework.context.support.ClassPathXmlApplicationContext;
@ComponentScan("com.example")
public class DemoApplication {
 public static void main(String[] args) {
 System.out.println("Spring容器初始化开始");
 ClassPathXmlApplicationContext context = new ClassPathXmlApplicationContext("applicationContext.xml");
 System.out.println("Spring容器初始化完成。");
 System.out.println("==================");
 System.out.println("Spring容器准备关闭");
 context.close();
 System.out.println("Spring容器已关闭。");
 }
}
运行结果
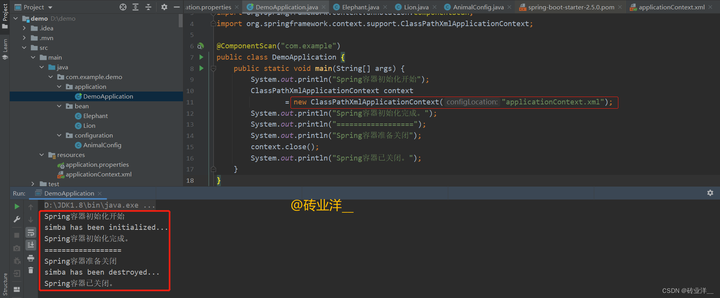
在<bean>标签中,有两个属性:init-method和destroy-method,这两个属性用于指定初始化和销毁方法。
这里"simba has been initialized...",证明init()方法被调用了。当context.close()被调用时,看到"simba has been destroyed...",证明destroy()方法被调用了。
在 IOC 容器初始化之前,默认情况下 Bean 已经创建好了,而且完成了初始化动作;容器调用销毁动作时,先销毁所有 Bean ,最后 IOC 容器全部销毁完成。
这个例子通过一个简单的Spring应用程序显示了Spring bean的生命周期。我们可以在创建bean时根据需要使用这些生命周期方法。
2.2 从配置类注解配置创建Bean看生命周期
这里再创建一个类Elephant和上面对比
package com.example.demo.bean;
public class Elephant {
 private String name;
 public void setName(String name) {
 this.name = name;
 }
 public void init() {
 System.out.println(name + " has been initialized...");
 }
 public void destroy() {
 System.out.println(name + " has been destroyed...");
 }
}
对于注解,@Bean注解中也有类似的属性:initMethod和destroyMethod,这两个属性的作用与XML配置中的相同。
package com.example.demo.configuration;
import com.example.demo.bean.Elephant;
import org.springframework.context.annotation.Bean;
import org.springframework.context.annotation.Configuration;
import org.springframework.context.annotation.ImportResource;
@Configuration
@ImportResource("classpath:applicationContext.xml")
public class AnimalConfig {
 @Bean(initMethod = "init", destroyMethod = "destroy")
 public Elephant elephant() {
 Elephant elephant = new Elephant();
 elephant.setName("Dumbo");
 return elephant;
 }
}
这里用@ImportResource("classpath:applicationContext.xml")引入xml配置创建Bean进行对比。
主程序改为如下:
package com.example.demo.application;
import com.example.demo.configuration.AnimalConfig;
import org.springframework.context.annotation.AnnotationConfigApplicationContext;
import org.springframework.context.annotation.ComponentScan;
@ComponentScan("com.example")
public class DemoApplication {
 public static void main(String[] args) {
 System.out.println("Spring容器初始化开始");
 AnnotationConfigApplicationContext context = new AnnotationConfigApplicationContext(AnimalConfig.class);
 System.out.println("Spring容器初始化完成。");
 System.out.println("==================");
 System.out.println("Spring容器准备关闭");
 context.close();
 System.out.println("Spring容器已关闭。");
 }
}
运行结果
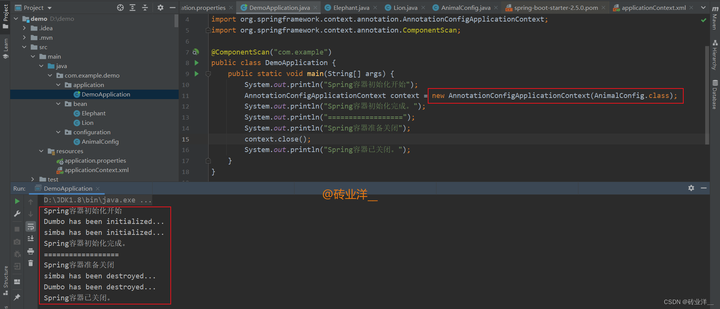
注意:在Spring中,如果在Java配置中定义了一个Bean,并在XML中定义了一个相同id或name的Bean,那么最后注册的那个Bean会覆盖之前注册的,这取决于配置文件加载顺序,无论在Java配置中还是XML配置中定义的initMethod或destroyMethod,最后生效的总是后加载的配置中定义的。
“init-method”是指定初始化回调方法的属性的统称,无论它是在XML配置还是Java配置中使用。同样地,“destroy-method”是指定销毁回调方法的属性的统称。后文我们讲解多种声明周期共存的时候,将延续这种说法。
2.3 初始化和销毁方法的特性
在Spring框架中配置Bean的初始化和销毁方法时,需要按照Spring的规范来配置这些方法,否则Spring可能无法正确地调用它们。下面给每个特性提供一个解释和示例:
1、方法的访问权限无限制:这意味着无论方法是public、protected还是private,Spring都可以调用。Spring通过反射来调用这些方法,所以它可以忽略Java的访问权限限制。示例:
public class MyBean {
 private void init() {
 // 初始化代码
 }
}
在上述代码中,即使init方法是private的,Spring也可以正常调用。
2、方法没有参数:由于Spring不知道需要传递什么参数给这些方法,所以这些方法不能有参数。示例:
public class MyBean {
 public void init() {
 // 初始化代码
 }
}
在上述代码中,init方法没有参数,如果添加了参数,如public void init(String arg),Spring将无法调用此方法。
3、方法没有返回值:由于返回的值对Spring来说没有意义,所以这些方法不应该有返回值。示例:
public class MyBean {
 public void init() {
 // 初始化代码
 }
}
在上述代码中,init方法是void的,如果让此方法返回一个值,如public String init(),那么Spring将忽略此返回值。
4、方法可以抛出异常:如果在初始化或销毁过程中发生错误,这些方法可以抛出异常来通知Spring。示例:
public class MyBean {
 public void init() throws Exception {
 // 初始化代码
 if (somethingGoesWrong) {
 throw new Exception("Initialization failed.");
 }
 }
}
在上述代码中,如果在init方法中的初始化代码出错,它会抛出一个异常。Spring框架默认会停止Bean的创建,并抛出异常。
2.4 探究Bean的初始化流程顺序
在上面的代码中,我们可以看出Bean在IOC容器初始化阶段就已经创建并初始化了,那么每个Bean的初始化动作又是如何进行的呢?我们修改一下Lion,在构造方法和setName方法中加入控制台打印,这样在调用这些方法时,会在控制台上得到反馈。
package com.example.demo.bean;
public class Lion {
 private String name;
 public Lion() {
 System.out.println("Lion's constructor is called...");
 }
 public void setName(String name) {
 System.out.println("setName method is called...");
 this.name = name;
 }
 public void init() {
 System.out.println(name + " has been initialized...");
 }
 public void destroy() {
 System.out.println(name + " has been destroyed...");
 }
}
我们重新运行主程序:
@ComponentScan("com.example")
public class DemoApplication {
 public static void main(String[] args) {
 System.out.println("Spring容器初始化开始");
 ClassPathXmlApplicationContext context = new ClassPathXmlApplicationContext("applicationContext.xml");
 System.out.println("Spring容器初始化完成。");
 System.out.println("==================");
 System.out.println("Spring容器准备关闭");
 context.close();
 System.out.println("Spring容器已关闭。");
 }
}
运行结果
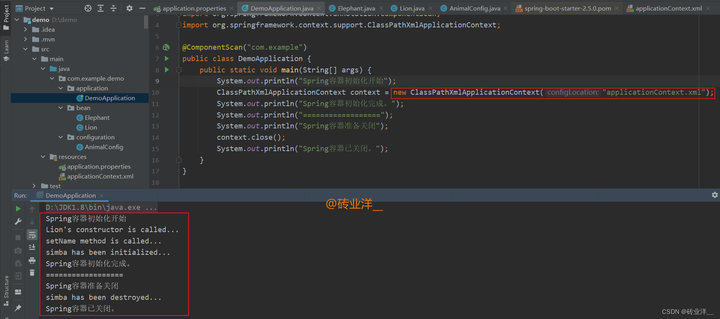
我们可以得出结论:在Bean的生命周期中,首先进行属性赋值,然后执行init-method标记的方法。
3. @PostConstruct和@PreDestroy
在JSR250规范中,有两个与Bean生命周期相关的注解,即@PostConstruct和@PreDestroy。这两个注解对应了Bean的初始化和销毁阶段。
@PostConstruct注解标记的方法会在bean属性设置完毕后(即完成依赖注入),但在bean对外暴露(即可以被其他bean引用)之前被调用,这个时机通常用于完成一些初始化工作。
@PreDestroy注解标记的方法会在Spring容器销毁bean之前调用,这通常用于释放资源。
3.1 示例:@PostConstruct和@PreDestroy的使用
我们这里还是用Lion类来创建这个例子,将Lion类修改为使用@PostConstruct和@PreDestroy注解
package com.example.demo.bean;
import org.springframework.stereotype.Component;
import javax.annotation.PostConstruct;
import javax.annotation.PreDestroy;
@Component
public class Lion {
 private String name;
 public void setName(String name) {
 this.name = name;
 }
 @PostConstruct
 public void init() {
 System.out.println("Lion is going through init.");
 }
 @PreDestroy
 public void destroy() {
 System.out.println("Lion is going through destroy.");
 }
 @Override
 public String toString() {
 return "Lion{" + "name=" + name + '}';
 }
}
给Lion类加上@Component注解,让IOC容器去管理这个类,我们这里就不把Elephant类加进来增加理解难度了。
被 @PostConstruct 和 @PreDestroy 注解标注的方法与 init-method / destroy-method 方法的初始化和销毁的要求是一样的,访问修饰符没有限制,private也可以。
我们可以注释掉之前的配置类和XML配置,因为和这里的例子没有关系,我们来看看主程序:
package com.example.demo.application;
import org.springframework.context.annotation.AnnotationConfigApplicationContext;
public class DemoApplication {
 public static void main(String[] args) {
 System.out.println("Spring容器初始化开始");
 AnnotationConfigApplicationContext context = new AnnotationConfigApplicationContext("com.example.demo.bean");
 System.out.println("Spring容器初始化完成。");
 System.out.println("==================");
 System.out.println("Spring容器准备关闭");
 context.close();
 System.out.println("Spring容器已关闭。");
 }
}
运行结果
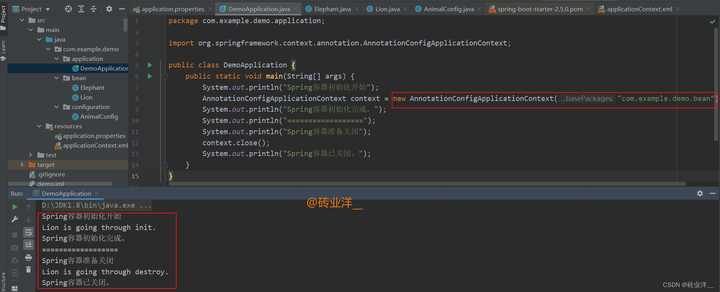
这里可以看到@PostConstruct和@PreDestroy注解正确地应用在了Lion的初始化和销毁过程中。
3.2 初始化和销毁——注解和init-method共存对比
@PostConstruct和@PreDestroy注解与init-method/destroy-method属性如何共存呢?我们来看看
我们只用Lion类来举例子,在Lion类中添加新的open()和close()方法
需要的全部代码如下:
Lion.java
package com.example.demo.bean;
import javax.annotation.PostConstruct;
import javax.annotation.PreDestroy;
public class Lion {
 private String name;
 public Lion() {
 System.out.println("Lion构造器");
 }
 public void setName(String name) {
 System.out.println("Lion设置name");
 this.name = name;
 }
 public void open() {
 System.out.println("配置类initMethod - 打开Lion。。。");
 }
 public void close() {
 System.out.println("配置类destroyMethod - 关闭Lion。。。");
 }
 @PostConstruct
 public void init() {
 System.out.println("@PostConstruct - Lion正在进行初始化。。。");
 }
 @PreDestroy
 public void destroy() {
 System.out.println("@PreDestroy - Lion正在进行销毁。。。");
 }
 @Override
 public String toString() {
 return "Lion{" + "name=" + name + '}';
 }
}
配置类AnimalConfig.java
package com.example.demo.configuration;
import com.example.demo.bean.Lion;
import org.springframework.context.annotation.Bean;
import org.springframework.context.annotation.Configuration;
@Configuration
public class AnimalConfig {
 @Bean(initMethod = "open", destroyMethod = "close")
 public Lion lion() {
 return new Lion();
 }
}
主程序
package com.example.demo.application;
import com.example.demo.configuration.AnimalConfig;
import org.springframework.context.annotation.AnnotationConfigApplicationContext;
public class DemoApplication {
 public static void main(String[] args) {
 System.out.println("Spring容器初始化开始");
 AnnotationConfigApplicationContext context = new AnnotationConfigApplicationContext(AnimalConfig.class);
 System.out.println("Spring容器初始化完成。");
 System.out.println("==================");
 System.out.println("Spring容器准备关闭");
 context.close();
 System.out.println("Spring容器已关闭。");
 }
}
运行结果
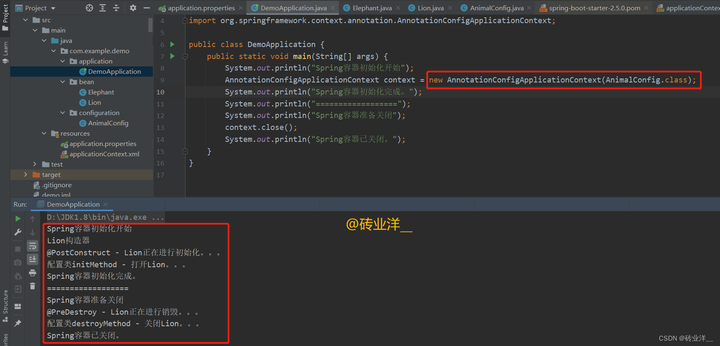
这里可以看到@PostConstruct和@PreDestroy注解的优先级始终高于配置类中@Bean注解的initMethod和destroyMethod属性。
4. 实现InitializingBean和DisposableBean接口
这两个接口是 Spring 预定义的两个关于生命周期的接口。他们被触发的时机与上文中的 init-method / destroy-method 以及 JSR250 规范的注解相同,都是在 Bean 的初始化和销毁阶段回调的。下面演示如何使用这两个接口。
4.1 示例:实现InitializingBean和DisposableBean接口
创建Bean,我们让Lion类实现这两个接口:
Lion.java
package com.example.demo.bean;
import org.springframework.beans.factory.DisposableBean;
import org.springframework.beans.factory.InitializingBean;
import org.springframework.stereotype.Component;
@Component
public class Lion implements InitializingBean, DisposableBean {
 private Integer energy;
 @Override
 public void afterPropertiesSet() throws Exception {
 System.out.println("狮子已经充满能量。。。");
 this.energy = 100;
 }
 @Override
 public void destroy() throws Exception {
 System.out.println("狮子已经消耗完所有能量。。。");
 this.energy = 0;
 }
 @Override
 public String toString() {
 return "Lion{" + "energy=" + energy + '}';
 }
}
InitializingBean接口只有一个方法:afterPropertiesSet()。在Spring框架中,当一个bean的所有属性都已经被设置完毕后,这个方法就会被调用。也就是说,这个bean一旦被初始化,Spring就会调用这个方法。我们可以在bean的所有属性被设置后,进行一些自定义的初始化工作。
DisposableBean接口也只有一个方法:destroy()。当Spring容器关闭并销毁bean时,这个方法就会被调用。我们可以在bean被销毁前,进行一些清理工作。
主程序:
package com.example.demo.application;
import org.springframework.context.annotation.AnnotationConfigApplicationContext;
public class DemoApplication {
 public static void main(String[] args) {
 System.out.println("Spring容器初始化开始");
 AnnotationConfigApplicationContext context
 = new AnnotationConfigApplicationContext("com.example.demo.bean");
 System.out.println("Spring容器初始化完成。");
 System.out.println("==================");
 System.out.println("Spring容器准备关闭");
 context.close();
 System.out.println("Spring容器已关闭。");
 }
}
运行结果:

4.2 三种生命周期并存
在Spring框架中,控制Bean生命周期的三种方式是:
- 使用Spring的init-method和destroy-method(在XML配置或者Java配置中自定义的初始化和销毁方法);
- 使用JSR-250规范的@PostConstruct和@PreDestroy注解;
- 实现Spring的InitializingBean和DisposableBean接口。
接下来我们测试一下,一个Bean同时定义init-method、destroy-method方法,使用@PostConstruct、@PreDestroy注解,以及实现InitializingBean、DisposableBean接口,执行顺序是怎样的。
我们创建一个新的类Lion2,并同时进行三种方式的生命周期控制:
需要运行的全部代码如下:
package com.example.demo.bean;
import org.springframework.beans.factory.DisposableBean;
import org.springframework.beans.factory.InitializingBean;
import org.springframework.stereotype.Component;
import javax.annotation.PostConstruct;
import javax.annotation.PreDestroy;
@Component
public class Lion2 implements InitializingBean, DisposableBean {
 private Integer energy;
 public void open() {
 System.out.println("init-method - 狮子开始行动。。。");
 }
 public void close() {
 System.out.println("destroy-method - 狮子结束行动。。。");
 }
 @PostConstruct
 public void gainEnergy() {
 System.out.println("@PostConstruct - 狮子已经充满能量。。。");
 this.energy = 100;
 }
 @PreDestroy
 public void loseEnergy() {
 System.out.println("@PreDestroy - 狮子已经消耗完所有能量。。。");
 this.energy = 0;
 }
 @Override
 public void afterPropertiesSet() throws Exception {
 System.out.println("InitializingBean - 狮子准备行动。。。");
 }
 @Override
 public void destroy() throws Exception {
 System.out.println("DisposableBean - 狮子行动结束。。。");
 }
}
接着,我们注册Lion2:
package com.example.demo.configuration;
import com.example.demo.bean.Lion2;
import org.springframework.context.annotation.Bean;
import org.springframework.context.annotation.Configuration;
@Configuration
public class AnimalConfig {
 @Bean(initMethod = "open", destroyMethod = "close")
 public Lion2 lion2() {
 return new Lion2();
 }
}
然后让注解 IOC 容器驱动这个配置类,主程序如下:
package com.example.demo.application;
import org.springframework.context.annotation.AnnotationConfigApplicationContext;
public class DemoApplication {
 public static void main(String[] args) {
 System.out.println("Spring容器初始化开始");
 AnnotationConfigApplicationContext context
 = new AnnotationConfigApplicationContext("com.example.demo");
 System.out.println("Spring容器初始化完成。");
 System.out.println("==================");
 System.out.println("Spring容器准备关闭");
 context.close();
 System.out.println("Spring容器已关闭。");
 }
}
运行结果:
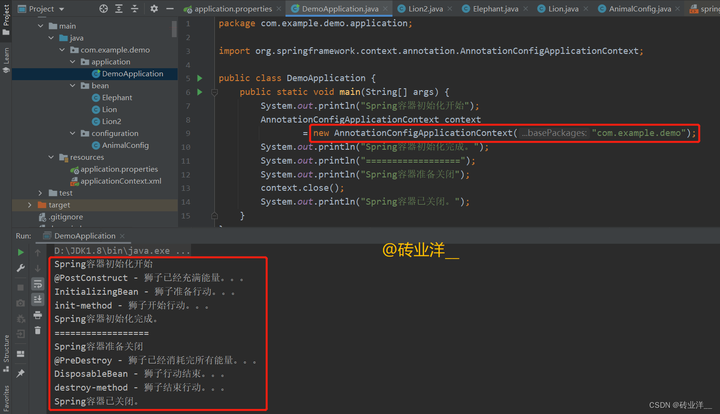
从上面的结果,我们可以得出以下结论,在Spring框架中单实例Bean的初始化和销毁过程有这样的执行顺序:
初始化顺序:@PostConstruct → InitializingBean → init-method
销毁顺序:@PreDestroy → DisposableBean → destroy-method
在初始化Bean时,@PostConstruct注解方法会首先被执行,然后是实现InitializingBean接口的afterPropertiesSet方法,最后是init-method指定的方法。
在销毁Bean时,@PreDestroy注解方法会首先被执行,然后是实现DisposableBean接口的destroy方法,最后是destroy-method指定的方法
结合前面说过的属性赋值(构造器方法和setter方法),简单总结一下Spring Bean生命周期的流程:
- 实例化(通过构造器方法);
- 设置Bean的属性(通过setter方法);
- 调用Bean的初始化方法(@PostConstruct、afterPropertiesSet方法或者init-method指定的方法);
- Bean可以被应用程序使用;
- 当容器关闭时,调用Bean的销毁方法(@PreDestroy、destroy方法或者destroy-method指定的方法)。
5. 原型Bean的生命周期
原型Bean的创建和初始化过程与单例Bean类似,但由于原型Bean的性质,其生命周期与IOC容器的生命周期并不相同。
这里展示一下需要的全部代码。
Lion2.java
package com.example.demo.bean;
import org.springframework.beans.factory.DisposableBean;
import org.springframework.beans.factory.InitializingBean;
import org.springframework.stereotype.Component;
import javax.annotation.PostConstruct;
import javax.annotation.PreDestroy;
public class Lion2 implements InitializingBean, DisposableBean {
 private Integer energy;
 public void roar() {
 System.out.println("The lion is roaring...");
 }
 public void rest() {
 System.out.println("The lion is resting...");
 }
 @PostConstruct
 public void gainEnergy() {
 System.out.println("@PostConstruct - 狮子已经充满能量。。。");
 this.energy = 100;
 }
 @PreDestroy
 public void loseEnergy() {
 System.out.println("@PreDestroy - 狮子已经消耗完所有能量。。。");
 this.energy = 0;
 }
 @Override
 public void afterPropertiesSet() throws Exception {
 System.out.println("InitializingBean - 狮子准备行动。。。");
 }
 @Override
 public void destroy() throws Exception {
 System.out.println("DisposableBean - 狮子行动结束。。。");
 }
}
然后在Spring的Java配置中声明并设定其为原型Bean
package com.example.demo.configuration;
import com.example.demo.bean.Lion2;
import org.springframework.beans.factory.config.ConfigurableBeanFactory;
import org.springframework.context.annotation.Bean;
import org.springframework.context.annotation.Configuration;
import org.springframework.context.annotation.Scope;
@Configuration
public class PrototypeLifecycleConfiguration {
 @Bean(initMethod = "roar", destroyMethod = "rest")
 @Scope(ConfigurableBeanFactory.SCOPE_PROTOTYPE)
 public Lion2 lion() {
 return new Lion2();
 }
}
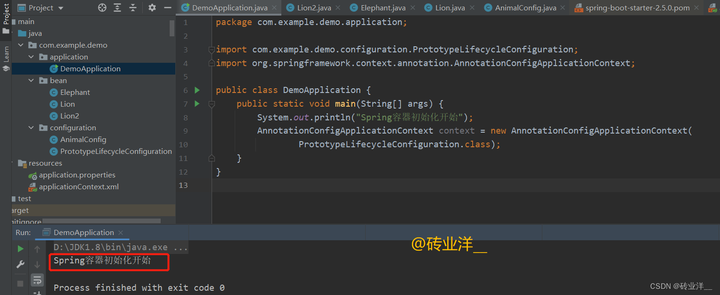
如果我们只是启动了IOC容器,但并未请求Lion2的实例,Lion Bean的初始化不会立刻发生。也就是说,原型Bean不会随着IOC容器的启动而初始化。以下是启动容器但并未请求Bean的代码:
package com.example.demo.application;
import com.example.demo.configuration.PrototypeLifecycleConfiguration;
import org.springframework.context.annotation.AnnotationConfigApplicationContext;
public class DemoApplication {
 public static void main(String[] args) {
 System.out.println("Spring容器初始化开始");
 AnnotationConfigApplicationContext context = new AnnotationConfigApplicationContext(
 PrototypeLifecycleConfiguration.class);
 }
}
运行结果:
当我们明确请求一个Lion2的实例时,我们会看到所有的初始化方法按照预定的顺序执行,这个顺序跟单例Bean完全一致:
package com.example.demo.application;
import com.example.demo.bean.Lion2;
import com.example.demo.configuration.PrototypeLifecycleConfiguration;
import org.springframework.context.annotation.AnnotationConfigApplicationContext;
public class DemoApplication {
 public static void main(String[] args) {
 System.out.println("Spring容器初始化开始");
 AnnotationConfigApplicationContext context = new AnnotationConfigApplicationContext(
 PrototypeLifecycleConfiguration.class);
 System.out.println("Ready to get a Lion instance...");
 Lion2 lion = context.getBean(Lion2.class);
 System.out.println("A Lion instance has been fetched...");
 System.out.println("Lion instance is no longer needed, preparing to destroy...");
 context.getBeanFactory().destroyBean(lion);
 System.out.println("Lion instance has been destroyed...");
 }
}
运行结果:
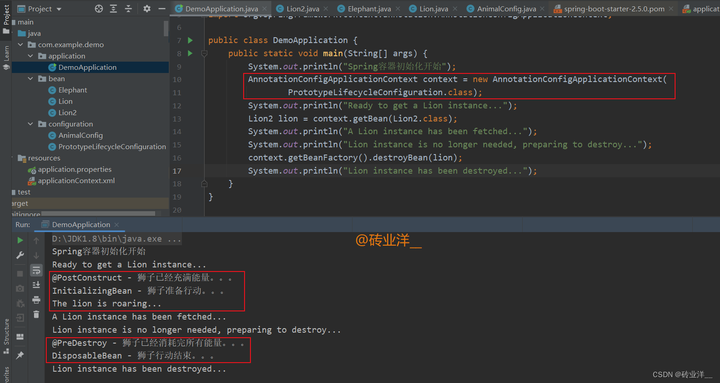
将原型Bean和单例Bean的三种生命周期进行对比后发现,调用IOC容器的destroyBean()方法销毁原型Bean时,只有@PreDestroy注解和DisposableBean接口的destroy方法会被触发,而被destroy-method标记的自定义销毁方法并不会被执行。
从这里我们可以得出结论:在销毁原型Bean时,Spring不会执行由destroy-method标记的自定义销毁方法,所以原型Bean的destroy-method的也有局限性。如果有重要的清理逻辑需要在Bean销毁时执行,那么应该将这部分逻辑放在@PreDestroy注解的方法或DisposableBean接口的destroy方法中。
6. Spring中控制Bean生命周期的三种方式总结


