课程链接:6.1810 / Fall 2023
一、本节任务

实验环境:

二、introduction and examples
2.1 open(), read(), write(), close(), dup()
使用 open 打开或创建文件,得到文件描述符 fd,再对 fd 进行 read 或者 write 操作。每个进程都默认打开三个文件描述符:0(standard input),1(standard output),2(standard error),所以当我们想把输入内容复制到输出,可以有如下程序:
// ex1.c: copy input to output.

#include "kernel/types.h"
#include "user/user.h"

int
main()
{
  char buf[64];

  while(1){
    int n = read(0, buf, sizeof(buf));
    if(n <= 0)
      break;
    write(1, buf, n);
  }

  exit(0);
}
或者使用 open 打开一个文件,向文件内写数据:
// ex2.c: create a file, write to it.

#include "kernel/types.h"
#include "user/user.h"
#include "kernel/fcntl.h"

int
main()
{
  int fd = open("out", O_WRONLY | O_CREATE | O_TRUNC);

  printf("open returned fd %d\n", fd);

  write(fd, "ooo\n", 4);

  exit(0);
}
close() 系统调用会关闭对应的文件描述符,而 dup() 会复制一个文件描述符,被复制的文件描述符和原来的描述符指向相同的文件。
2.2 fork(), exec()
使用 fork() 函数可以创建一个子进程,子进程相当于父进程的副本,包括指令和数据。fork 在子进程和父进程中都会返回。在子进程中,fork 返回子进程的 PID。在父进程中,fork 返回 0。如下:
// ex3.c: create a new process with fork()

#include "kernel/types.h"
#include "user/user.h"

int
main()
{
  int pid;

  pid = fork();

  printf("fork() returned %d\n", pid);

  if(pid == 0){
    printf("child\n");
  } else {
    printf("parent\n");
  }

  exit(0);
}
exec() 使用一个可执行文件替代当前进程,相当于让子进程去执行可执行文件的内容,一般 fork() 和 exec() 是一起使用的:
#include "kernel/types.h"
#include "user/user.h"

// ex5.c: fork then exec

int
main()
{
  int pid, status;

  pid = fork();
  if(pid == 0){
    char *argv[] = { "echo", "THIS", "IS", "ECHO", 0 };
    exec("echo", argv);
    printf("exec failed!\n");
    exit(1);
  } else {
    printf("parent waiting\n");
    wait(&status);
    printf("the child exited with status %d\n", status);
  }

  exit(0);
}
exec 会替换调用进程的内存,但将保留其文件打开表,从而使得调用 exec 来运行新程序可以实现I/O重定向:
#include "kernel/types.h"
#include "user/user.h"
#include "kernel/fcntl.h"

// ex6.c: run a command with output redirected

int
main()
{
  int pid;

  pid = fork();
  if(pid == 0){
    close(1);
    open("out", O_WRONLY | O_CREATE | O_TRUNC);

    char *argv[] = { "echo", "this", "is", "redirected", "echo", 0 };
    exec("echo", argv);
    printf("exec failed!\n");
    exit(1);
  } else {
    wait((int *) 0);
  }

  exit(0);
}
这里先关掉了标准输出描述符 1,然后使用 open 打开 out 文件,因为 open 会选择最小的可使用的文件描述符,所以文件 out 对应的文件描述符为 1,再使用 exec 执行 echo程序,echo 程序就会把写到到标准输出上的内容写到文件 out 里。
2.3 pipe()
管道 pipe 是作为一对文件描述符公开给进程的一个小的内核缓冲区,一个用于读取,另一个用于写入(其实就是两个文件描述符指向同一个缓冲区,一个用来读,一个用来写)。将数据写入管道的一端,使该数据可以从管道的另一端读取。管道为流程提供了一种通信的方式。
使用 pipe() 系统调用初始化一个管道,两个文件描述符放到数组里面,第一个文件描述符用于读,第二个用于写。使用管道可以让父进程和子进程通信,因为 fork 复制父进程的文件描述符表及其内存,所以子进程与父进程的打开文件表相同,故父子进程可以通过 pipe 的读写两端进行通信:
#include "kernel/types.h"
#include "user/user.h"

// ex8.c: communication between two processes

int
main()
{
  int n, pid;
  int fds[2];
  char buf[100];

  // create a pipe, with two FDs in fds[0], fds[1].
  pipe(fds);

  pid = fork();
  if (pid == 0) {
    // child
    write(fds[1], "this is ex8\n", 12);
  } else {
    // parent
    n = read(fds[0], buf, sizeof(buf));
    write(1, buf, n);
  }

  exit(0);
}
当 pipe 所有的写端被关闭后,使用 read() 系统调用会返回 0。
相比于临时文件,管道的一大优势就是会自动清理自己。管道可以通过任意长的数据量。
三、Lab util: Unix utilities
安装实验工具链:
sudo apt-get install git build-essential gdb-multiarch qemu-system-misc gcc-riscv64-linux-gnu binutils-riscv64-linux-gnu clone 并进入实验仓库:
git clone git://g.csail.mit.edu/xv6-labs-2023
cd xv6-labs-2023
编译并运行 xv6:
make qemu成功运行会打印如下信息:
xv6 kernel is booting

hart 2 starting
hart 1 starting
init: starting sh
$
下面开始完成实验。
3.1 Sleep(easy)
实现一个用户 sleep 函数,很简单,调用系统函数 sleep 就行:
#include "kernel/types.h"
#include "user/user.h"

/*
 * usage: sleep <tick>
 * to sleep for some tick
 */

int main(int argc, char *argv[])
{
        if (argc != 2)
        {
                fprintf(2, "usage: sleep <tick>\n");
                exit(1);
        }

        int ticks = atoi(argv[1]);


        sleep(ticks);

        exit(0);
}
3.2 pingpong(easy)
实现父进程和子进程之间交换一个字节,使用前面的 pipe 即可实现父子进程的通信,因为 pipe 不是全双工的,所以这里我们用两个管道:
#include "kernel/types.h"
#include "user/user.h"

int main(int argc, char *argv[])
{
        int pid, n;
        int p1[2], p2[2];
        char buf[10];

        pipe(p1);
        pipe(p2);

        pid = fork();
        if (pid ==  0)
        {
                /* child */
                close(p1[1]); // close pipe1's write port
                close(p2[0]);
                n = read(p1[0], buf, 1);
                if (n == 1)
                {
                        fprintf(1, "%d: received ping\n", getpid());
                }
                write(p2[1], buf, 1);
        }
        else
        {
                /* parent */
                close(p1[0]);
                close(p2[1]);
                write(p1[1], "a", 1);
                n = read(p2[0], buf, 1);
                if (n == 1)
                {
                        fprintf(1, "%d: received pong\n", getpid());
                }
        }
        exit(0);
}
3.3 primes(hard)
实现Sieve质数算法,大致流程如下图,每个进程打印第一个输入的质数,然后使用第一个质数筛选一遍剩下的数(即不可被第一个质数整除),这样到达最后一个进程即可打印全部质数:

代码:
#include "kernel/types.h"
#include "user/user.h"


void run_process(int rd_pipe_fd)
{
        int pipes[2];
        int num, n;
        n = read(rd_pipe_fd, &num, sizeof(num));

        /* 判断是否有输入 */
        if (n > 0)
        {
                /* 打印第一个质数 */
                fprintf(1, "prime %d\n", num);
                pipe(pipes);

                int pid = fork();

                if (pid > 0)
                {
                        int num1;
                        /* 筛选一遍输入的数 */
                        while ((n = read(rd_pipe_fd, &num1, sizeof(num1))) != 0)
                        {
                                if (num1 % num != 0)
                                        write(pipes[1], &num1, sizeof(num1));
                        }
                        close(pipes[1]);
                        close(rd_pipe_fd);
                        run_process(pipes[0]);

                        int status;
                        wait(&status);
                        exit(0);
                }
        }
        else
        {
                close(rd_pipe_fd);
                exit(0);
        }

        return;
}

int main(int argc, char *argv[])
{
        int i;
        int pipes[2];

        pipe(pipes);

        for (i = 2; i <= 35; i++)
        {
                write(pipes[1], &i, sizeof(i));
        }
        close(pipes[1]);

        run_process(pipes[0]);

        exit(0);
}
3.4 find (moderate)
实现 find 命令:
#include "kernel/types.h"
#include "kernel/stat.h"
#include "user/user.h"
#include "kernel/fs.h"
#include "kernel/fcntl.h"


char*
fmtname(char *path)
{
  char *p;

  // Find first character after last slash.
  for(p=path+strlen(path); p >= path && *p != '/'; p--)
    ;
  p++;

  return p;
}

void find(char *path, char *filename)
{
        int fd;
        char buf[512], *p;
        struct stat st;
        struct dirent dt;

        /* open file */
        if ((fd = open(path, O_RDONLY)) < 0)
        {
                fprintf(2, "cannot open %s\n", path);
                return;
        }

        /* stat file */
        if (fstat(fd, &st) < 0)
        {
                fprintf(2, "cannot stat %s\n");
                close(fd);
                return;
        }

        switch (st.type)
        {
                case T_DEVICE:
                case T_FILE:
                        if (strcmp(fmtname(path), filename) == 0)
                        {
                                fprintf(1, "%s\n", path);
                        }
                        break;

                case T_DIR:
                        strcpy(buf, path);
                        p = buf + strlen(buf);
                        *p++ = '/';
                        while ((read(fd, &dt, sizeof(dt))) == sizeof(dt))
                        {
                                if ((dt.inum == 0) || (strcmp(dt.name, ".") == 0) || (strcmp(dt.name, "..") == 0))
                                        continue;
                                memmove(p, dt.name, DIRSIZ);
                                p[DIRSIZ] = 0;
                                find(buf, filename);
                        }
                        break;
        }
        close(fd);

}

int main(int argc, char *argv[])
{
        if (argc != 3)
        {
                fprintf(2, "Usage: find <source dir> <filename>\n");
                exit(1);
        }

        find(argv[1], argv[2]);

        exit(0);
}
3.5 xargs (moderate)
因为不是所有指令都能直接读取标准输入作为参数,所以需要 xargs 进行转换:
#include "kernel/types.h"
#include "kernel/param.h"
#include "user/user.h"

int main(int argc, char *argv[])
{
        if (argc < 2)
        {
                fprintf(2, "Usage: xargs <command> ...");
                exit(1);
        }

        char buf[512], *p;
        int n, i;

        p = buf;

        /* read from the standard input */
        while ((n = read(0, p, sizeof(char))) > 0)
        {
                if (*p == '\n')
                {
                        char *args[MAXARG];
                        *p = '\0';

                        for (i = 1; i < argc; i++)
                        {
                                args[i-1] = argv[i];
                        }

                        char *p2 = buf;
                        char *ch_p;
                        while ((ch_p = strchr(p2, ' ')) != 0 && ch_p < buf + strlen(buf))
                        {
                                *ch_p = '\0';
                                args[i-1] = p2;
                                i++;
                                p2 = ch_p + 1;
                        }
                        args[i-1] = p2;

                        if (fork() == 0)
                        {
                                exec(args[0], args);
                        }
                        wait(0);

                        p = buf;
                }
                else
                {
                        p++;
                }
        }

        exit(0);
}
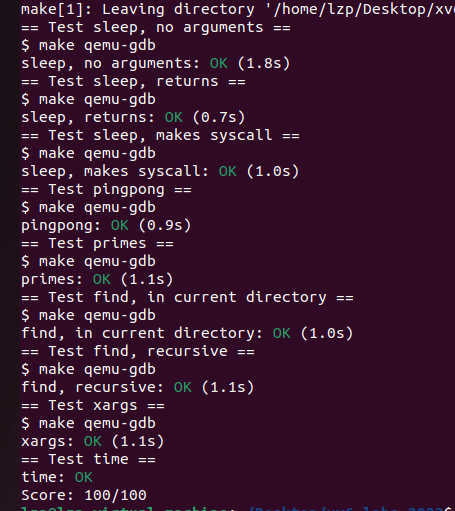
最后所有 test 均通过:
