🍨 本文为🔗365天深度学习训练营 中的学习记录博客
🍦 参考文章:365天深度学习训练营-第G7周:Semi-Supervised GAN 理论与实战(训练营内部成员可读)
🍖 原作者:K同学啊|接辅导、项目定制
🏡 运行环境:
电脑系统:Windows 10
语言环境:python 3.10
编译器:Pycharm 2022.1.1
深度学习环境:Pytorch
目录
一、理论知识讲解
二、代码实现
1、配置代码
2、初始化权重
3、定义算法模型
4、配置模型
5、训练模型
一、理论知识讲解
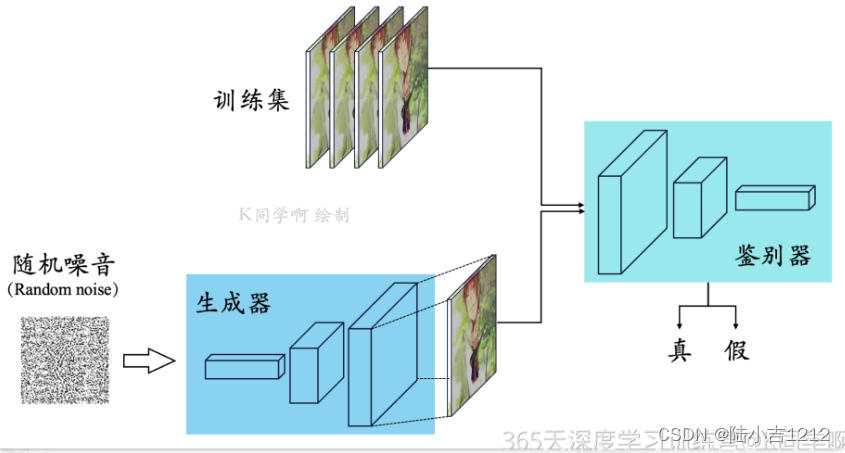
该算法将产生式对抗网络(GAN) 拓展到半监督学习,通过强制判别器D来输出类别标签。我们
在一个数据集上训练一个生成器G以及一个判别器D,输入是N类当中的一个。在训练的时候,判别器D被用于预测输入是属于N+1类中的哪一个,这个N+1是对应了生成器G的输出,这里的判别器
D同时也充当起了分类器C的效果。这种方法可以用于训练效果更好的判别器D,并且可以比普通的GAN产性更加高质量的样本。Semi-Supervised GAN有如下优点:
(1)作者对GANs做了一个新的扩展,允许它同时学习一个生成模型和一个分类器。我们把这个 扩展叫做半监督GAN或SGAN
(2)论文实验结果表明,SGAN在有限数据集比没有生成部分的基准分类器提升了分类性能。
(3)论文实验结果表明,SGAN可以显著地提升生成样本的质量并降低生成器的训练时间。 
二、代码实现
1、配置代码
import argparse
import os
import numpy as np
import math

import torchvision.transforms as transforms
from torchvision.utils import save_image

from torch.utils.data import DataLoader
from torchvision import datasets
from torch.autograd import Variable

import torch.nn as nn
import torch.nn.functional as F
import torch

os.makedirs("images", exist_ok=True)

parser = argparse.ArgumentParser()
parser.add_argument("--n_epochs", type=int, default=2, help="number of epochs of training")
parser.add_argument("--batch_size", type=int, default=64, help="size of the batches")
parser.add_argument("--lr", type=float, default=0.0002, help="adam: learning rate")
parser.add_argument("--b1", type=float, default=0.5, help="adam: decay of first order momentum of gradient")
parser.add_argument("--b2", type=float, default=0.999, help="adam: decay of first order momentum of gradient")
parser.add_argument("--n_cpu", type=int, default=2, help="number of cpu threads to use during batch generation")
parser.add_argument("--latent_dim", type=int, default=100, help="dimensionality of the latent space")
parser.add_argument("--num_classes", type=int, default=10, help="number of classes for dataset")
parser.add_argument("--img_size", type=int, default=32, help="size of each image dimension")
parser.add_argument("--channels", type=int, default=1, help="number of image channels")
parser.add_argument("--sample_interval", type=int, default=400, help="interval between image sampling")
opt = parser.parse_args(args=[])
print(opt)

cuda = True if torch.cuda.is_available() else False
Namespace(n_epochs=2, batch_size=64, lr=0.0002, b1=0.5, b2=0.999, n_cpu=2, latent_dim=100, num_classes=10, img_size=32, channels=1, sample_interval=400)
2、初始化权重
def weights_init_normal(m):
    classname = m.__class__.__name__
    if classname.find("Conv") != -1:
        torch.nn.init.normal_(m.weight.data, 0.0, 0.02)
    elif classname.find("BatchNorm") != -1:
        torch.nn.init.normal_(m.weight.data, 1.0, 0.02)
        torch.nn.init.constant_(m.bias.data, 0.0)
3、定义算法模型
class Generator(nn.Module):
    def __init__(self):
        super(Generator, self).__init__()

        self.label_emb = nn.Embedding(opt.num_classes, opt.latent_dim)

        self.init_size = opt.img_size // 4  # Initial size before upsampling
        self.l1 = nn.Sequential(nn.Linear(opt.latent_dim, 128 * self.init_size ** 2))

        self.conv_blocks = nn.Sequential(
            nn.BatchNorm2d(128),
            nn.Upsample(scale_factor=2),
            nn.Conv2d(128, 128, 3, stride=1, padding=1),
            nn.BatchNorm2d(128, 0.8),
            nn.LeakyReLU(0.2, inplace=True),
            nn.Upsample(scale_factor=2),
            nn.Conv2d(128, 64, 3, stride=1, padding=1),
            nn.BatchNorm2d(64, 0.8),
            nn.LeakyReLU(0.2, inplace=True),
            nn.Conv2d(64, opt.channels, 3, stride=1, padding=1),
            nn.Tanh(),
        )

    def forward(self, noise):
        out = self.l1(noise)
        out = out.view(out.shape[0], 128, self.init_size, self.init_size)
        img = self.conv_blocks(out)
        return img


class Discriminator(nn.Module):
    def __init__(self):
        super(Discriminator, self).__init__()

        def discriminator_block(in_filters, out_filters, bn=True):
            """Returns layers of each discriminator block"""
            block = [nn.Conv2d(in_filters, out_filters, 3, 2, 1), nn.LeakyReLU(0.2, inplace=True), nn.Dropout2d(0.25)]
            if bn:
                block.append(nn.BatchNorm2d(out_filters, 0.8))
            return block

        self.conv_blocks = nn.Sequential(
            *discriminator_block(opt.channels, 16, bn=False),
            *discriminator_block(16, 32),
            *discriminator_block(32, 64),
            *discriminator_block(64, 128),
        )

        # The height and width of downsampled image
        ds_size = opt.img_size // 2 ** 4

        # Output layers
        self.adv_layer = nn.Sequential(nn.Linear(128 * ds_size ** 2, 1), nn.Sigmoid())
        self.aux_layer = nn.Sequential(nn.Linear(128 * ds_size ** 2, opt.num_classes + 1), nn.Softmax())

    def forward(self, img):
        out = self.conv_blocks(img)
        out = out.view(out.shape[0], -1)
        validity = self.adv_layer(out)
        label = self.aux_layer(out)

        return validity, label
4、配置模型
# Loss functions
adversarial_loss = torch.nn.BCELoss()
auxiliary_loss = torch.nn.CrossEntropyLoss()

# Initialize generator and discriminator
generator = Generator()
discriminator = Discriminator()

if cuda:
    generator.cuda()
    discriminator.cuda()
    adversarial_loss.cuda()
    auxiliary_loss.cuda()

# Initialize weights
generator.apply(weights_init_normal)
discriminator.apply(weights_init_normal)

# Configure data loader
os.makedirs("../../data/mnist", exist_ok=True)
dataloader = torch.utils.data.DataLoader(
    datasets.MNIST(
        "../../data/mnist",
        train=True,
        download=True,
        transform=transforms.Compose(
            [transforms.Resize(opt.img_size), transforms.ToTensor(), transforms.Normalize([0.5], [0.5])]
        ),
    ),
    batch_size=opt.batch_size,
    shuffle=True,
)

# Optimizers
optimizer_G = torch.optim.Adam(generator.parameters(), lr=opt.lr, betas=(opt.b1, opt.b2))
optimizer_D = torch.optim.Adam(discriminator.parameters(), lr=opt.lr, betas=(opt.b1, opt.b2))

FloatTensor = torch.cuda.FloatTensor if cuda else torch.FloatTensor
LongTensor = torch.cuda.LongTensor if cuda else torch.LongTensor
Downloading http://yann.lecun.com/exdb/mnist/train-images-idx3-ubyte.gz Downloading http://yann.lecun.com/exdb/mnist/train-images-idx3-ubyte.gz to ../../data/mnist\MNIST\raw\train-images-idx3-ubyte.gzExtracting ../../data/mnist\MNIST\raw\train-images-idx3-ubyte.gz to ../../data/mnist\MNIST\raw Downloading http://yann.lecun.com/exdb/mnist/train-labels-idx1-ubyte.gz Downloading http://yann.lecun.com/exdb/mnist/train-labels-idx1-ubyte.gz to ../../data/mnist\MNIST\raw\train-labels-idx1-ubyte.gzExtracting ../../data/mnist\MNIST\raw\train-labels-idx1-ubyte.gz to ../../data/mnist\MNIST\raw Downloading http://yann.lecun.com/exdb/mnist/t10k-images-idx3-ubyte.gz Downloading http://yann.lecun.com/exdb/mnist/t10k-images-idx3-ubyte.gz to ../../data/mnist\MNIST\raw\t10k-images-idx3-ubyte.gzExtracting ../../data/mnist\MNIST\raw\t10k-images-idx3-ubyte.gz to ../../data/mnist\MNIST\raw Downloading http://yann.lecun.com/exdb/mnist/t10k-labels-idx1-ubyte.gz Downloading http://yann.lecun.com/exdb/mnist/t10k-labels-idx1-ubyte.gz to ../../data/mnist\MNIST\raw\t10k-labels-idx1-ubyte.gzExtracting ../../data/mnist\MNIST\raw\t10k-labels-idx1-ubyte.gz to ../../data/mnist\MNIST\raw
5、训练模型
# ----------
#  Training
# ----------

for epoch in range(opt.n_epochs):
    for i, (imgs, labels) in enumerate(dataloader):

        batch_size = imgs.shape[0]

        # Adversarial ground truths
        valid = Variable(FloatTensor(batch_size, 1).fill_(1.0), requires_grad=False)
        fake = Variable(FloatTensor(batch_size, 1).fill_(0.0), requires_grad=False)
        fake_aux_gt = Variable(LongTensor(batch_size).fill_(opt.num_classes), requires_grad=False)

        # Configure input
        real_imgs = Variable(imgs.type(FloatTensor))
        labels = Variable(labels.type(LongTensor))

        # -----------------
        #  Train Generator
        # -----------------

        optimizer_G.zero_grad()

        # Sample noise and labels as generator input
        z = Variable(FloatTensor(np.random.normal(0, 1, (batch_size, opt.latent_dim))))

        # Generate a batch of images
        gen_imgs = generator(z)

        # Loss measures generator's ability to fool the discriminator
        validity, _ = discriminator(gen_imgs)
        g_loss = adversarial_loss(validity, valid)

        g_loss.backward()
        optimizer_G.step()

        # ---------------------
        #  Train Discriminator
        # ---------------------

        optimizer_D.zero_grad()

        # Loss for real images
        real_pred, real_aux = discriminator(real_imgs)
        d_real_loss = (adversarial_loss(real_pred, valid) + auxiliary_loss(real_aux, labels)) / 2

        # Loss for fake images
        fake_pred, fake_aux = discriminator(gen_imgs.detach())
        d_fake_loss = (adversarial_loss(fake_pred, fake) + auxiliary_loss(fake_aux, fake_aux_gt)) / 2

        # Total discriminator loss
        d_loss = (d_real_loss + d_fake_loss) / 2

        # Calculate discriminator accuracy
        pred = np.concatenate([real_aux.data.cpu().numpy(), fake_aux.data.cpu().numpy()], axis=0)
        gt = np.concatenate([labels.data.cpu().numpy(), fake_aux_gt.data.cpu().numpy()], axis=0)
        d_acc = np.mean(np.argmax(pred, axis=1) == gt)

        d_loss.backward()
        optimizer_D.step()

        batches_done = epoch * len(dataloader) + i
        if batches_done % opt.sample_interval == 0:
            save_image(gen_imgs.data[:25], "images/%d.png" % batches_done, nrow=5, normalize=True)

    print(
        "[Epoch %d/%d] [Batch %d/%d] [D loss: %f, acc: %d%%] [G loss: %f]"
        % (epoch, opt.n_epochs, i, len(dataloader), d_loss.item(), 100 * d_acc, g_loss.item())
    )
[Epoch 0/2] [Batch 937/938] [D loss: 1.358861, acc: 50%] [G loss: 0.671799]
[Epoch 1/2] [Batch 937/938] [D loss: 1.343094, acc: 50%] [G loss: 0.681119]