文章目录
- 一、前言
- 二、系列文章
- 三、准备工作
- 3.1 查找PWM引脚
- 3.2 原理图:确认引脚位置
- 3.3 PWM Controller
- 四、查阅PWM bindings
- 五、编写设备树节点
- 5.1 实现节点:pwm-leds
- 5.2 测试命令
- 六、后语
一、前言
在完成了基于GPIO的LED设备驱动的文章后,本文继续介绍基于PWM的LED设备驱动。同样的,站在巨人的肩膀上,不写一行代码……,但工资还是要领……
二、系列文章
1.基于GPIO的LED设备驱动
链接:实现安卓LED设备驱动:不写一行代码
2.基于PWM的LED设备驱动:即本文
三、准备工作
3.1 查找PWM引脚
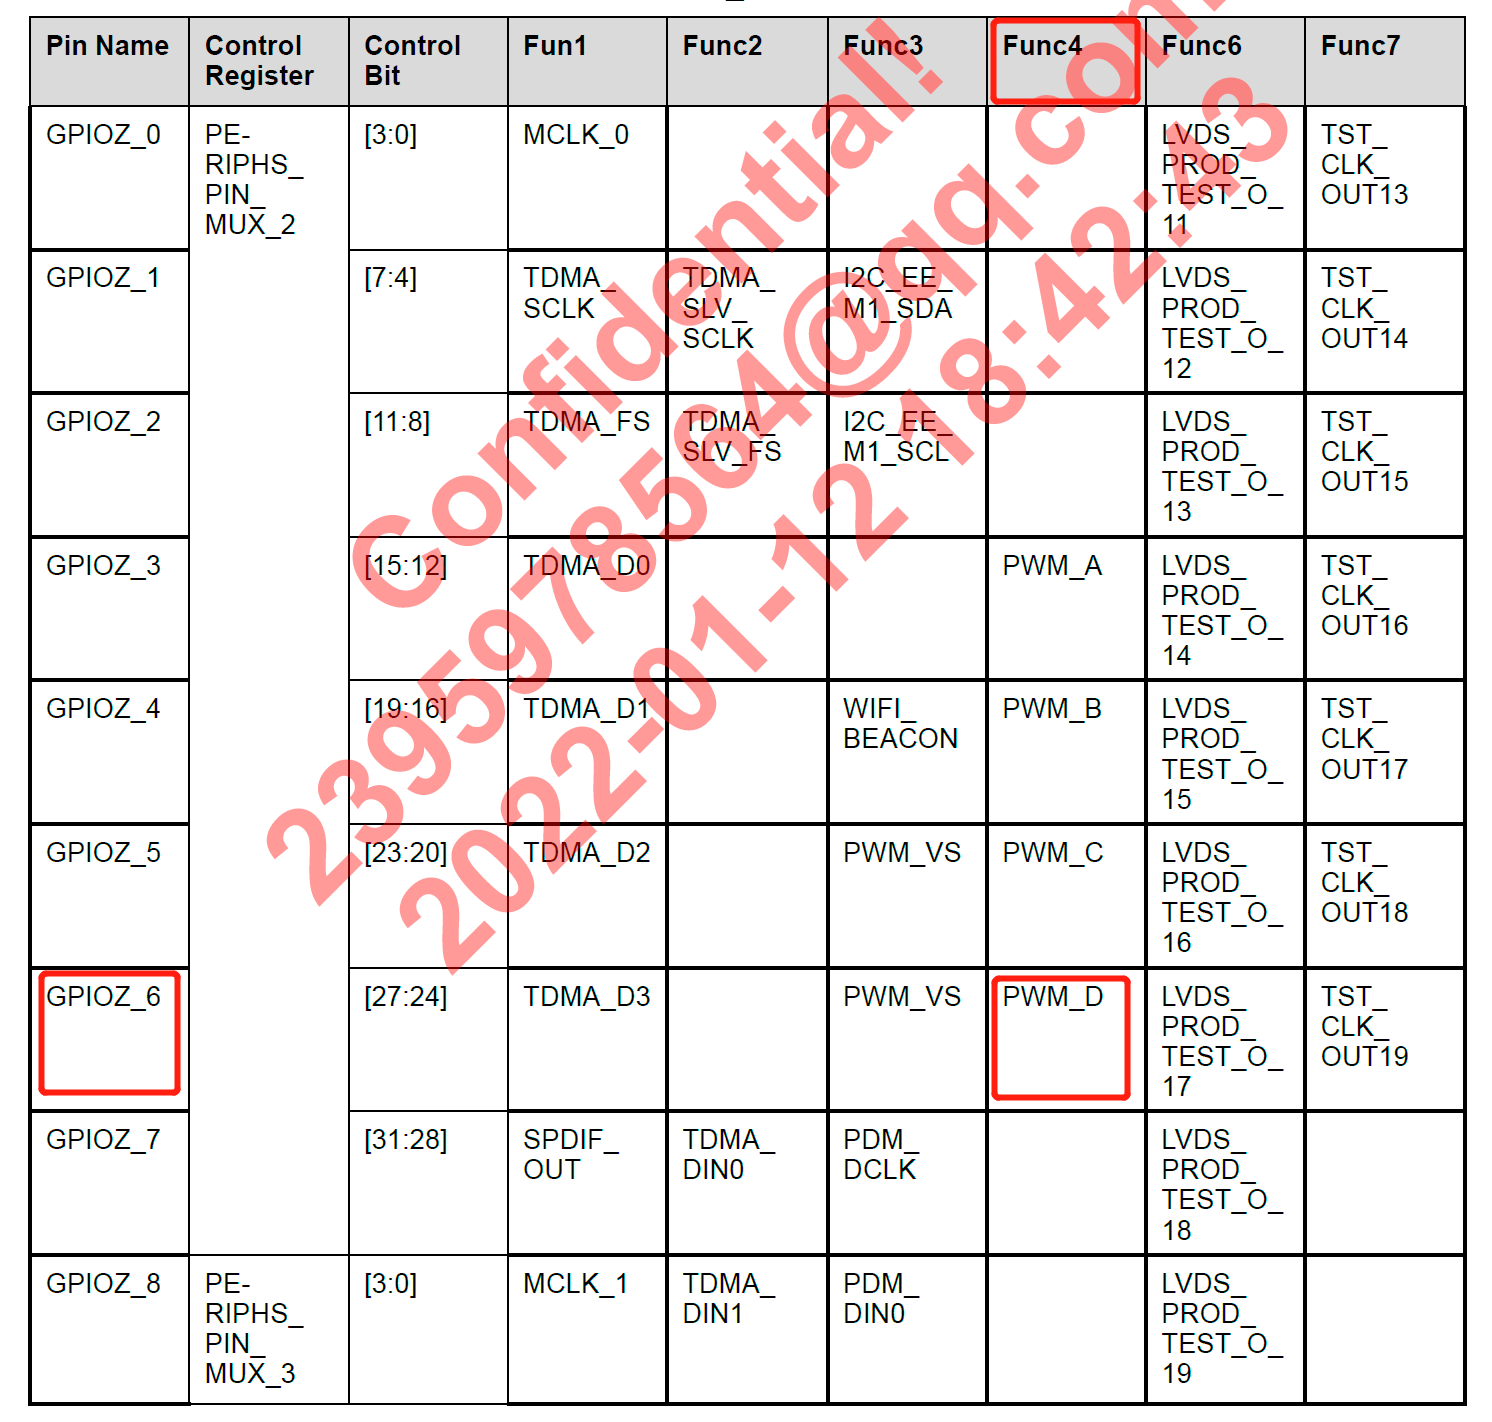
(1)通过查看Datasheet,结合原理图,姑且选择GPIOZ_6作为实验所用的PWM引脚。
(2)GPIOZ_6在复用为Func4时,可作为PWM_D使用
3.2 原理图:确认引脚位置
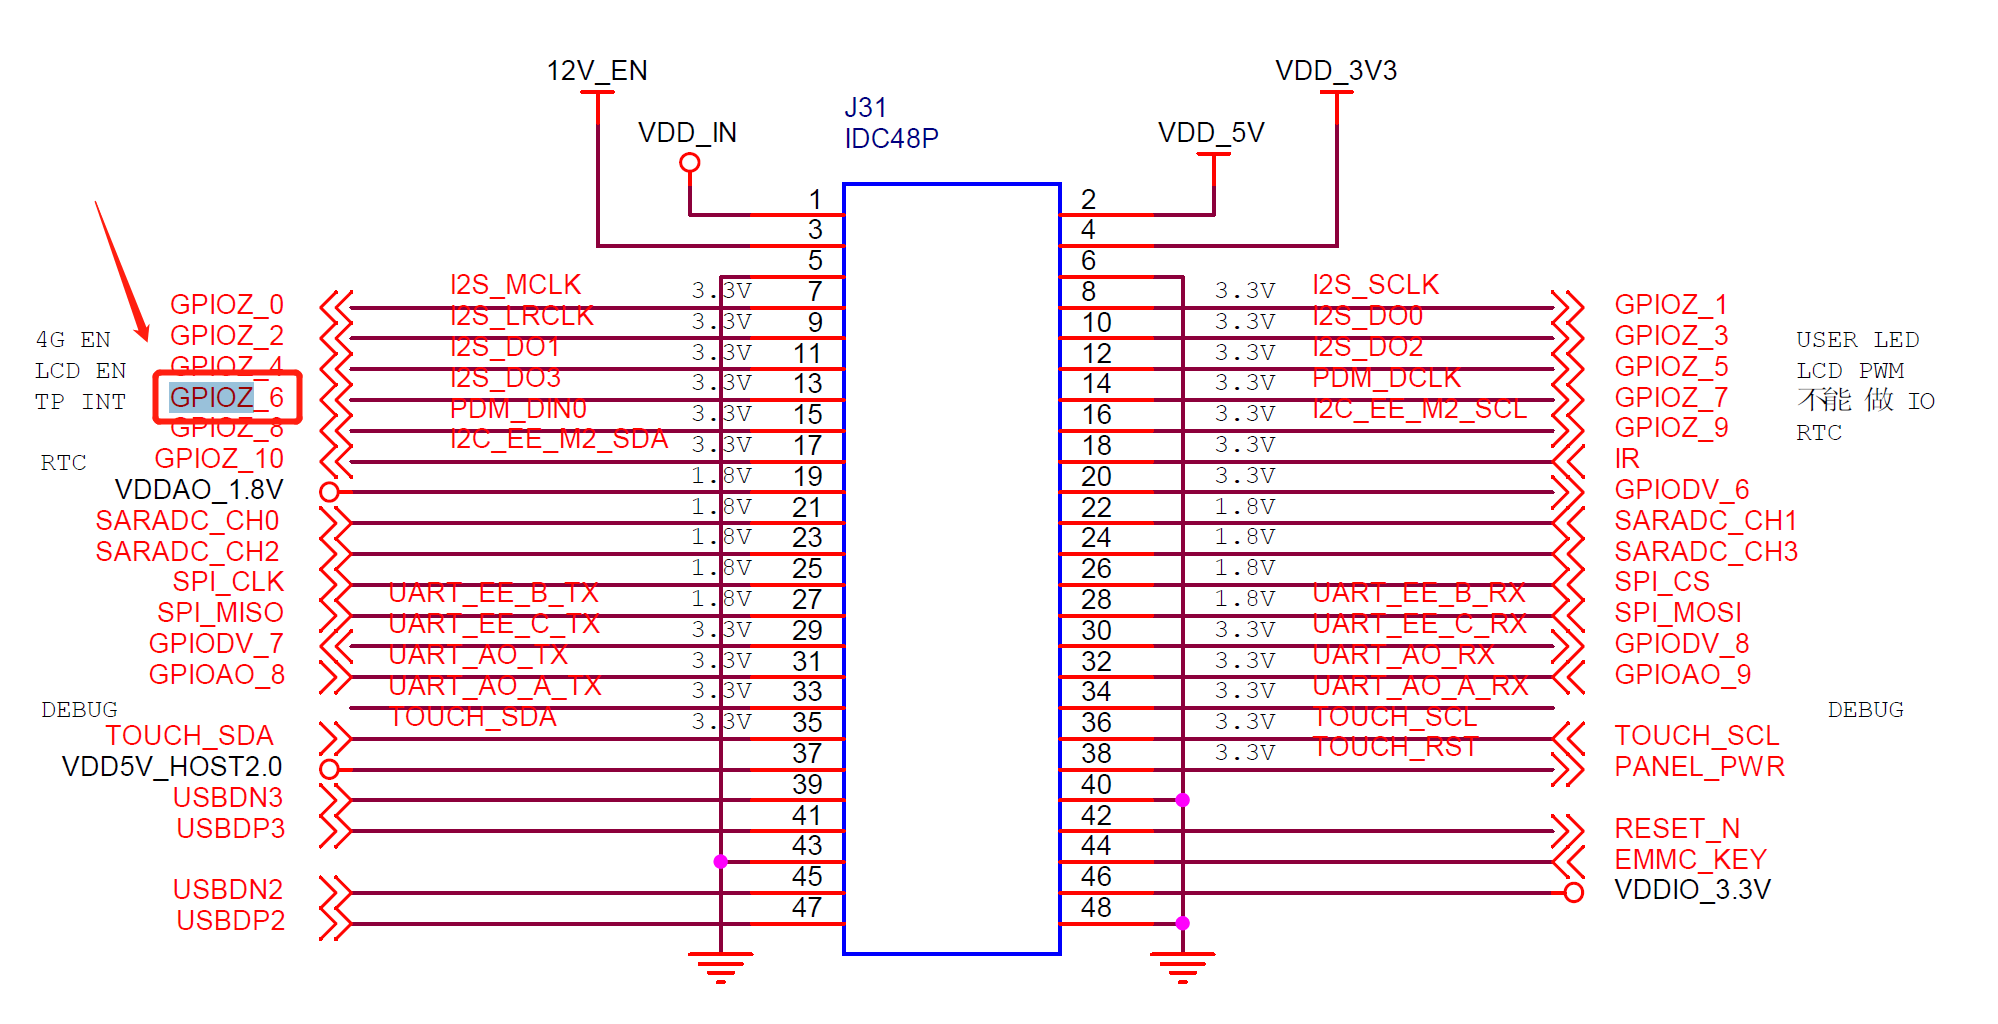
(1)GPIOZ_6引脚,通过原理图可知,它位于J31插座左边的第7个PIN,即PIN-13
3.3 PWM Controller
(1)通过查阅板子的DTS设备树文件,查找PWM_D的控制器
(2)如下所示,控制PWM_D的控制器名为:pwm_cd, 此控制器同时控制了PWM_C和PWM_D
//文件:common\arch\arm\boot\dts\amlogic\mesontl1.dtsi

			pwm_cd: pwm@1a000 {
				compatible = "amlogic,tl1-ee-pwm";
				reg = <0x1a000 0x20>;
				#pwm-cells = <3>;
				clocks = <&xtal>,
						<&xtal>,
						<&xtal>,
						<&xtal>;
				clock-names = "clkin0",
						"clkin1",
						"clkin2",
						"clkin3";
				status = "disabled";
			};
四、查阅PWM bindings
想要站在大神的肩膀上,自然要查看大神遗留的Leds-pwm说明文档,以了解什么样的设备才能与大神的leds-pwm驱动绑定
- 文件位置:Documentation/devicetree/bindings/leds/leds-pwmtxt
LED connected to PWM

Required properties:
- compatible : should be "pwm-leds".

Each LED is represented as a sub-node of the pwm-leds device.  Each
node's name represents the name of the corresponding LED.

LED sub-node properties:
- pwms : PWM property to point to the PWM device (phandle)/port (id) and to
  specify the period time to be used: <&phandle id period_ns>;
- pwm-names : (optional) Name to be used by the PWM subsystem for the PWM device
  For the pwms and pwm-names property please refer to:
  Documentation/devicetree/bindings/pwm/pwm.txt
- max-brightness : Maximum brightness possible for the LED
- active-low : (optional) For PWMs where the LED is wired to supply
  rather than ground.
- label :  (optional)
  see Documentation/devicetree/bindings/leds/common.txt
- linux,default-trigger :  (optional)
  see Documentation/devicetree/bindings/leds/common.txt

Example:

twl_pwm: pwm {
	/* provides two PWMs (id 0, 1 for PWM1 and PWM2) */
	compatible = "ti,twl6030-pwm";
	#pwm-cells = <2>;
};

twl_pwmled: pwmled {
	/* provides one PWM (id 0 for Charing indicator LED) */
	compatible = "ti,twl6030-pwmled";
	#pwm-cells = <2>;
};

pwmleds {
	compatible = "pwm-leds";
	kpad {
		label = "omap4::keypad";
		pwms = <&twl_pwm 0 7812500>;
		max-brightness = <127>;
	};

	charging {
		label = "omap4:green:chrg";
		pwms = <&twl_pwmled 0 7812500>;
		max-brightness = <255>;
	};
};
五、编写设备树节点
5.1 实现节点:pwm-leds
	pwmleds {
		status = "okay";
		compatible = "pwm-leds";
			pwm_cd-led {
				//向&pwm_cd控制器传送了3个参数,分别是:1.index=6   2.Period=30541  3.极性=0
				pwms = <&pwm_cd 3 30541 0>;  //GPIOZ-6的index=3,这个具体要查阅datasheet和驱动源码
				max-brightness = <255>; //设置Levels,最大256级调整
			};
	};
5.2 测试命令
(1)进入pwm_cd-led设备目录
:/sys/class/leds/pwm_cd-led # ls
brightness device max_brightness power subsystem trigger uevent
:/sys/class/leds/pwm_cd-led # cat brightness
0
:/sys/class/leds/pwm_cd-led # cat max_brightness
255

(2)尝试不同LEV的亮度值,值越大则占空比越大(越亮),反正则越小(越暗)
:/sys/class/leds/pwm_cd-led # echo 200 >  brightness
:/sys/class/leds/pwm_cd-led # echo 100 >  brightness
:/sys/class/leds/pwm_cd-led # echo 255 >  brightness
:/sys/class/leds/pwm_cd-led # echo 1 >  brightness
:/sys/class/leds/pwm_cd-led # echo 20 >  brightness
:/sys/class/leds/pwm_cd-led # echo 80 >  brightness
:/sys/class/leds/pwm_cd-led # echo 200 >  brightness
:/sys/class/leds/pwm_cd-led # echo 250 >  brightness
:/sys/class/leds/pwm_cd-led #
六、后语
继续周末爆肝……
