目录
一、创建vue项目并运行
二、vue-cli中的路由使用
三、element-ui框架、实现页面布局以及vue-路由
四、前端登录页面
五、user登录后端接口完善【后端】
六、user登录前端-请求工具-请求发起【前端】
七、请求的跨域-访问策略
八、完善项目的页面布局、导航菜单以及权限划分
九、实现疫苗分类的查询及分析流程
十、疫苗分类--页面完善、以及添加、修改及删除实现
一、创建vue项目并运行
--使用管理员身份运行VSCode,然后在终端打开dos命令行界面

--设置国内的镜像
#经过下面的配置,以后所有的 npm install 都会经过淘宝的镜像地址下载
npm config set registry https://registry.npm.taobao.org
--安装vue-cli的插件\全局安装
npm install vue-cli -g

npm install -g @vue/cli-init  或者  npm install -g '@vue/cli-init'
--安装webpack的插件\全局安装
npm install -g webpack注意:shell命令策略设置【当命令执行失败时操作、没有问题就不用管、继续下一步即可】
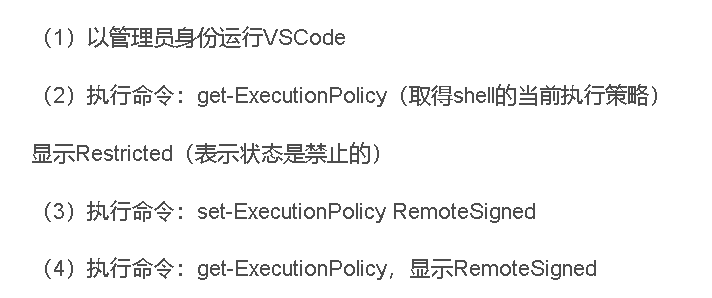
像这种都是策略问题,用管理员打开vscode,然后设置策略
get-ExecutionPolicy

执行set-ExecutionPolicy RemoteSigned  然后 get-ExecutionPolicy,显示RemoteSigned就是ok了

set-ExecutionPolicy RemoteSigned
--通过vue-cli脚手架来创建一个项目
vue init webpack vaccinum-vue
--切换到当前项目路径下、然后在启动vue项目测试【npm run dev】
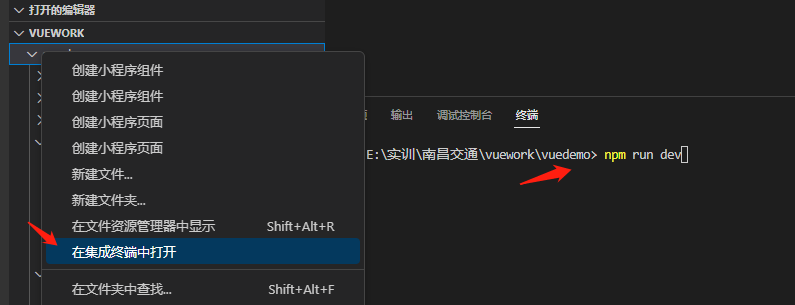
cd vaccinum-vue

npm run dev

二、vue-cli中的路由使用
路由主要是实现页面跳转【实际上是请求地址映射vue页面】
--在components中创建两个vue页面文件
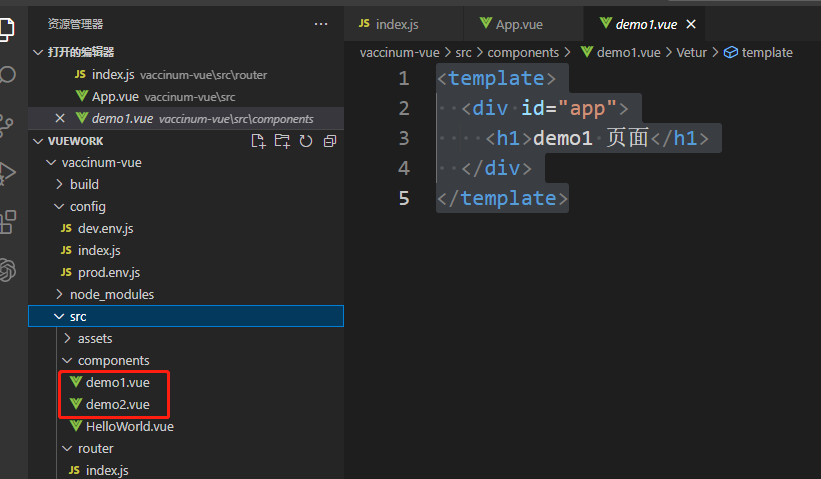
<template>
  <div class="hello">
    <h2>Demo1111 Links</h2>
  </div>
</template>
<template>
<div class="hello">
<h2>Demo222 Links</h2>
</div>
</template>--在router路由配置文件中配置页面的访问地址


import Vue from 'vue'
import Router from 'vue-router'
import HelloWorld from '@/components/HelloWorld'
Vue.use(Router)
export default new Router({
  routes: [
    {
      path: '/',
      name: 'HelloWorld',
      component: HelloWorld
    },
    {
      path: '/demo1',
      name: 'demo1',
      component: ()=>import('@/components/demo1')
    },
    {
      path: '/demo2',
      name: 'demo2',
      component: ()=>import('@/components/demo2')
    }
  ]
})
--在App.vue中提供两个链接,然后测试

<!--  两个链接 -->
    <router-link to="/demo1">demo1</router-link>
    <router-link to="/demo2">demo2</router-link>
    <!--  两个链接 -->
三、element-ui框架、实现页面布局以及vue-路由
--布局效果图

 --element-ui网站【参考学习】
https://element.eleme.cn/#/zh-CN/component/installation--ctrl+c 结束程序,然后执行命令下载element-ui依赖
--添加elementui依赖
--在vue项目目录下使用下面命令,添加ElementUI 依赖
npm i element-ui -S--在src中的main.js中配置、导入element-ui组件及样式文件

// 导入ElementUI
import ElementUI from 'element-ui';
import 'element-ui/lib/theme-chalk/index.css';
Vue.use(ElementUI);//在vue使用ElementUI
--创建页面

--页面布局:在components下创建Layout.vue
<template>
  <div>
    <!-- 头部 -->
    <Header />
    <!-- 主题 -->

    <div style="display: flex">
      <!-- 主题-左边 -->
      <Aside />
      <!-- 主题-右边  flex: 1 自适应布局 -->
      <router-view style="flex: 1" />
    </div>
  </div>
</template>

    <!-- js -->
    <script>
// 导入组件
import Header from "@/components/Header";
import Aside from "@/components/Aside";

export default {
  name: "Layout",
  //  使用哪些组件
  components: {
    Aside,
    Header,
  },
};
</script>
--页面布局:在components下创建Header.vue文件
<template>
  <div
    style="
      height: 50px;
      line-height: 50px;
      border-bottom: 1px solid #ccc;
      display: flex;
    "
  >
    <div
      style="
        width: 200px;
        padding-left: 30px;
        font-weight: bold;
        color: dodgerblue;
      "
    >
      管理系统
    </div>
    <div style="flex: 1"></div>
    <div style="width: 150px">
      <el-dropdown @command="handleCommand">
        <span class="el-dropdown-link">
          <el-avatar
            src="https://cube.elemecdn.com/0/88/03b0d39583f48206768a7534e55bcpng.png"
          ></el-avatar>
          admin<i class="el-icon-arrow-down el-icon--right"></i>
        </span>
        <el-dropdown-menu slot="dropdown">
          <el-dropdown-item command="a">个人信息</el-dropdown-item>
          <el-dropdown-item command="b">退出系统</el-dropdown-item>
        </el-dropdown-menu>
      </el-dropdown>
    </div>
  </div>
</template>

    <script>
import router from "@/router";

export default {
  name: "Header",
  data() {
    return {
      name: "未登录",
    };
  },
  created() {},
  methods: {
    handleCommand(command) {},
  },
};
</script>
--页面布局:在components下创建Aside.vue文件
<template>
  <div>
    <el-menu
      style="width: 250px; min-height: calc(100vh - 50px)"
      default-active="2"
      class="el-menu-vertical-demo"
      @open="handleOpen"
      @close="handleClose"
      :default-openeds="[path]"
      router
    >
      <el-submenu index="1">
        <template slot="title">
          <i class="el-icon-location"></i>
          <span>导航一</span>
        </template>
        <el-menu-item-group>
          <template slot="title">分组一</template>
          <el-menu-item index="/list">选项1</el-menu-item>
          <el-menu-item index="1-2">选项2</el-menu-item>
        </el-menu-item-group>
        <el-menu-item-group title="分组2">
          <el-menu-item index="1-3">选项3</el-menu-item>
        </el-menu-item-group>
        <el-submenu index="1-4">
          <template slot="title">选项4</template>
          <el-menu-item index="1-4-1">选项1</el-menu-item>
        </el-submenu>
      </el-submenu>
      <el-menu-item index="2">
        <i class="el-icon-menu"></i>
        <span slot="title">导航二</span>
      </el-menu-item>
      <el-menu-item index="3" disabled>
        <i class="el-icon-document"></i>
        <span slot="title">导航三</span>
      </el-menu-item>
      <el-menu-item index="4">
        <i class="el-icon-setting"></i>
        <span slot="title">导航四</span>
      </el-menu-item>
    </el-menu>
  </div>
</template>

    <script>
export default {
  data() {
    return {
      //path变量
      path: this.$route.path,
    };
  },
  methods: {
    handleOpen(key, keyPath) {
      console.log(key, keyPath);
    },
    handleClose(key, keyPath) {
      console.log(key, keyPath);
    },
  },
};
</script>
--把App.vue的图标注释掉

--路由:在router下index.js修改请求映射

import Vue from 'vue'
import Router from 'vue-router'
//导入局部的页面Layout
import Layout from '@/components/Layout'
Vue.use(Router)
export default new Router({
  routes: [
    // 也就是--   / 映射到了 Layout的页面
    {
      path: '/',
      name: 'Layout',
      component: Layout
    }
  ]
})
--重新启动前端项目-访问即可

四、前端登录页面
--1、在components下创建Login.vue
<template>
  <div class="login">
    <!-- 登录表单 v-model -->
    <div class="login-form">
      <!-- :gutter="20" -->
      <el-row :gutter="20">
        <el-col :span="12">
          <div>
            <img
              src="../assets/logo.png"
              alt=""
              style="
                position: relative;
                left: -100px;
                width: 250px;
                height: 85px;
              "
            />
          </div>
          <div style="position: relative; left: 50px">
            <img src="../assets/icon-big.png" alt="" />
          </div>
        </el-col>
        <el-col :span="2"></el-col>
        <el-col :span="10">
          <!-- 登录的form组件【提交的信息】 -->
          <el-form
            ref="loginForm"
            :model="loginForm"
            style="margin-left: 150px; margin-top: 150px"
          >
            <el-form-item>
              <el-tabs
                v-model="roleType"
                @tab-click="selectRole"
                :stretch="true"
              >
                <el-tab-pane label="用户登录" name="用户"></el-tab-pane>
                <el-tab-pane label="医生登录" name="医生"></el-tab-pane>
                <el-tab-pane label="管理员登录" name="管理员"></el-tab-pane>
              </el-tabs>
            </el-form-item>
            <el-form-item prop="name" v-if="roleType === '管理员'">
              <el-input
                prefix-icon="el-icon-user"
                v-model="loginForm.name"
                type="text"
                placeholder="账号"
              >
              </el-input>
            </el-form-item>
            <el-form-item prop="phone" v-if="roleType !== '管理员'">
              <el-input
                prefix-icon="el-icon-user"
                v-model="loginForm.phone"
                type="text"
                placeholder="账号"
              >
              </el-input>
            </el-form-item>
            <el-form-item prop="password">
              <el-input
                prefix-icon="el-icon-lock"
                v-model="loginForm.password"
                autocomplete="off"
                show-password
                placeholder="密码"
              >
              </el-input>
            </el-form-item>
            <el-form-item prop="code" v-if="captchaEnabled">
              <el-input
                v-model="loginForm.code"
                placeholder="请输入验证码"
                style="width: 63%"
              >
              </el-input>
              <div class="login-code">
                <el-avatar
                  shape="square"
                  style="width: 100px"
                  :src="codeUrl"
                ></el-avatar>
              </div>
            </el-form-item>
            <el-form-item style="width: 100%">
              <el-button
                size="medium"
                type="primary"
                style="width: 100%; background-color: rgb(77, 167, 252)"
                @click="doLogin()"
              >
                <span style="font-size: 20px">登 录</span>
              </el-button>
            </el-form-item>
            <el-form-item style="width: 100%">
              <el-button
                size="medium"
                type="primary"
                style="width: 100%; background-color: rgb(77, 167, 252)"
                v-if="roleType == '用户'"
                @click="registerFormVisible = true"
              >
                <span style="font-size: 20px">注 册</span>
              </el-button>
            </el-form-item>
          </el-form>
          <!-- 登录的form组件【提交的信息】 -->
        </el-col>
      </el-row>
    </div>
    <!-- 用户注册表单 -->
    <el-dialog
      title="用户注册"
      :visible.sync="registerFormVisible"
      :close-on-click-modal="false"
    >
      <el-form
        label-position="top"
        :model="registerForm"
        status-icon
        ref="registerForm"
        label-width="100px"
        class="demo-registerForm"
      >
        <!-- 头像 -->
        <el-form-item label="头像" prop="image">
          <el-upload
            class="avatar-uploader"
            action="http://localhost:80/vaccinum/common/upload"
            :show-file-list="false"
            :on-success="handleAvatarSuccess"
            :before-upload="beforeAvatarUpload"
          >
            <img v-if="imageUrl" :src="imageUrl" class="avatar" />
            <i v-else class="el-icon-plus avatar-uploader-icon"></i>
          </el-upload>
          <!-- 隐藏输入字段,用来存储图片的文件名 -->
          <input type="hidden" name="avatar" v-model="registerForm.image" />
        </el-form-item>
        <!-- 用户名\性别 -->
        <el-row :gutter="20">
          <el-col :span="12">
            <el-form-item label="用户名" prop="name">
              <el-input
                type="text"
                v-model="registerForm.name"
                autocomplete="off"
              ></el-input>
            </el-form-item>
          </el-col>
          <el-col :span="12">
            <el-form-item label="性别" prop="sex">
              <el-input
                type="text"
                v-model="registerForm.sex"
                autocomplete="off"
              ></el-input>
            </el-form-item>
          </el-col>
        </el-row>
        <!-- 年龄\身份证号 -->
        <el-row :gutter="20">
          <el-col :span="12">
            <el-form-item label="年龄" prop="age">
              <el-input
                type="text"
                v-model="registerForm.age"
                autocomplete="off"
              ></el-input>
            </el-form-item>
          </el-col>
          <el-col :span="12">
            <el-form-item label="身份证号" prop="codeid">
              <el-input
                type="text"
                v-model="registerForm.codeid"
                autocomplete="off"
              ></el-input>
            </el-form-item>
          </el-col>
        </el-row>
        <!-- 密码\密码 -->
        <el-row :gutter="20">
          <el-col :span="12">
            <el-form-item label="密 码" prop="password">
              <el-input
                type="password"
                v-model="registerForm.password"
                autocomplete="off"
              ></el-input>
            </el-form-item>
          </el-col>
          <el-col :span="12">
            <el-form-item label="确认密码" prop="password_check">
              <el-input
                type="password"
                v-model="registerForm.password_check"
                autocomplete="off"
              ></el-input>
            </el-form-item>
          </el-col>
        </el-row>
        <!-- 手机号\地址 -->
        <el-row :gutter="20">
          <el-col :span="12">
            <el-form-item label="手机号" prop="phone">
              <el-input
                type="text"
                v-model="registerForm.phone"
                autocomplete="off"
              ></el-input>
            </el-form-item>
          </el-col>
          <el-col :span="12">
            <el-form-item label="地址" prop="address">
              <el-input
                type="text"
                v-model="registerForm.address"
                autocomplete="off"
              ></el-input>
            </el-form-item>
          </el-col>
        </el-row>
        <el-form-item>
          <el-button type="primary" @click="registerSumbit">提交</el-button>
          <el-button
            @click="
              registerFormVisible = false;
              this.registerForm = {
                name: '',
                password: '',
                password_check: '',
                phone: '',
              };
            "
            >取消</el-button
          >
        </el-form-item>
      </el-form>
    </el-dialog>
    <!-- 用户注册表单 -->
    <!-- 底部 -->
    <div class="el-login-footer">
      <span>Copyright © 2018-2022 gec All Rights Reserved.</span>
    </div>
    <!-- 底部 -->
  </div>
</template>
    <script>
import router from "@/router";
export default {
  name: "Login",
  data() {
    return {
      password_type: "password", //密码显示类型
      imageUrl: "", //头像上传路径
      codeUrl: "",
      loginForm: {
        //登录的表单数据
        name: "12345678909",
        phone: "12345678909",
        password: "123",
        code: "",
      },
      registerForm: {
        //注册的表单数据
        name: "",
        sex: "",
        age: "",
        password: "",
        password_check: "",
        image: "",
        codeid: "",
        phone: "",
        address: "",
      },
      loading: false,
      captchaEnabled: true,
      register: true,
      registerFormVisible: false,
      roleType: "用户",
    };
  },
  created() {},
  methods: {
    //修改密码显示类型
    cho() {
      this.password_type = this.password_type == "text" ? "password" : "text";
    }, //选择哪个用户类型就显示那个类型
    selectRole() {
      console.log(this.roleType); // this.roleType = command;
    },
    //登录的处理函数
    doLogin() {
      if (this.loginForm.phone=="12345678909"&&this.loginForm.password=="123") {
        this.$message.success("登录成功!");
        //跳转到Layout页面【首页】
        router.push("/Layout");
      } else {
        //登录失败提示信息
        this.$message.error("登录失败!");
      }
    }, //注册函数
    registerSumbit() {
      //发起了异步请求
      request
        .post("register", this.registerForm) //回调函数
        .then((res) => {
          if (res.flag == true) {
            this.$message.success("注册成功!");
            this.registerFormVisible = false;
            this.registerForm = {
              name: "",
              sex: "",
              age: "",
              password: "",
              password_check: "",
              image: "",
              codeid: "",
              phone: "",
              address: "",
            };
            this.imageUrl = "";
          } else {
            //注册失败提示信息
            this.$message.error(res.message);
          }
        });
    }, //在上传成功后处理函数中,获取服务端返回的图片文件名或URL
    handleAvatarSuccess(res, file) {
      this.registerForm.image = res.fileName;
      this.imageUrl = URL.createObjectURL(file.raw);
    }, // 在上传之前,清空旧图片信息
    beforeAvatarUpload(file) {
      this.registerForm.image = "";
      this.imageUrl = "";
      const isJPG = file.type === "image/jpeg";
      const isLt2M = file.size / 1024 / 1024 < 2;
      if (!isJPG) {
        this.$message.error("上传头像图片只能是 JPG 格式!");
      }
      if (!isLt2M) {
        this.$message.error("上传头像图片大小不能超过 2MB!");
      }
      return isJPG && isLt2M;
    },
  },
};
</script>

    <style>
.el-dialog {
  border-radius: 45px;
}
.login {
  position: absolute;
  width: 100%;
  height: 100%;
  overflow: hidden;
  background-image: url("../assets/1.png");
  background-size: 100% 100%;
  background-repeat: no-repeat;
}
.title {
  margin: 0px auto 30px auto;
  text-align: center;
  color: #707070;
}
.login-form {
  margin: 150px auto;
  background-image: url("../assets/beijing.png");
  border-radius: 45px;
  background-position: -35px, -35px;
  width: 1240px;
  height: 657px;
  /* padding: 25px 25px 5px 25px; */
}
.el-input {
  height: 38px;
}
input {
  height: 38px;
}
.input-icon {
  height: 39px;
  width: 14px;
  margin-left: 2px;
}
.login-tip {
  font-size: 13px;
  text-align: center;
  color: #bfbfbf;
}
.login-code {
  width: 33%;
  height: 38px;
  float: right;
}
.el-login-footer {
  height: 40px;
  line-height: 40px;
  position: fixed;
  bottom: 0;
  width: 100%;
  text-align: center;
  /* color: #fff; */
  font-family: Arial;
  font-size: 12px;
  letter-spacing: 1px;
}
.login-code-img {
  height: 38px;
}
.avatar-uploader .el-upload {
  /* border: 1px dashed #d9d9d9; */
  border: 1px solid black;
  border-radius: 6px;
  cursor: pointer;
  position: relative;
  overflow: hidden;
}
.avatar-uploader .el-upload:hover {
  border-color: #409eff;
}
.avatar-uploader-icon {
  font-size: 28px;
  color: #8c939d;
  width: 178px;
  height: 178px;
  line-height: 178px;
  text-align: center;
}
.avatar {
  width: 178px;
  height: 178px;
  display: block;
}
</style>
--2、在路由index.js中配置根目录访问登录页面、然后修改首页的
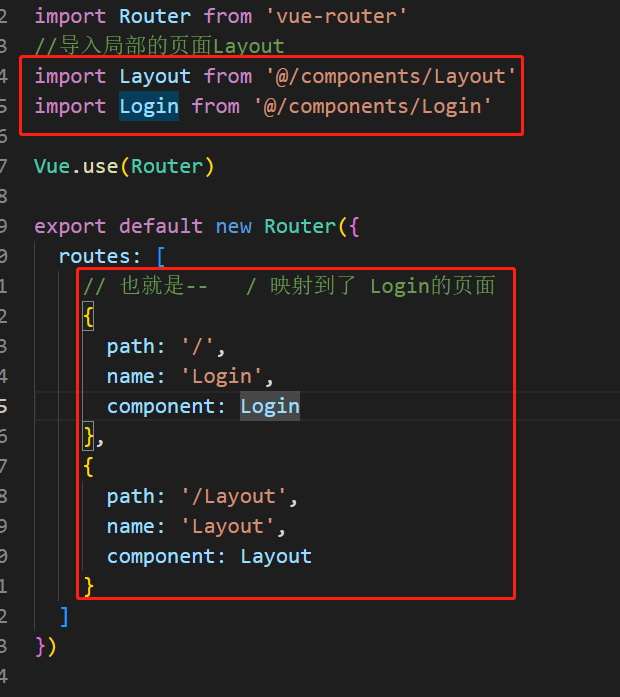
import Vue from 'vue'
import Router from 'vue-router'
//导入局部的页面Layout
import Layout from '@/components/Layout'
import Login from '@/components/Login'
Vue.use(Router)
export default new Router({
  routes: [
    // 也就是--   / 映射到了 Login的页面
    {
      path: '/',
      name: 'Login',
      component: Login
    },
    {
      path: '/Layout',
      name: 'Layout',
      component: Layout
    }
  ]
})
--3、替换src中的assets文件中的图片

五、user登录后端接口完善【后端】
--1、在UserController中提供登录的处理方法、接收数据,响应json格式的数据

//json 的解析工具
ObjectMapper jsonTool = new ObjectMapper();

// http://localhost:8085/user/loginUser?phone=sdfsdf&password=xxxx
//    定义user的登录查询的请求接口【根据手机号码和密码进行登录】
@RequestMapping("/loginUser")
public String loginUser(String phone,String password) throws JsonProcessingException {
    // map集合-结果集
    HashMap result =new HashMap();
    //調用业务层的查询方法,根据手机号码和密码进行查询
    QueryWrapper<User> wrapper = new QueryWrapper<>();
    wrapper.eq("phone",phone).eq("password",password);
    //条件查询,获取一个对象
    User user = userService.getOne(wrapper);
    //业务逻辑的判断
    if(user!=null){//登录成功
        result.put("flag",true);
        result.put("user",user);
         result.put("role","user");
    }else{//登录失败
        result.put("flag",false);
        result.put("message","用戶名或密碼錯誤!!!");
    }
    //返回json格式的数据
    return jsonTool.writeValueAsString(result);
}
--2、启动项目然后测试
http://localhost:8085/user/loginUser?phone=123451645602&password=123sdfsdfsdfsd
六、user登录前端-请求工具-请求发起【前端】
--结束前端程序ctrl+c
--执行命令、安装axios和cookie依赖
npm install axios --save
npm install --save js-cookie
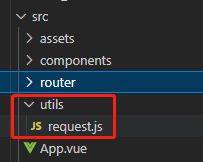
--在src下创建utils文件夹、并创建request.js文件
import axios from 'axios'
import router from "@/router";
import qs from "qs"
import Cookies from "js-cookie";
axios.defaults.withCredentials=true //让ajax请求携带cookie
//1、目的是封装请求对象  2、目的对请求和响应数据进行格式
// 创建对象
const request = axios.create({
    baseURL: 'http://localhost:8085',  // 注意!! 这里是全局统一加上了 baseURL 前缀,
    timeout: 5000
})

// request 拦截器
request.interceptors.request.use(
    config => {
      //对请求的数据进行处理
      if (config.method != 'get') {
        config.data = qs.stringify(config.data);
      }
      // post请求方式的content格式
      config.headers['content-Type'] = 'application/x-www-form-urlencoded';//允许通过访问
      return config;
    },
    error => {
      console.log('err' + error) // for debug
      return Promise.reject(error)
    }
)

// response 拦截器
// 可以在接口响应后统一处理结果
request.interceptors.response.use(
    response => {
        let res = response.data;
        // 如果是返回的文件
        if (response.config.responseType === 'blob') {
            return res
        }
        // 兼容服务端返回的字符串数据
        if (typeof res === 'string') {
            res = res ? JSON.parse(res) : res
        }
        return res;
    },
    error => {
        console.log('err' + error) // for debug
        return Promise.reject(error)
    }
)

export default request
--修改Login.vue中的登录请求处理函数、发起异步请求
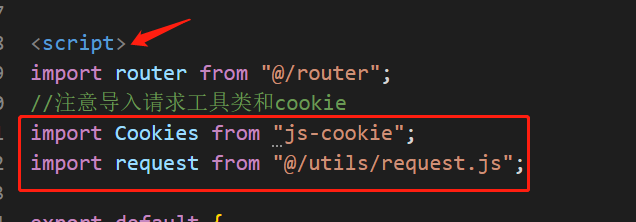
//注意导入请求工具类和cookie
import Cookies from "js-cookie";
import request from "@/utils/request.js";
doLogin() {
      //通过请求对象发起一个异步请求操作【axios】
      request
        .post("/user/loginUser", this.loginForm) //第一个参数是请求地址、第二个参数提交的数据 //回调函数\获取服务器响应的结果
        .then((res) => {
          //如果成功flag
          if (res.flag == true) {
            this.$message.success("登录成功!"); //把user信息、角色信息存放在cookie中
            Cookies.set("user", JSON.stringify(res.user), { expires: 0.3 });
            Cookies.set("role", res.role, { expires: 0.3 });
            //通过路由跳转、登录成功后跳转到首页
            router.push("/Layout");
          } else {
            //登录失败提示信息
            this.$message.error(res.message);
          }
        });
    },
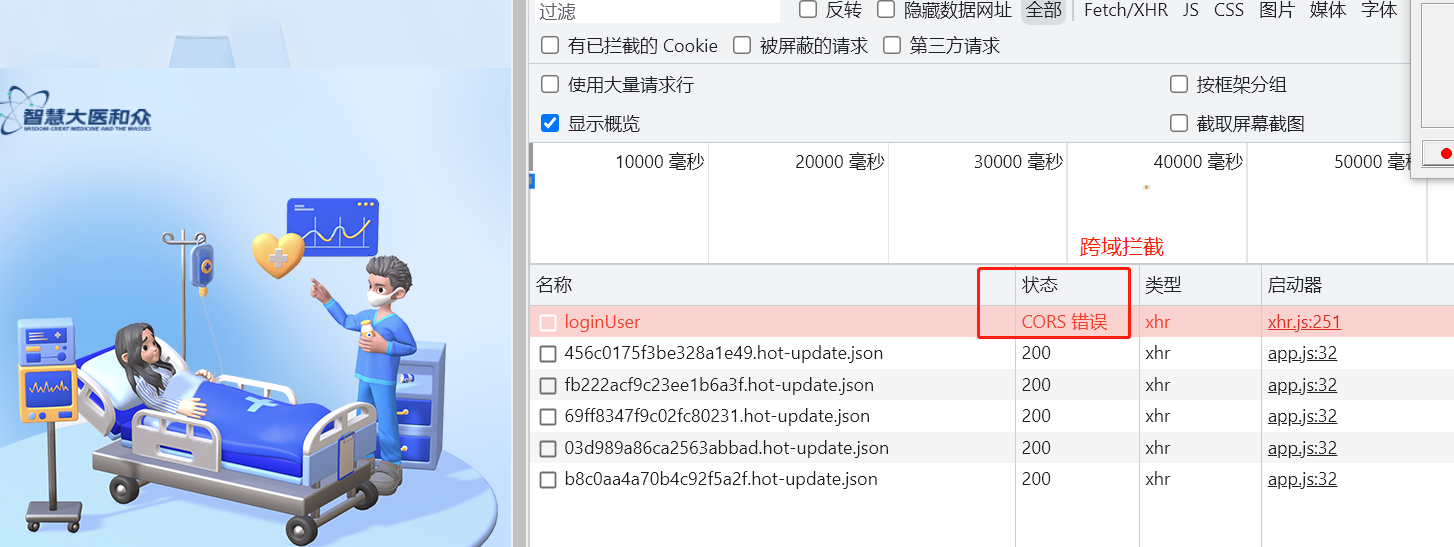
--点击登录按钮进行测试、请求是成功发起的,但是发现跨域拦截:
七、请求的跨域-访问策略
--后端项目中创建config包,然后创建配置类提供跨域访问策略:

import org.springframework.stereotype.Component;

import javax.servlet.*;
import javax.servlet.http.HttpServletResponse;
import java.io.IOException;

//定义拦截器允许跨域访问
@Component
public class UrlCorsConfiguration implements Filter {

    public void doFilter(ServletRequest req, ServletResponse res,
                         FilterChain chain) throws IOException, ServletException {

        HttpServletResponse response = (HttpServletResponse) res;
        //        允许跨域访问的地址【前端项目部署的地址】
        response.setHeader("Access-Control-Allow-Origin", "http://localhost:8080");
        //允许跨域的请求方法GET, POST, HEAD 等
        response.setHeader("Access-Control-Allow-Methods", "POST, GET, PUT, OPTIONS, DELETE");
        //重新预检验跨域的缓存时间 (s)
        response.setHeader("Access-Control-Max-Age", "3600");
        //允许跨域的请求头
        response.setHeader("Access-Control-Allow-Headers", "x-requested-with, Content-Type");
        //是否携带cookie
        response.setHeader("Access-Control-Allow-Credentials", "true");
        // 设置响应的类型及字符集编码
        response.setContentType("text/json;charset=utf-8");
        //设置响应的中文编码
        chain.doFilter(req, res);
    }

    public void init(FilterConfig filterConfig) {
    }

    public void destroy() {
    }

}
--重启后端项目,然后发起请求查看

八、完善项目的页面布局、导航菜单以及权限划分
--替换Aside.vue后端项目
<template>
  <div>
    <el-menu
      style="width: 250px; min-height: calc(100vh - 50px);padding-top: 10px;"
      default-active="2"
      class="el-menu-vertical-demo"
      @open="handleOpen"
      @close="handleClose"
      :default-openeds="[path]"
      router
    >
      <el-submenu index="1" v-if="role == 'manager'">
        <template slot="title">
          <i class="el-icon-s-management"></i>
          <!-- font-family:'Franklin Gothic Medium', 'Arial Narrow', Arial, sans-serif;" -->
          <span style="font-size: 17px; font-weight: bold;font-family:'苹方'">管理员模块</span>
        </template>
        <el-menu-item-group>
          <el-menu-item index="/Layout/adminList"
            ><i class="el-icon-link"></i>管理员列表</el-menu-item
          >
        </el-menu-item-group>
      </el-submenu>
      <el-submenu index="2">
        <template slot="title">
          <i class="el-icon-first-aid-kit"></i>
          <span style="font-size: 17px; font-weight: bold;font-family:'苹方'">医生模块</span>
        </template>
        <el-menu-item-group>
          <!-- <i class="icon_line"></i> -->
          <el-menu-item index="/Layout/doctorList"
            ><i class="el-icon-link"></i> 医生列表</el-menu-item
          >
          <el-menu-item
            index="/Layout/registration"
            v-if="role == 'manager' || role == 'doctor' || role == 'user'"
            ><i class="el-icon-link"></i>挂号记录</el-menu-item
          >
          <el-menu-item index="/Layout/vaccineRecord" v-if="role != 'doctor'"
            ><i class="el-icon-link"></i>接种记录</el-menu-item
          >
        </el-menu-item-group>
      </el-submenu>
      <el-submenu index="3" v-if="role == 'manager' || role == 'user'">
        <template slot="title">
          <i class="el-icon-user"></i>
          <span style="font-size: 17px; font-weight: bold;font-family:'苹方'">用户模块</span>
        </template>
        <el-menu-item-group>
          <el-menu-item index="/Layout/userList" v-if="role == 'manager'"
            ><i class="el-icon-link"></i>用户列表</el-menu-item
          >
          <el-menu-item index="/Layout/userRegis" v-if="role == 'user'"
            ><i class="el-icon-link"></i>预约挂号</el-menu-item
          >
        </el-menu-item-group>
      </el-submenu>
      <el-submenu index="4">
        <template slot="title">
          <i class="el-icon-office-building"></i>
          <span style="font-size: 17px; font-weight: bold;font-family:'苹方'">医院模块</span>
        </template>
        <el-menu-item-group>
          <el-menu-item index="/Layout/hosList"
            ><i class="el-icon-link"></i>医院列表</el-menu-item
          >
          <el-menu-item index="/Layout/deptList"
            ><i class="el-icon-link"></i>科室列表</el-menu-item
          >
        </el-menu-item-group>
      </el-submenu>
      <el-submenu index="5">
        <template slot="title">
          <i class="el-icon-office-building"></i>
          <span style="font-size: 17px; font-weight: bold;font-family:'苹方'">疫苗模块</span>
        </template>
        <el-menu-item-group>
          <el-menu-item index="/Layout/vaccineType"
            ><i class="el-icon-link"></i>疫苗种类</el-menu-item
          >
          <el-menu-item index="/Layout/vaccine"
            ><i class="el-icon-link"></i>疫苗信息</el-menu-item
          >
          <el-menu-item index="/Layout/appVaccineList"
            ><i class="el-icon-link"></i>可预约疫苗</el-menu-item
          >
        </el-menu-item-group>
      </el-submenu>
    </el-menu>
  </div>
</template>
<style>
.icon1 {
  display: inline-block;
  width: 50px;
  height: 50px;
  background-image: url("../assets/BUTTON_NOOPEN.png");
  background-position: center center;
  background-repeat: no-repeat;
}
.icon_line {
  display: block;
  width: 20px;
  height: 20px;
  background-image: url("../assets/line1.png");
  position: relative;
  left: 75px;
  background-repeat: no-repeat;
}
</style>

<script>
import Cookies from "js-cookie";
import request from "@/utils/request";
export default {
  data() {
    return {
      //path变量
      path: this.$route.path,
      role: "",
      userId: "",
      timer: null,
    };
  },
  //生命周期【当页面对象创建成功,触发的函数】
  created() {
    //获取manager信息
    var userJson = JSON.parse(Cookies.get("user"));
    this.role = Cookies.get("role");
    console.log("this.role="+this.role);
    this.userId = userJson.id;
    // 启动定时器,每5秒钟检查一次
    this.timer = setInterval(this.checkDatabaseChanges, 5000);
  },
  methods: {
    //获取数据库最新数据,持续更新cookie
    checkDatabaseChanges() {
      //判断是哪种用户
      let url =
        this.role == "manager"
          ? "/manager/selectById"
          : this.role == "doctor"
          ? "/doctor/selectById"
          : "/user/selectById";
      // 通过请求获取最新的数据
      request
        .get(url, {
          params: {
            id: this.userId,
          },
        })
        //回调函数
        .then((res) => {
          if (res.flag == true) {
            //更新Cookie值
            Cookies.set("user", JSON.stringify(res.user), { expires: 0.3 });
          }
        });
    },
    handleOpen(key, keyPath) {
      console.log(key, keyPath);
      console.log("打开");
    },
    handleClose(key, keyPath) {
      console.log(key, keyPath);
      console.log("关闭");
    },
  },
  beforeDestroy() {
    // 销毁定时器
    clearInterval(this.timer);
  },
};
</script>
--替换Header.vue
<template>
  <div
    style="
      height: 65px;
      line-height: 65px;
      border-bottom: 1px solid #ccc;
      background-color: #254175;
      display: flex;
    "
  >
    <div
      style="
        width: 200px;
        padding-left: 30px;
        font-weight: bold;
        color: dodgerblue;
      "
    >
      <img
        src="../assets/logo-06.png"
        style="width: 200px; height: 50px; padding-top: 5px"
        alt=""
      />
    </div>
    <div style="flex: 1"></div>
    <div style="width: 250px">
      <el-dropdown @command="handleCommand">
        <span class="el-dropdown-link">
          <el-row :gutter="5">
            <el-col :span="12"  style="padding-top: 9px;"><el-avatar :src="image" shape="square" :size="50"></el-avatar></el-col>
            <el-col :span="9" style="color:#fff;font-weight: bold;">{{ name }}</el-col>
            <el-col :span="3" style="color:#fff;font-weight: bold;"><i class="el-icon-arrow-down el-icon--right"></i></el-col>
          </el-row>
        </span>
        <el-dropdown-menu slot="dropdown">
          <el-dropdown-item command="a" v-if="role !== 'manager'"
            >个人信息</el-dropdown-item
          >
          <el-dropdown-item command="b">退出系统</el-dropdown-item>
        </el-dropdown-menu>
      </el-dropdown>
    </div>
  </div>
</template>

    <script>
import router from "@/router";
import Cookies from "js-cookie";
export default {
  name: "Header",
  data() {
    return {
      name: "未登录",
      image: "",
      role: "",
    };
  },
  created() {
    //获取登录用户信息
    var userJson = JSON.parse(Cookies.get("user"));
    this.name = userJson.name;
    this.image = userJson.image;
    this.role = Cookies.get("role");
  },
  methods: {
    handleCommand(command) {
      if (command == "b") {
        Cookies.remove("user");
        //跳转到登录
        router.push("/login");
      } else {
        //跳转到个人信息
        router.push("/Layout/personalInfo");
      }
    },
  },
};
</script>
--修改后端UserController中-的登录请求要返回user的对象数据、用户的角色
// 在结果集中保存user对象以及角色信息
result.put("user", user);
result.put("role", "user");
--登录页面的登录函数中存储user和role角色信息

--重新登录测试即可
九、实现疫苗分类的查询及分析流程
--后端:VaccineType实体类中添加主键变量

/**
 * 主键
 */
@TableId(type = IdType.AUTO)
private Integer id;
--后端:VaccineTypeController中定义查询请求接口
@RestController
@RequestMapping("/vaccinetype")
public class VaccineTypeController {

    //json
    ObjectMapper json = new ObjectMapper();

    //service
    @Autowired
    IVaccineTypeService typeService;

    // 测试 http://localhost:8085/vaccinetype/query
    //查询分类、响应json数据【键值对的数据】
    @RequestMapping("/query")
    public String query() throws JsonProcessingException {
        //结果的存放集合
        HashMap result = new HashMap();
        //    1\调用业务层方法执行查询操作
        List<VaccineType> list = typeService.list();
        //    2\在结果集中存放list集合
        result.put("list", list);
        //   返回json数据
        return json.writeValueAsString(result);
    }

}
--前端:在src下创建type文件夹,然后创建TypeList.vue

--前端:从element-ui中获取组件代码、提供请求操作和修改table中的字段名
<template>
  <el-table :data="tableData" stripe style="width: 100%">
    <el-table-column prop="id" label="编号"> </el-table-column>
    <el-table-column prop="name" label="名称"> </el-table-column>
    <el-table-column prop="remark" label="描述"> </el-table-column>
  </el-table>
</template>

  <script>
import request from "@/utils/request.js";
export default {
  data() {
    return {
      tableData: [],
    };
  },
  // 页面中的vue对象创建成功后触发
  created() {
    //发起查询请求
    request
      .get("/vaccinetype/query") //第一个参数是请求地址、第二个参数提交的数据 //回调函数\获取服务器响应的结果
      .then((res) => {
        this.tableData = res.list;
      });
  },
};
</script>
--前端:修改路由、在Layout路径下配置子url的映射【router中的index.js文件】
import Vue from 'vue'
import Router from 'vue-router'
//导入局部的页面Layout
import Layout from '@/components/Layout'
import Login from '@/components/Login'
Vue.use(Router)
export default new Router({
  routes: [
    // 也就是--   / 映射到了 Login的页面
    {
      path: '/',
      name: 'Login',
      component: Login
    },
    // 页面布局的映射
    {
      path: '/Layout',
      name: 'Layout',
      component: Layout,
      children: [
        {
          path: 'vaccineType',//   --> /Layout/vaccineType
          name: 'vaccineType',
          component: ()=>import('@/type/TypeList')
        },
      ],
    }
  ]
})
十、疫苗分类--页面完善、以及添加、修改及删除实现
--后端:在VaccineTypeController中提供删除、添加和修改的请求接口
@RestController
@RequestMapping("/vaccinetype")
public class VaccineTypeController {

    //依賴VaccineType业务层对象
    @Autowired //自动注入
    IVaccineTypeService typeService;

    //json 的解析工具
    ObjectMapper jsonTool = new ObjectMapper();

    // http://localhost:8085/vaccinetype/query
    //    定义查询的请求接口
    @RequestMapping("/query")
    public String query(String phone,String password) throws JsonProcessingException {
        // map集合-结果集
        HashMap result =new HashMap();
        //調用业务层的查询方法
        List<VaccineType> list = typeService.list();
        result.put("list",list);
        //返回json格式的数据
        return jsonTool.writeValueAsString(result);
    }

    // http://localhost:8085/vaccinetype/update
    //    定义修改的请求接口
    @RequestMapping("/update")
    public String update(VaccineType type) throws JsonProcessingException {
        // map集合-结果集
        HashMap result =new HashMap();
        //調用业务层的查询方法
        boolean update = typeService.updateById(type);
        result.put("flag",update);
        //返回json格式的数据
        return jsonTool.writeValueAsString(result);
    }

    // http://localhost:8085/vaccinetype/insert
    //    定义添加的请求接口
    @RequestMapping("/insert")
    public String insert(VaccineType type) throws JsonProcessingException {
        // map集合-结果集
        HashMap result =new HashMap();
        //調用业务层的查询方法
        boolean insert = typeService.save(type);
        result.put("flag",insert);
        //返回json格式的数据
        return jsonTool.writeValueAsString(result);
    }

    // http://localhost:8085/vaccinetype/insert
    //    定义刪除的请求接口
    @RequestMapping("/delete")
    public String delete(Integer id) throws JsonProcessingException {
        // map集合-结果集
        HashMap result =new HashMap();
        //調用业务层的查询方法
        boolean delete = typeService.removeById(id);
        result.put("flag",delete);
        //返回json格式的数据
        return jsonTool.writeValueAsString(result);
    }

}
--替换TypeList.vue页面即可、效果如下:

<template>
  <div style="width: 100%">
    <div class="top_div">
      <!-- 模糊查询表单 -->
      <el-form
        :inline="true"
        class="demo-form-inline"
        style="padding-top: 22px"
      >
        <!--批量删除、新增按钮-->
        <el-form-item v-if="role == 'manager' || role == 'nurse'">
          <el-popconfirm
            title="删除后无法恢复,确定吗?"
            icon-color="red"
            @confirm="batch_delete()"
          >
            <el-button slot="reference" plain type="danger">批量删除</el-button>
          </el-popconfirm>
        </el-form-item>
        <el-form-item>
          <el-input
            v-model="name"
            placeholder="请输入疫苗种类名关键字"
          ></el-input>
        </el-form-item>
        <el-form-item>
          <el-button
            type="primary"
            style="background-color: #254175"
            @click="selectPage"
            >查询</el-button
          >
          <el-button
            type="primary"
            style="background-color: #254175"
            @click="addOperate"
            >新增</el-button
          >
        </el-form-item>
      </el-form>
    </div>
    <div class="botoom_div">
      <!-- 疫苗种类信息展示表格 -->
      <el-table
        :data="tableData"
        style="width: 100%"
        @selection-change="handleSelectionChange"
      >
        <!-- 复选框 -->
        <el-table-column
          type="selection"
          width="55"
          v-if="role == 'manager' || role == 'nurse'"
        ></el-table-column>
        <el-table-column prop="id" label="种类编号"> </el-table-column>
        <el-table-column prop="name" label="种类名称" sortable>
        </el-table-column>
        <el-table-column prop="remark" label="介绍">
          <template #default="scope">
            <el-popover
              placement="top-start"
              width="100"
              trigger="click"
              :content="scope.row.remark"
            >
              <el-button slot="reference" class="ellipsis-button">{{
                scope.row.remark
              }}</el-button>
            </el-popover>
          </template>
        </el-table-column>
        <!-- v-if="role == 'manager' || role == 'nurse'" -->
        <el-table-column prop="status" label="状态">
          <template #default="scope">
            <el-tag type="success" v-if="scope.row.status == 1">正常</el-tag>
            <el-tag type="danger" v-if="scope.row.status == 0">禁用</el-tag>
          </template>
        </el-table-column>
        <!-- v-if="role == 'manager' || role == 'nurse'" -->
        <el-table-column label="管理">
          <template #default="scope">
            <el-button
              size="small"
              v-if="scope.row.status == 1"
              type="danger"
              @click="updateStatus(scope.row)"
              >禁用</el-button
            >
            <el-button
              size="small"
              v-if="scope.row.status == 0"
              type="success"
              @click="updateStatus(scope.row)"
              >启用</el-button
            >
          </template>
        </el-table-column>
        <!-- v-if="role == 'manager' || role == 'nurse'" -->
        <el-table-column label="操作">
          <template #default="scope">
            <el-button size="small" @click="handleEdit(scope.$index, scope.row)"
              >修改</el-button
            >
            <el-popconfirm
              title="删除后无法恢复,确定吗?"
              icon-color="red"
              @confirm="handleDelete(scope.$index, scope.row)"
            >
              <el-button slot="reference" size="small" type="danger"
                >删除</el-button
              >
            </el-popconfirm>
          </template>
        </el-table-column>
      </el-table>
      <!-- 添加-修改表单 -->
      <el-dialog
        :title="!vaccineType.id ? '疫苗种类-添加' : '疫苗种类-修改'"
        :visible.sync="formVisible"
        :close-on-click-modal="false"
      >
        <el-form
          :model="vaccineType"
          status-icon
          :rules="rules"
          ref="addType"
          label-width="50px"
          class="demo-vaccineType"
        >
          <el-form-item label="编号" prop="id" v-if="vaccineType.id">
            <el-input v-model="vaccineType.id" disabled></el-input>
          </el-form-item>
          <el-form-item label="种类名" prop="name">
            <el-input
              type="text"
              v-model="vaccineType.name"
              autocomplete="off"
            ></el-input>
          </el-form-item>
          <el-form-item label="介绍" prop="remark">
            <el-input
              type="textarea"
              v-model="vaccineType.remark"
              autocomplete="off"
            ></el-input>
          </el-form-item>
          <el-form-item>
            <el-button type="primary" @click="submitForm('addType')"
              >提交</el-button
            >
            <el-button @click="formVisible = false">取消</el-button>
          </el-form-item>
        </el-form>
      </el-dialog>
    </div>
  </div>
</template>
    <script>
//导入request工具
import request from "@/utils/request";
import Cookies from "js-cookie";
export default {
  data() {
    return {
      role: "",
      name: "", //模糊查询数据 //表格数据
      tableData: [],
      ids: [], //根据id批量删除存放的容器
      vaccineType: {
        id: "",
        name: "",
        remark: "",
      },
      rules: {
        name: [
          { required: true, message: "请输入疫苗种类名称", trigger: "blur" },
        ],
        remark: [
          { required: true, message: "请输入疫苗种类介绍", trigger: "blur" },
        ],
      },
      formVisible: false,
    };
  }, //当vue创建后,发起请求查询数据
  created() {
    if (Cookies.get("user")) {
      //获取登录用户角色
      var userJson = JSON.parse(Cookies.get("user"));
      this.role = userJson.role;
    }
    this.selectPage();
  },
  methods: {
    //分页-模糊查询函数
    selectPage() {
      //发送请求
      request
        .get("/vaccinetype/query", {
          params: {
            name: this.name,
          },
        })
        .then((res) => {
          //处理响应
          if (res.flag == false) {
            //查询失败
            this.$message.error(res.message);
          } else {
            this.$message.success("查询成功"); //将查询到的数据赋值到当前tableData中
            this.tableData = res.list;
          }
        });
    }, //当复选框状态改变时,自动调用该函数,将复选框选中的行的数据id存入ids数组中
    handleSelectionChange(selection) {
      //遍历selection数组,存储id值
      this.ids = selection.map((item) => item.id);
    }, //批量删除函数
    batch_delete(index, row) {
      if (this.ids != "") {
        request
          .get("/vaccinetype/batchDelete", {
            params: {
              ids: this.ids.toString(),
            },
          })
          .then((res) => {
            //处理响应
            if (res.flag == false) {
              //删除失败
              this.$message.error(res.message);
            } else {
              this.$message.success("删除成功");
              this.selectPage();
            }
          });
      } else {
        this.$message.error("请先选择需要删除的数据!");
      }
    }, //删除函数
    handleDelete(index, row) {
      request
        .get("/vaccinetype/delete", {
          params: {
            //参数
            id: row.id,
          },
        })
        .then((res) => {
          //处理响应
          if (res.flag == false) {
            //删除失败
            this.$message.error(res.message);
          } else {
            this.$message.success("删除成功");
            this.selectPage();
          }
        });
    }, //每页展示多少条
    handleSizeChange(val) {
      this.pageSize = val;
      this.selectPage();
    }, //当前页为多少页
    handleCurrentChange(val) {
      this.currentPage = val;
      this.selectPage();
    }, //打开添加表单
    addOperate() {
      this.formVisible = true; //对该表单项进行移除校验结果
      this.$refs.addType.resetFields();
      this.vaccineType = {
        id: "",
        name: "",
        remark: "",
      };
    }, //修改-添加表单提交函数
    submitForm(formName) {
      //validate校验代码
      this.$refs[formName].validate((valid) => {
        // ok--通过校验
        if (valid) {
          if (this.vaccineType.id) {//id存在则是进行修改操作
            request
              .post("/vaccinetype/update", this.vaccineType)
              .then((res) => {
                if (res.flag == false) {
                  //修改失败
                  this.$message.error(res.message);
                  // 查询方法
                  this.selectPage();
                } else {
                  //修改成功
                  this.formVisible = false;
                  this.$message.success("修改成功");
                  this.vaccineType = {
                    id: "",
                    name: "",
                    remark: "",
                  };
                  this.selectPage();
                }
              });
          } else {//id不存在则是进行添加操作
            //发送请求
            request
              .post("/vaccinetype/insert", this.vaccineType)
              .then((res) => {
                //处理响应
                if (res.flag == false) {
                  //添加失败
                  this.$message.error(res.message);
                } else {
                  this.$message.success("添加成功"); //关闭模态框
                  this.formVisible = false; //清空数据
                  this.vaccineType = {
                    id: "",
                    name: "",
                    remark: "",
                  }; //重新查询数据
                  this.selectPage();
                }
              });
          }
        }
      });
    }, // 打开修改表单函数
    handleEdit(index, row) {
      //打开嵌套表单的修改对话框
      this.formVisible = true; //将数据进行回显
      this.vaccineType.id = row.id;
      this.vaccineType.name = row.name;
      this.vaccineType.remark = row.remark; //对该表单项进行移除校验结果 // this.$refs.addType.clearValidate();
    },
  },
};
</script>
    <style>
.top_div {
  border-radius: 15px;
  box-shadow: rgba(0, 0, 0, 0.32) 0px 2px 5px;
  margin-bottom: 50px;
  background-color: #fff;
}
.botoom_div {
  border-radius: 15px;
  padding-top: 25px;
  padding-bottom: 25px;
  box-shadow: rgba(0, 0, 0, 0.32) 0px 2px 5px;
  margin-bottom: 50px;
  background-color: #fff;
}
.ellipsis-button {
  white-space: nowrap;
  overflow: hidden;
  text-overflow: ellipsis;
  height: 50px;
  max-width: 200px;
  /* 假设按钮最大宽度为100px,根据需要进行调整 */
}
</style>
--重启后端服务进行测试、建议可以先新增一些数据,然后再测试修改和删除的操作
