Pyside6 QRadioBox
- QRadioButton使用
- QRadioButton分组
- QRadioButton设置文本
- 代码设置
- 界面设置
- QRadioButton禁用和启用
- 代码设置
- 界面设置
- QRadioButton设置默认值
- 代码设置
- 界面设置
- 读取QRadioButton状态
- QRadioButton样式设计
- 代码设置
- 界面设置
- 完整程序
- 界面程序
- 主程序
QRadioButton单选框,QRadioButton是一个可以切换选中和未选中的控件,它的作用跟QCheckBox复选框一样,但是复选框可以实现多选多的功能,而单选框只能实现多选一的功能。
QRadioButton都是默认开启了自动互斥功能,意味着属于同一个父部件的所有单选框都是相互排斥,也就是只能有一个单选框被选中。在实际应用中通常需要对单选框进行分组,以实现不同的功能。关于QRadioButton的更多资料可以参考下面的文档
https://doc.qt.io/qtforpython-6/PySide6/QtWidgets/QRadioButton.html
https://doc.qt.io/qtforpython-6/PySide6/QtWidgets/QAbstractButton.html
QRadioButton使用
QRadioButton分组
在使用QRadioButton前需要对QRadioButton进行分组,我们可以利用QButtonGroup进行分组
		btn1 = QButtonGroup(self) # 创建ButtonGroup
        btn2 = QButtonGroup(self) # 创建ButtonGroup
        btn3 = QButtonGroup(self) # 创建ButtonGroup


        # 将RadioBox1/2/3/4 划入组1
        btn1.addButton(self.ui.radioButton,1)
        btn1.addButton(self.ui.radioButton_2,1)
        btn1.addButton(self.ui.radioButton_3,1)
        btn1.addButton(self.ui.radioButton_4,1)

        # 将RadioBox5/6/7/8 划入组2
        btn2.addButton(self.ui.radioButton_5,1)
        btn2.addButton(self.ui.radioButton_6,1)
        btn2.addButton(self.ui.radioButton_7,1)
        btn2.addButton(self.ui.radioButton_8,1)

		# 将RadioBox9/10 划入组3
        btn3.addButton(self.ui.radioButton_9,1)
        btn3.addButton(self.ui.radioButton_10,1)
QRadioButton设置文本
QRadioButton设置文本有两种方式,分别是代码设置和界面设置
代码设置
 		 # 设置RadioBox文本
        self.ui.radioButton.setText("Windows")
        self.ui.radioButton_2.setText("SQL")
        self.ui.radioButton_3.setText("Python")
        self.ui.radioButton_4.setText("Java")

        self.ui.radioButton_5.setText("十进制")
        self.ui.radioButton_6.setText("十六进制")
        self.ui.radioButton_7.setText("二进制")
        self.ui.radioButton_8.setText("八进制")

        self.ui.radioButton_9.setText("C语言")
        self.ui.radioButton_10.setText("C++语言")
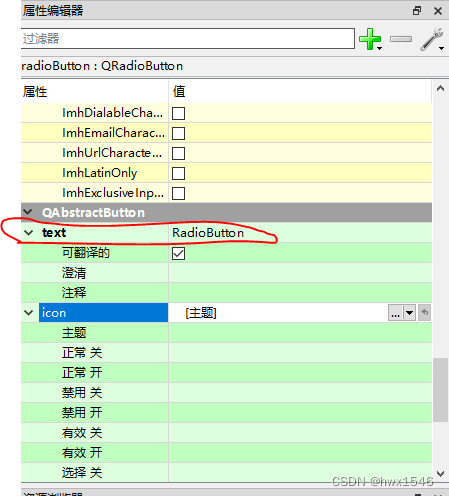
界面设置
我们可以通过designer软件进行QRadioButton的文本设置,具体设置如下:
点击控件->属性编辑器->text里面进行设置
QRadioButton禁用和启用
当我们不需要使用某个QRadioButton的功能时,可以设置其为禁用模式,设置为禁用模式的QRadioButton将不能被用户使用。如果用户需要再次使用该QRadioButton,需要将其QRadioButton设置为启用模式。同样地设置QRadioButton的禁用和启用也可通过代码和界面进行设置。默认QRadioButton是启用模式。
代码设置
self.ui.radioButton_4.setEnabled(False) # 将单选框4设置为禁用模式
self.ui.radioButton_8.setEnabled(True)  # 将单选框8设置为启用模式
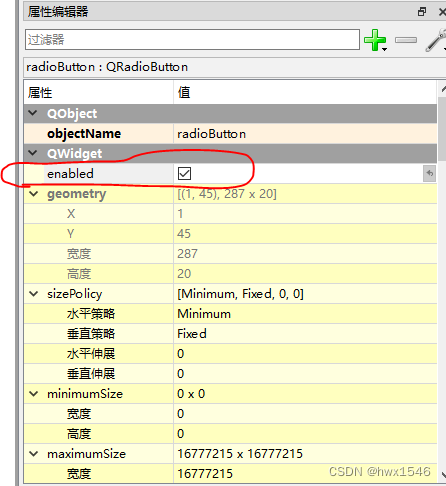
界面设置
我们可以通过designer软件进行QRadioButton的禁用和启用设置,具体设置如下:
点击控件->属性编辑器->enabled里面进行设置。打勾则代表该QRadioButton是启用状态,不打勾则代表该QRadioButton是禁用状态。
QRadioButton设置默认值
QRadioButton可以设置默认值,也就是说当软件启动时,QRadioButton是默认选中还是未选中状态。设置默认值可以通过代码和界面设置。
代码设置
self.ui.radioButton_9.setChecked(False) # 将单选框9的默认值为不选中
self.ui.radioButton_10.setChecked(True) # 将单选框10的默认值为选中
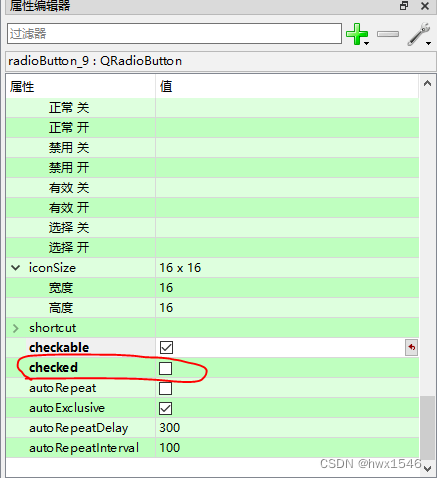
界面设置
我们可以通过designer软件进行QRadioButton的默认值设置,具体设置如下:
点击控件->属性编辑器->checked里面进行设置。打勾则代表该QRadioButton为选中,不打勾则代表该QRadioButton未选中。
读取QRadioButton状态
QRadioButton可以通过isChecked函数读取其状态,返回True则代表QRadioButton被选中,返回False则代表QRadioButton没有被选中。
	self.ui.pushButton.clicked.connect(self.pushButton_func)

    def pushButton_func(self):
        if self.ui.radioButton_9.isChecked() == True:
            print("C语言答案被选中")
        else:
            print("C语言答案没有被选中")

        if self.ui.radioButton_10.isChecked() == True:
            print("C++语言答案被选中")
        else:
            print("C++语言答案没有被选中")
QRadioButton样式设计
如果觉得QRadioButton的外观太单调,可以设置QRadioButton的样式,根据自己的需要设置其背景颜色,字体颜色等。同样地有两种方法进行样式设计,代码设置和界面设置
代码设置
self.ui.radioButton_9.setStyleSheet("#radioButton_9:hover{background-color:rgb(0,130,150);border:2px solid #5F92B2;border-radius:5px;color:white;}"
                                            "#radioButton_9:pressed{background-color:rgb(85,170,255);border:2px solid #3C80B1;border-radius:5px;color:red;}")
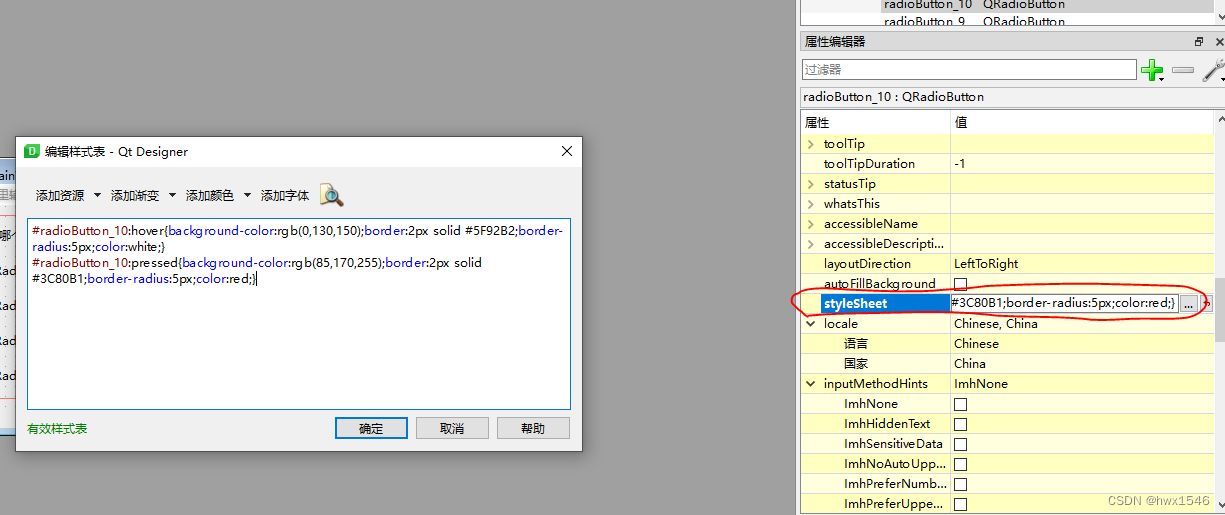
界面设置
我们可以通过designer软件进行QRadioButton的样式设置,具体设置如下:
点击控件->属性编辑器->styleSheet里面进行设置。
完整程序
界面程序
<?xml version="1.0" encoding="UTF-8"?>
<ui version="4.0">
 <class>MainWindow</class>
 <widget class="QMainWindow" name="MainWindow">
  <property name="geometry">
   <rect>
    <x>0</x>
    <y>0</y>
    <width>601</width>
    <height>244</height>
   </rect>
  </property>
  <property name="windowTitle">
   <string>MainWindow</string>
  </property>
  <widget class="QWidget" name="centralwidget">
   <layout class="QHBoxLayout" name="horizontalLayout">
    <item>
     <layout class="QVBoxLayout" name="verticalLayout">
      <item>
       <widget class="QLabel" name="label">
        <property name="maximumSize">
         <size>
          <width>16777215</width>
          <height>20</height>
         </size>
        </property>
        <property name="text">
         <string>以下哪个是操作系统</string>
        </property>
       </widget>
      </item>
      <item>
       <widget class="QRadioButton" name="radioButton">
        <property name="text">
         <string>RadioButton</string>
        </property>
       </widget>
      </item>
      <item>
       <widget class="QRadioButton" name="radioButton_2">
        <property name="text">
         <string>RadioButton</string>
        </property>
       </widget>
      </item>
      <item>
       <widget class="QRadioButton" name="radioButton_3">
        <property name="text">
         <string>RadioButton</string>
        </property>
       </widget>
      </item>
      <item>
       <widget class="QRadioButton" name="radioButton_4">
        <property name="enabled">
         <bool>true</bool>
        </property>
        <property name="text">
         <string>RadioButton</string>
        </property>
       </widget>
      </item>
     </layout>
    </item>
    <item>
     <layout class="QVBoxLayout" name="verticalLayout_2">
      <item>
       <widget class="QLabel" name="label_2">
        <property name="maximumSize">
         <size>
          <width>16777215</width>
          <height>20</height>
         </size>
        </property>
        <property name="text">
         <string>计算机内部使用的编码是</string>
        </property>
       </widget>
      </item>
      <item>
       <widget class="QRadioButton" name="radioButton_5">
        <property name="text">
         <string>RadioButton</string>
        </property>
       </widget>
      </item>
      <item>
       <widget class="QRadioButton" name="radioButton_6">
        <property name="text">
         <string>RadioButton</string>
        </property>
       </widget>
      </item>
      <item>
       <widget class="QRadioButton" name="radioButton_7">
        <property name="enabled">
         <bool>true</bool>
        </property>
        <property name="text">
         <string>RadioButton</string>
        </property>
       </widget>
      </item>
      <item>
       <widget class="QRadioButton" name="radioButton_8">
        <property name="text">
         <string>RadioButton</string>
        </property>
       </widget>
      </item>
     </layout>
    </item>
    <item>
     <layout class="QVBoxLayout" name="verticalLayout_3">
      <item>
       <widget class="QLabel" name="label_3">
        <property name="maximumSize">
         <size>
          <width>16777215</width>
          <height>20</height>
         </size>
        </property>
        <property name="text">
         <string>以下哪个是面向对象语言</string>
        </property>
       </widget>
      </item>
      <item>
       <widget class="QRadioButton" name="radioButton_9">
        <property name="text">
         <string>RadioButton</string>
        </property>
        <property name="checkable">
         <bool>true</bool>
        </property>
        <property name="checked">
         <bool>false</bool>
        </property>
       </widget>
      </item>
      <item>
       <widget class="QRadioButton" name="radioButton_10">
        <property name="styleSheet">
         <string notr="true">#radioButton_10:hover{background-color:rgb(0,130,150);border:2px solid #5F92B2;border-radius:5px;color:white;}
#radioButton_10:pressed{background-color:rgb(85,170,255);border:2px solid #3C80B1;border-radius:5px;color:red;}</string>
        </property>
        <property name="text">
         <string>RadioButton</string>
        </property>
       </widget>
      </item>
      <item>
       <widget class="QPushButton" name="pushButton">
        <property name="text">
         <string>确认答案</string>
        </property>
       </widget>
      </item>
     </layout>
    </item>
   </layout>
  </widget>
  <widget class="QMenuBar" name="menubar">
   <property name="geometry">
    <rect>
     <x>0</x>
     <y>0</y>
     <width>601</width>
     <height>22</height>
    </rect>
   </property>
  </widget>
  <widget class="QStatusBar" name="statusbar"/>
 </widget>
 <resources/>
 <connections/>
</ui>
主程序
# Import Qt libraries
from PySide6.QtWidgets import *
from PySide6.QtCore import QFile
# Import UI developed in Qt Creator
from radiobox_ui import Ui_MainWindow  # 导入界面
# Import PseudoSensor
# Import system tools and datetime
import sys
import statistics
import time
from datetime import datetime

# Create and start the Qt application
class MainWindow(QMainWindow):
    def __init__(self):
        super(MainWindow, self).__init__()

        # 设置界面为用户设计的界面
        self.ui = Ui_MainWindow()
        self.ui.setupUi(self)

        btn1 = QButtonGroup(self) # 创建ButtonGroup
        btn2 = QButtonGroup(self) # 创建ButtonGroup
        btn3 = QButtonGroup(self) # 创建ButtonGroup


        # 将RadioBox1/2/3/4 划入组1
        btn1.addButton(self.ui.radioButton,1)
        btn1.addButton(self.ui.radioButton_2,1)
        btn1.addButton(self.ui.radioButton_3,1)
        btn1.addButton(self.ui.radioButton_4,1)

        # 将RadioBox5/6/7/8 划入组2
        btn2.addButton(self.ui.radioButton_5,1)
        btn2.addButton(self.ui.radioButton_6,1)
        btn2.addButton(self.ui.radioButton_7,1)
        btn2.addButton(self.ui.radioButton_8,1)

        # 将RadioBox9/10 划入组3
        btn3.addButton(self.ui.radioButton_9,1)
        btn3.addButton(self.ui.radioButton_10,1)


        # 设置RadioBox文本
        self.ui.radioButton.setText("Windows")
        self.ui.radioButton_2.setText("SQL")
        self.ui.radioButton_3.setText("Python")
        self.ui.radioButton_4.setText("Java")

        self.ui.radioButton_5.setText("十进制")
        self.ui.radioButton_6.setText("十六进制")
        self.ui.radioButton_7.setText("二进制")
        self.ui.radioButton_8.setText("八进制")

        self.ui.radioButton_9.setText("C语言")
        self.ui.radioButton_10.setText("C++语言")

        self.ui.radioButton_4.setEnabled(False) # 将单选框4设置为禁用模式
        self.ui.radioButton_8.setEnabled(True)  # 将单选框8设置为启用模式

        self.ui.radioButton_9.setChecked(False) # 将单选框9的默认值为不选中
        self.ui.radioButton_10.setChecked(True) # 将单选框10的默认值为选中

        self.ui.radioButton_9.setStyleSheet("#radioButton_9:hover{background-color:rgb(0,130,150);border:2px solid #5F92B2;border-radius:5px;color:white;}"
                                            "#radioButton_9:pressed{background-color:rgb(85,170,255);border:2px solid #3C80B1;border-radius:5px;color:red;}") # 设置单选框9样式

        self.ui.pushButton.clicked.connect(self.pushButton_func)


    def pushButton_func(self):
        if self.ui.radioButton_9.isChecked() == True: # 判断单选框9状态
            print("C语言答案被选中")
        else:
            print("C语言答案没有被选中")

        if self.ui.radioButton_10.isChecked() == True: # 判断单选框10状态
            print("C++语言答案被选中")
        else:
            print("C++语言答案没有被选中")

    def closeAndExit(self):
        sys.exit()

if __name__ == "__main__":
    app = QApplication(sys.argv) # 初始化QApplication

    # 初始化界面并显示界面
    window = MainWindow()
    window.show()

    sys.exit(app.exec())