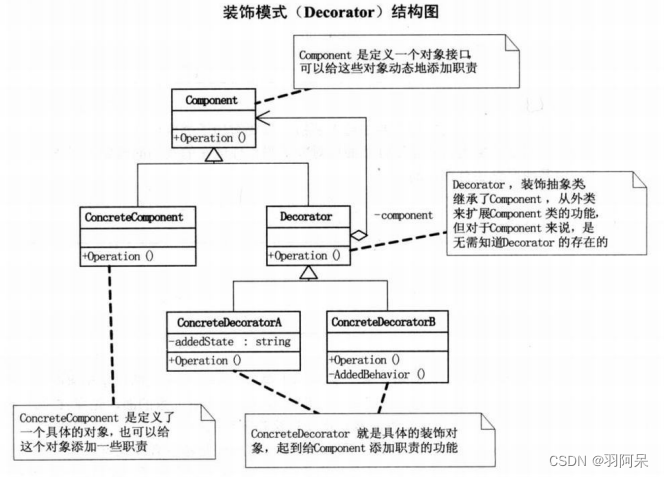
装饰模式(Decorator),动态地给一个对象添加一些额外的职责,就增加功能来说,装饰模式比生成子类更为灵活。
Component类:
abstract class Component : MonoBehaviour
{
    public abstract void Operation();
}
ConcreteComponent类:
class ConcreteComponent : Component
{
    public override void Operation()
    {
        Debug.Log("具体对象操作");
    }
}
Decorator类:
abstract class Decorator : Component
{
    protected Component component;
    public void SetComponent(Component component)
    {
        this.component = component;
    }
    public override void Operation()
    {
        if(component != null)
        {
            component.Operation();
        }
    }
}
ConcreteDecoratorA类:
class ConcreteDecoratorA : Decorator
{
    //此类特有的功能,区别于ConcreteDecoratorB
    private string addState;
    public override void Operation()
    {
        //首先运行元Component的Operation()
        //再执行本类功能,对原Component进行修饰
        base.Operation();
        addState = "new state";
        Debug.Log("具体装饰对象A的操作");
    }
}
ConcreteDecoratorB类:
class ConcreteDecoratorB : Decorator
{
    public override void Operation()
    {
        //首先运行元Component的Operation()
        //再执行本类功能,对原Component进行修饰
        base.Operation();
        AddBehavior();
        Debug.Log("具体装饰对象B的操作");
    }

    //本类特有的方法
    private void AddBehavior()
    {

    }
}
客户端:
class Main : MonoBehaviour
{
    private void Start()
    {
        ConcreteComponent c = new ConcreteComponent();
        ConcreteDecoratorA a = new ConcreteDecoratorA();
        ConcreteDecoratorB b = new ConcreteDecoratorB();

        a.SetComponent(c);
        b.SetComponent(a);
        b.Operation();

    }
}
输出结果:
具体装饰对象A的操作 具体装饰对象B的操作 具体对象操作装饰模式是利用SetComponent来对对象进行包装的。这样每个装饰对象的实现就和如何使用这个对象分离开了,每个装饰对象只关心自已的功能,不需要关心如何被添加到对象链当中。
如果只有一个Concrete Component类而没有抽象的Component类,那么Decorator类可以是Concrete Component的一个子类。同样道理,如果只有一个Concrete Decorator类,那么就没有必要建立一个单独的Decorator类,而可以把Decorator和Concrete Decorator的责任合并成一个类。
起初的设计中,当系统需要新功能的时候,是向旧的类中添加新的代码。这些新加的代码通常装饰了原有类的核心职责或主要行为,但这种做法的问题在于,它们在主类中加入了新的字段,新的方法和新的逻辑,从而增加了主类的复杂度,而这些新加入的东西仅仅是为了满足一些只在某种特定情况下才会执行的特殊行为的需要。而装饰模式却提供了一个非常好的解决方案,它把每个要装饰的功能放在单独的类中,并让这个类包装它所要装饰的对象,因此,当需要执行特殊行为时,客户代码就可以在运行时根据需要有选择地、按顺序地使用装饰功能包装对象了。



![[C++从入门到精通] 11.回顾类内初始化、默认构造函数、=default](https://img-blog.csdnimg.cn/487ab8f16a4a4fd4b499ffcb74300995.png)

