一、创建vue3项目
需要node16版本或者以上,
npm init vue@latest

二、vue3模块
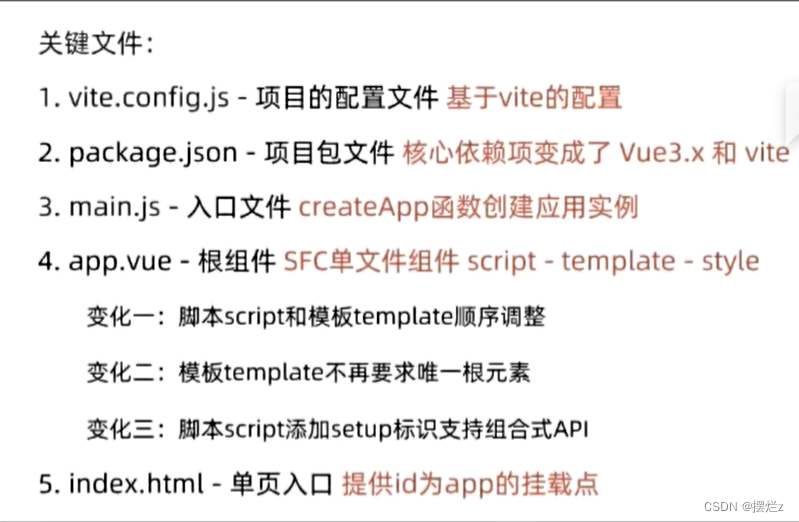
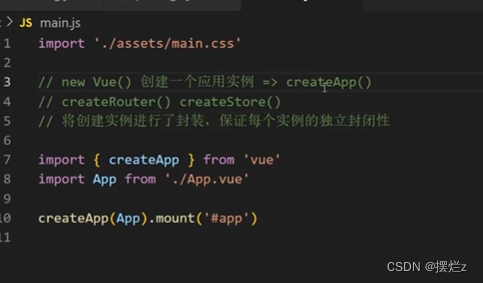
在vue3中所有的创建都用了函数封装,保证了每个实例的独立性
三、setup
1、setup选项
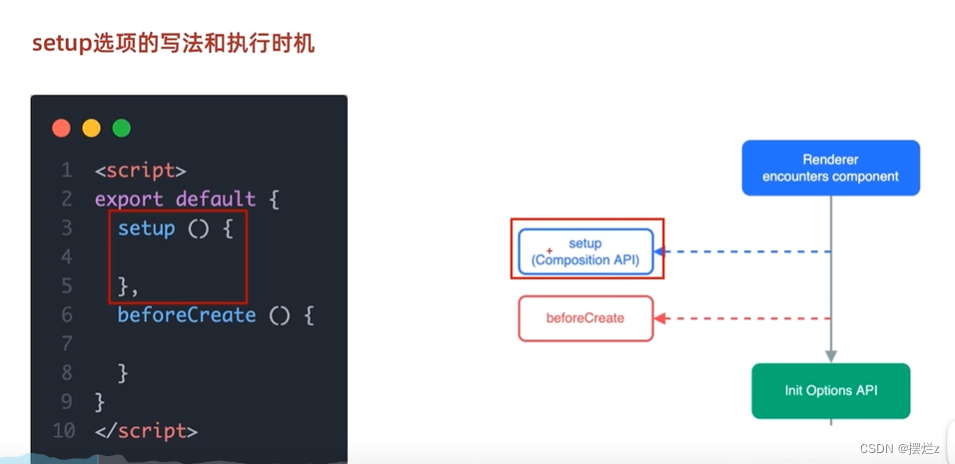
setup组合式api
1、执行时间比beforeCreate还早
2、setup函数,获取不到this
3、数据和函数需要return出去才可以使用
<script>
export default {

  setup(){
    console.log("setup", this)

    const message = "消息"
    const aaa = () =>{
      console.log("函数调用")
    }
    return {
      message,
      aaa
    }
  },
  beforeCreate() {
    console.log("beforeCreate")
  }
}
</script>

<template>
  <div>{{message}}</div>
  <button @click="aaa">点击按钮</button>
</template>
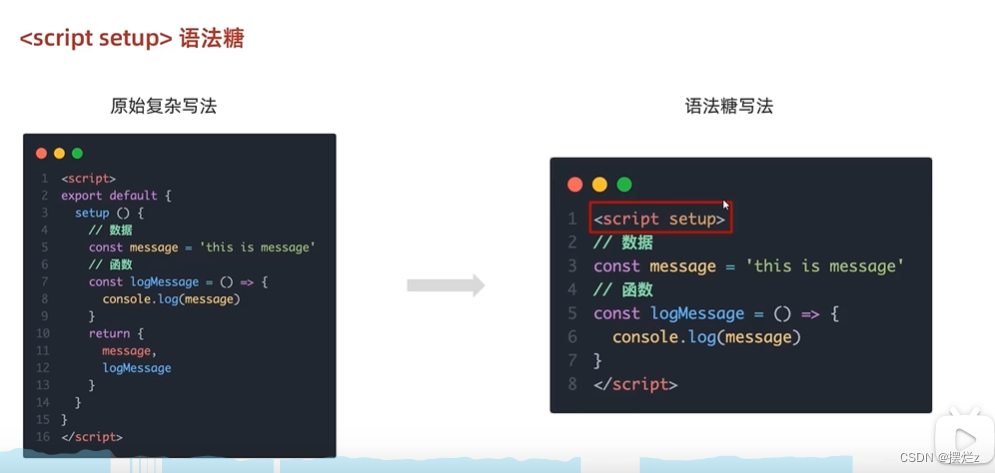
2、setup语法糖(<script setup>)
不需要return就可以使用函数和参数
<script setup>
   const message = "消息"
    const aaa = () =>{
      console.log("函数调用")
    }
</script>

<template>
  <div>{{message}}</div>
  <button @click="aaa">点击按钮</button>
</template>
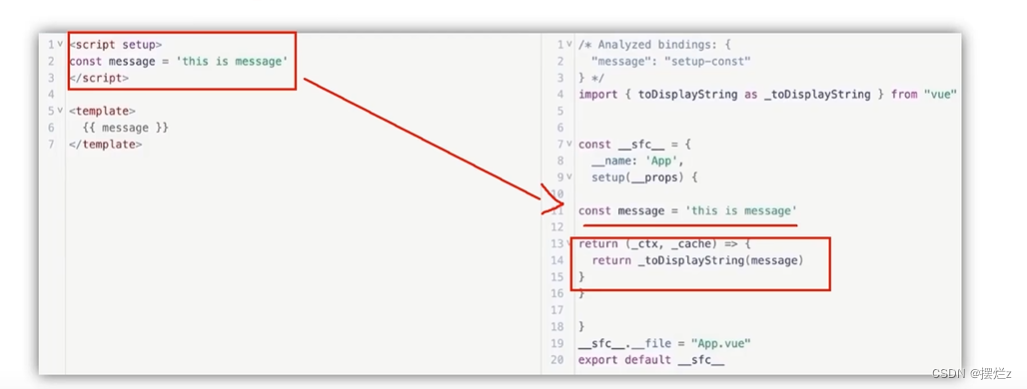
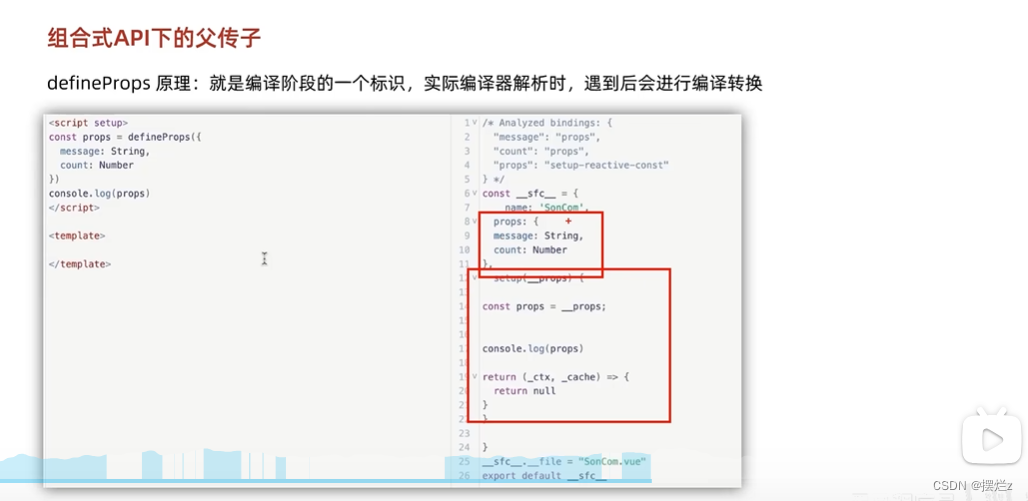
3、setup原理
四、响应式(推荐使用ref)
1、reactive 响应式对象
<script setup>
  import { reactive } from 'vue'
  const state = reactive({
    count: 100
  })

  const aaa = () => {
    state.count++
  }


</script>

<template>
  <div>{{state.count}}</div>
  <button @click="aaa">增加</button>
</template>
2、ref 响应式简单类型或者对象类型
实际上ref是被给包了一层,可以打印看到变成了对象
1、在js中需要
变量.value去拿到值
2、在vue的template可以直接拿到值(vue3给拔了一层)
<script setup>
  import { ref } from 'vue'
  const count = ref(0)
  console.log("包装了对象", count)
  console.log("取值", count.value)
  const aaa = () => {
    count.value++
  }


</script>

<template>
  <!-- 直接取值就行 -->
  <div>{{count}}</div>
  <button @click="aaa">增加</button>
</template>
五、计算属性
1、computed
<script setup>
  import { ref, computed } from 'vue'
  const list = ref([0,1,2,3,4,5])
  const computedList = computed(()=>{
    return list.value.filter(item => item > 2)
  })
  const aaa = () => {
    list.value.push("666")
  }
</script>

<template>
  <!-- 直接取值就行 -->
  <div>{{ list }}</div>
  <div>{{ computedList }}</div>
  <button @click="aaa">增加</button>
</template>
2、computed完整写法
<script setup>
  import { ref, computed } from 'vue'
  const count = ref(1)
  const computedList = computed({
    //简写get: () => count.value + 1
    get() {
      return count.value + 1
    },
    set(val){
      console.log(val)
      count.value = val
    }
  })
  const aaa = () => {
    computedList.value = 100
  }

</script>

<template>
  <!-- 直接取值就行 -->
  <div>{{ computedList }}</div>
  <button @click="aaa">增加</button>
</template>
六、watch监听
1、watch监听单个
<script setup>
  import { ref, watch } from 'vue'
  const count = ref(0)
  const name = ref('张三')

  const setName = () => {
    name.value = "里斯"
  }

  const setCount = () => {
    count.value = 18
  }


  // 单个监听
  watch(count, (newValue, oldValue)=>{
    if (newValue == 18) {
      name.value = "小伙子"
    }
  })

</script>

<template>

<div>{{count}}</div>
<div>{{name}}</div>
<button @click="setName">修改名称</button>
<button @click="setCount">修改年龄</button>
</template>
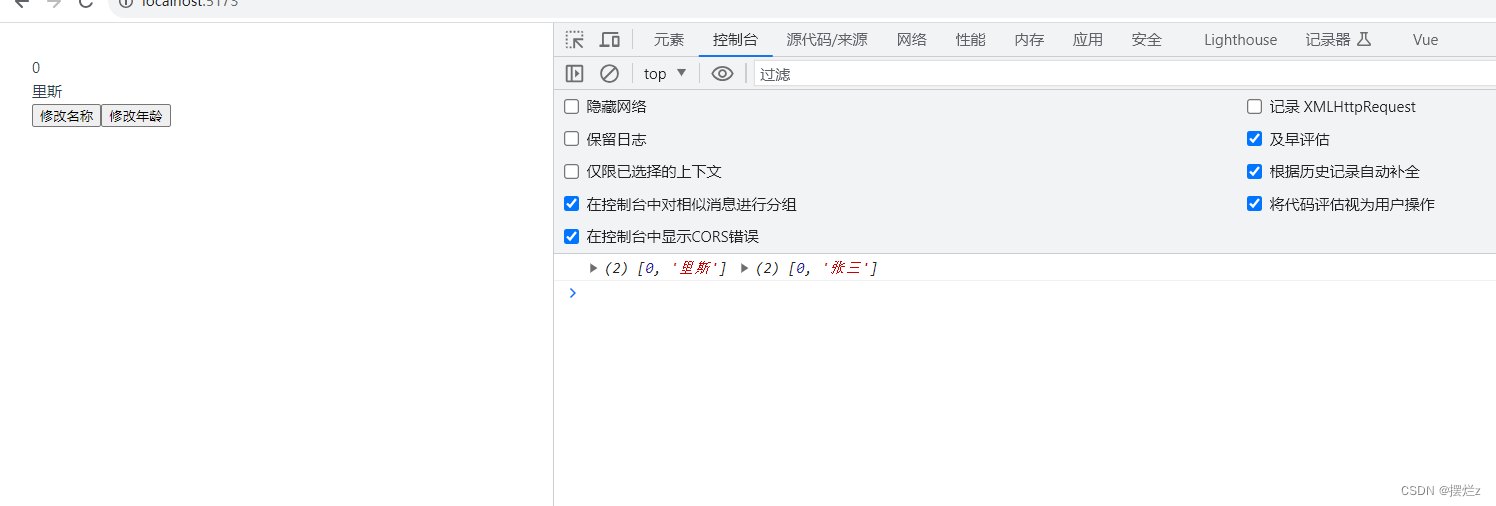
2、watch监听多个
<script setup>
  import { ref, watch } from 'vue'
  const count = ref(0)
  const name = ref('张三')

  const setName = () => {
    name.value = "里斯"
  }

  const setCount = () => {
    count.value = 18
  }

  //多个监听
  watch([count, name], (newValue, oldValue)=>{
    console.log(newValue, oldValue)
  })
</script>

<template>
<div>{{count}}</div>
<div>{{name}}</div>
<button @click="setName">修改名称</button>
<button @click="setCount">修改年龄</button>
</template>
3、watch监听配置参数
deep:true 对复杂类型进行深度监听
immdiate:true 页面初始化 立刻执行一次
这边就简写了
<script setup>
  import { ref, watch } from 'vue'
  const count = ref(0)
  const name = ref('张三')

  const setName = () => {
    name.value = "里斯"
  }

  const setCount = () => {
    count.value = 18
  }

  //多个监听
  watch([count, name], (newValue, oldValue)=>{
    console.log(newValue, oldValue)
  },{
  	deep:true,
  	immdiate:true
  })
</script>

<template>
<div>{{count}}</div>
<div>{{name}}</div>
<button @click="setName">修改名称</button>
<button @click="setCount">修改年龄</button>
</template>
4、精准监听对象

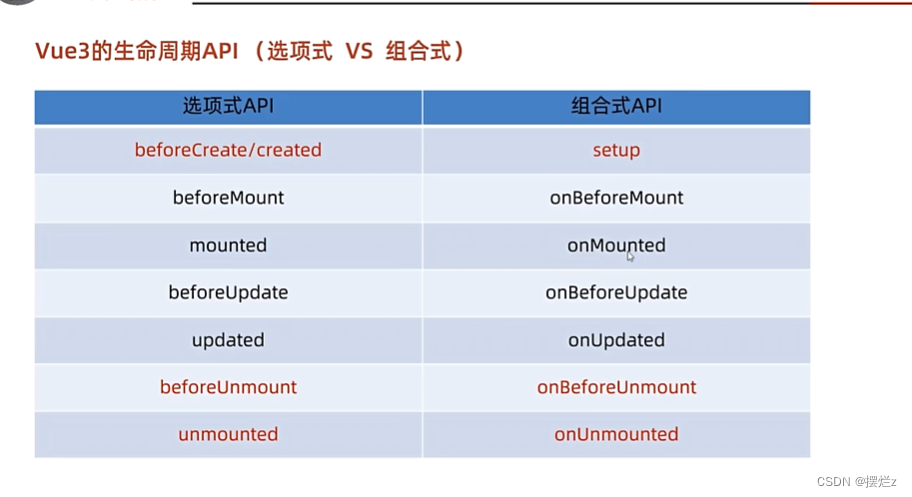
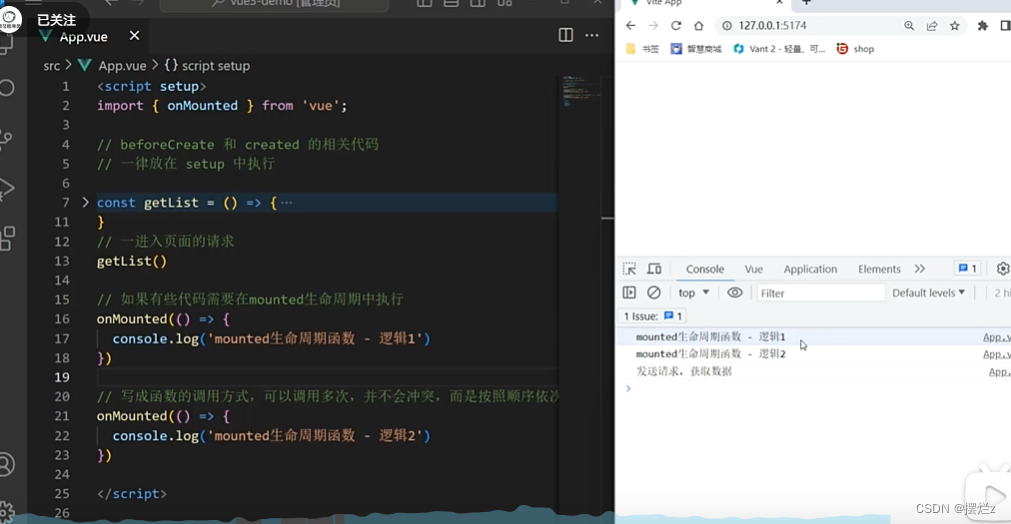
七、生命周期
八、父子通信
8.1、父传子
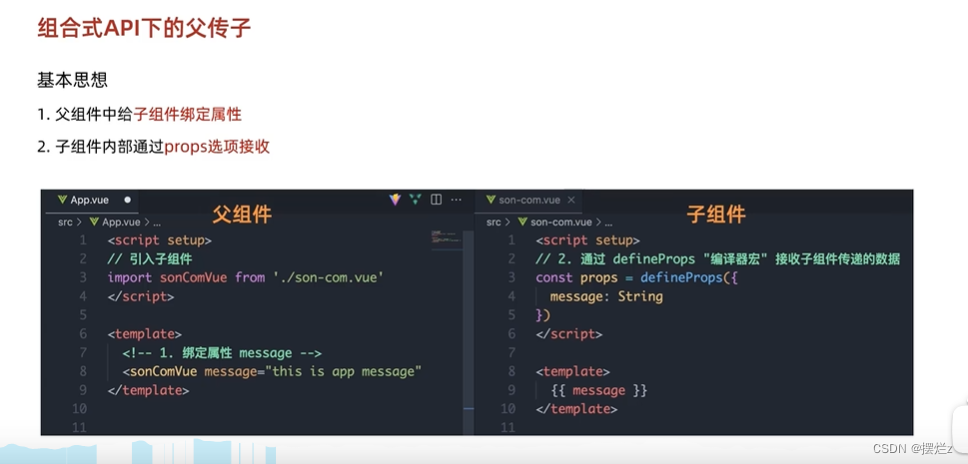
1、父传子语法
语法
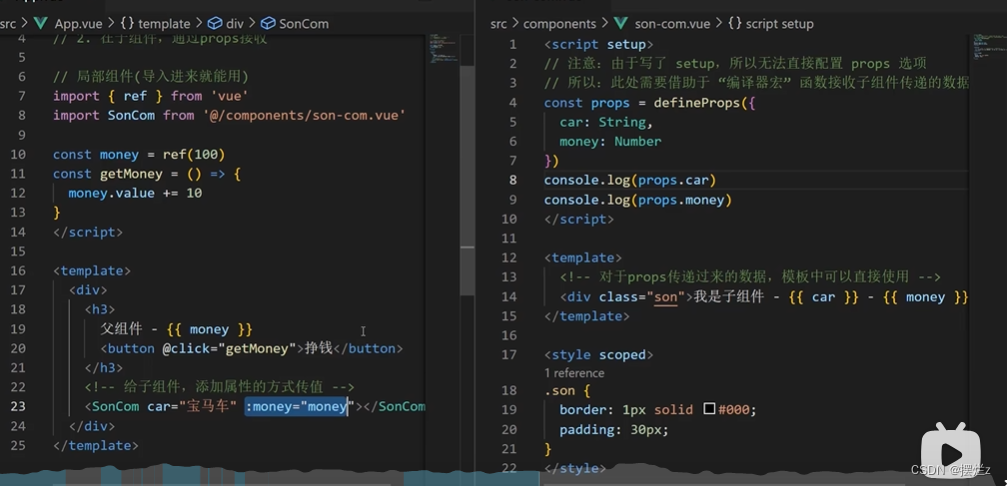
实例:其中:money是动态绑定的,到子组件就会动态变化
2、原理
8.2、子传父
1、语法
语法
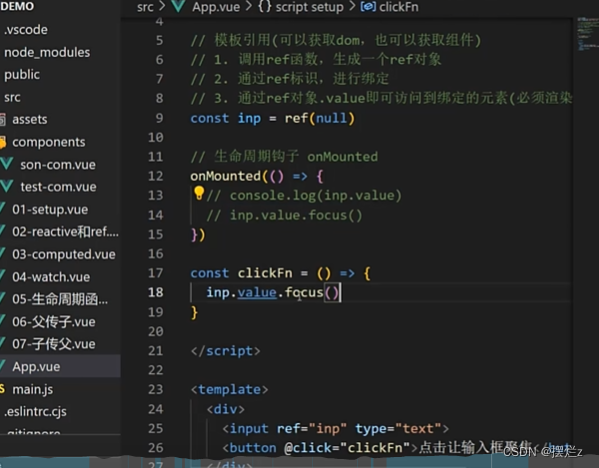
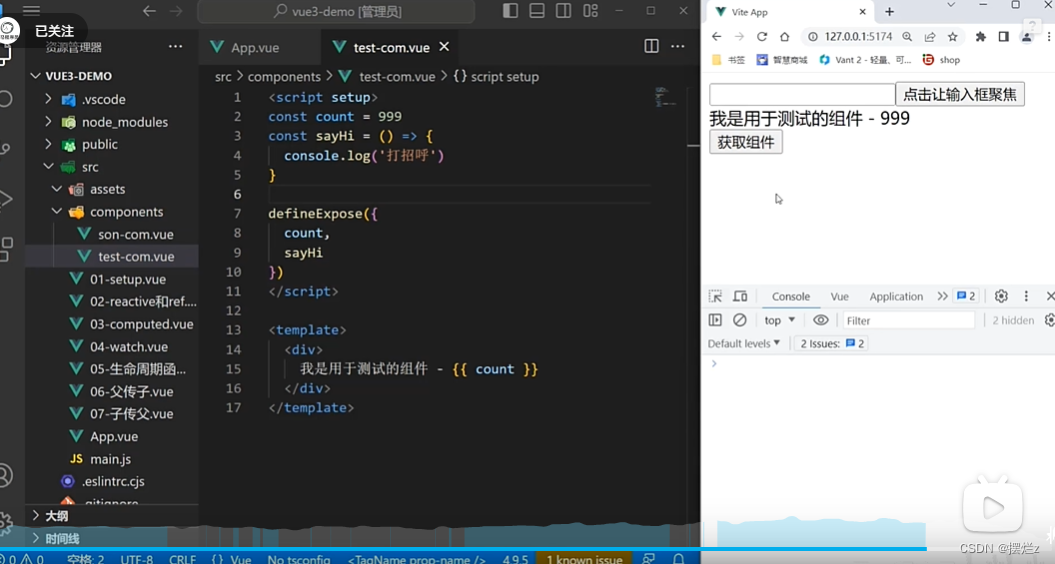
九、模板引用和defineExpose宏函数
1、ref获取dom对象
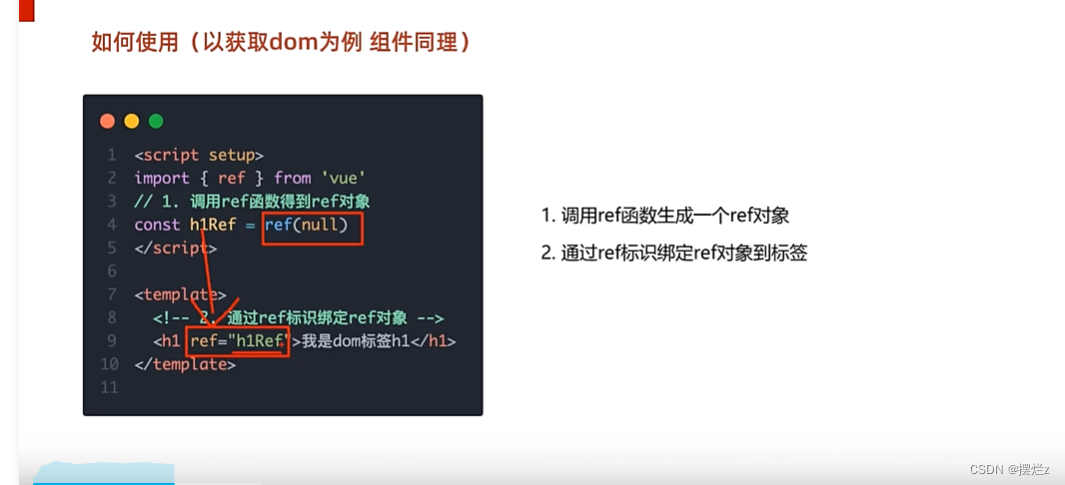
案例
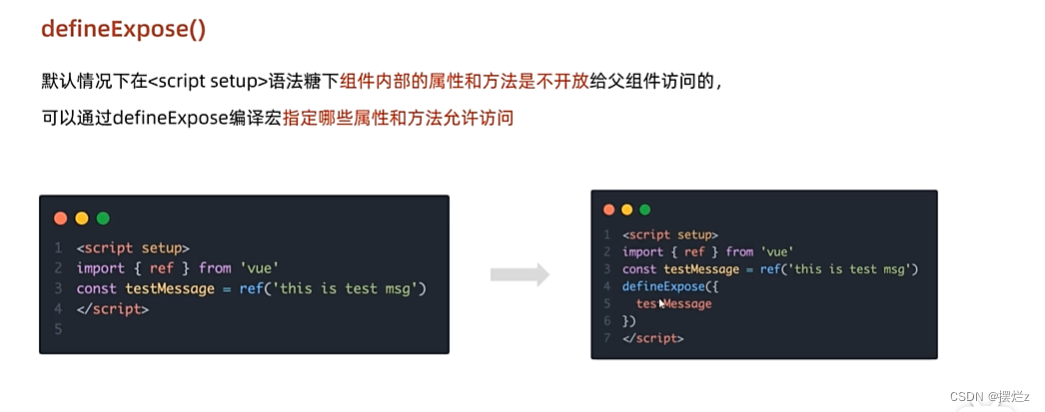
2、defineExpose宏函数
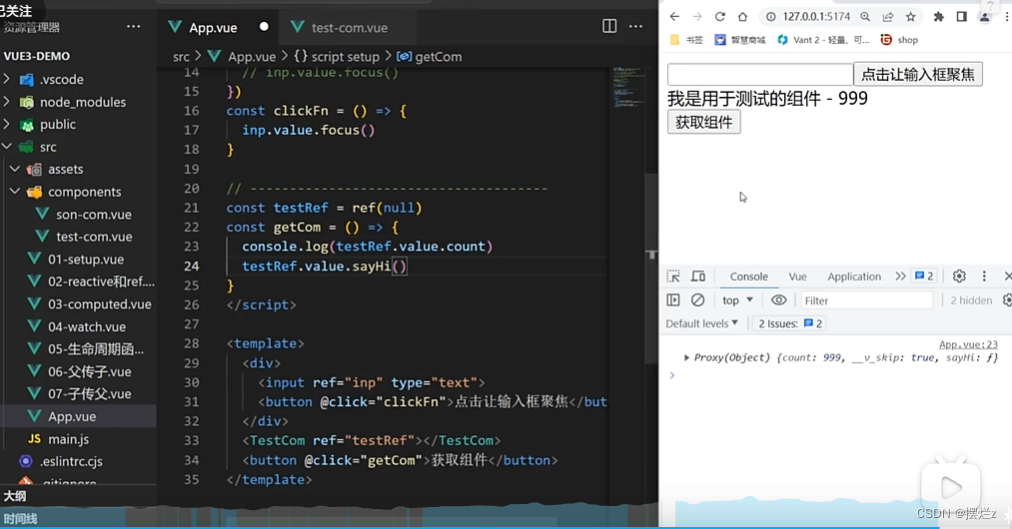
ref调用子组件内的方法
子组件
父组件
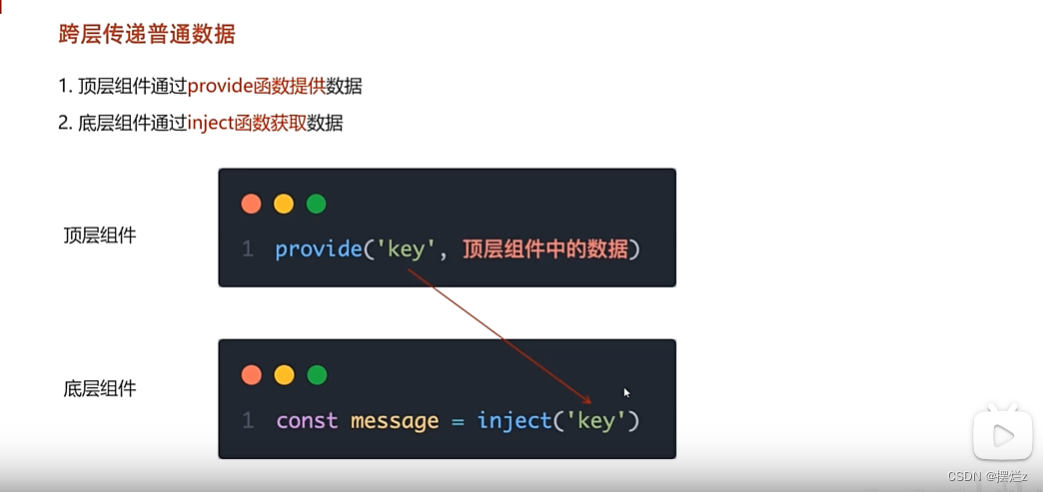
十、provide和inject跨层级别通讯
语法 顶层组件也可以把函数传递下去
十一、vue3.3的新特性
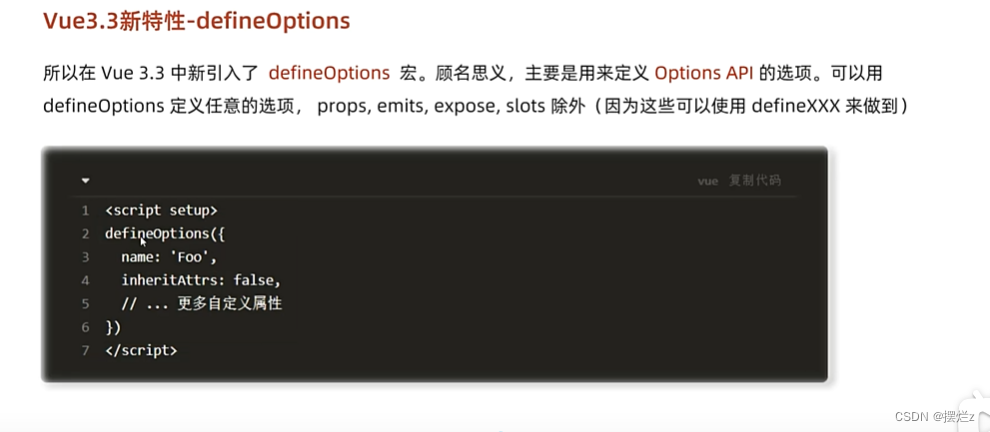
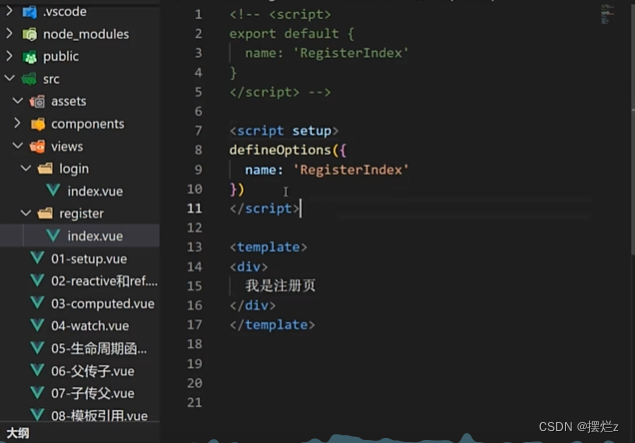
1、defineOptions(与setup函数平级例如:组件命名)
语法:
例子
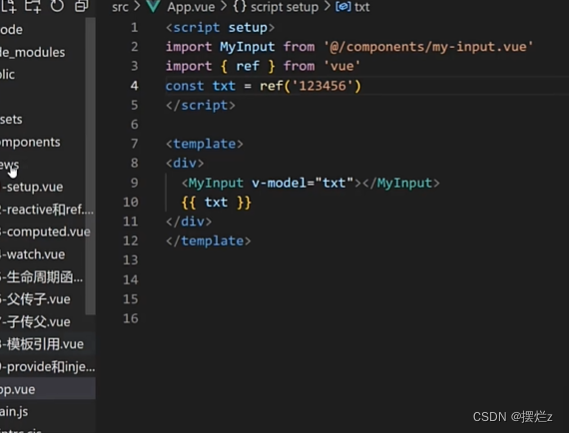
2、defineModel(为了解决动态绑定值传递问题)
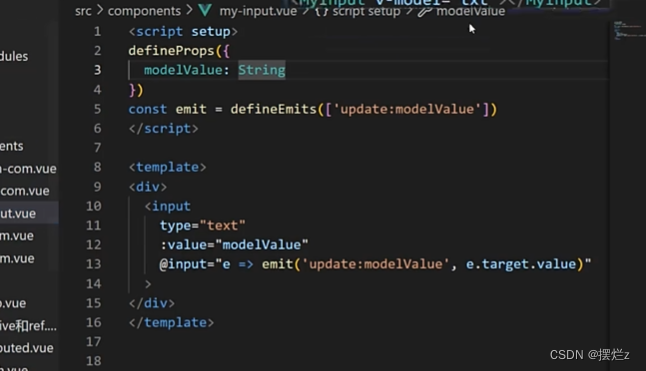
1、原本实现方法(使用vue2的逻辑在vue3中写)
父组件
子组件
1、先接prop
2、注册emit发送事件
3、监听组件value
4、发送组件消息
2、新特性的写法
语法
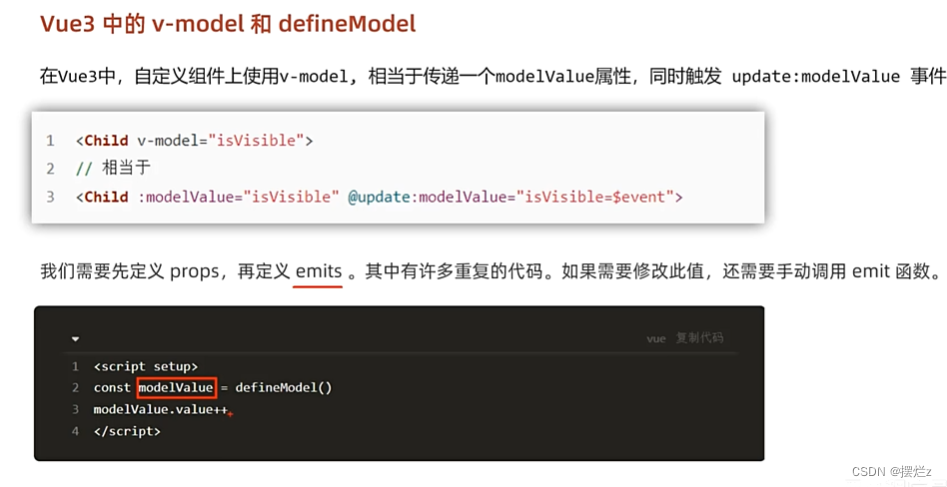
案例
- 父组件不变
- 子组件
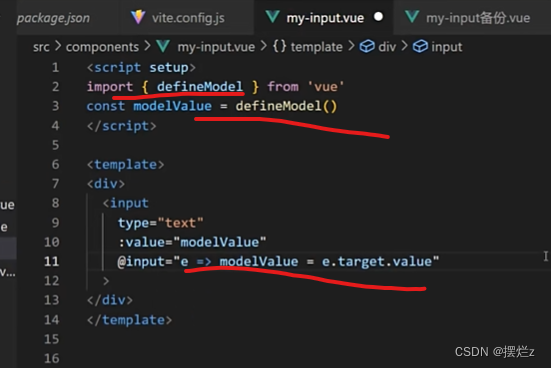
- 开启事件(
vite.config.js中开启)
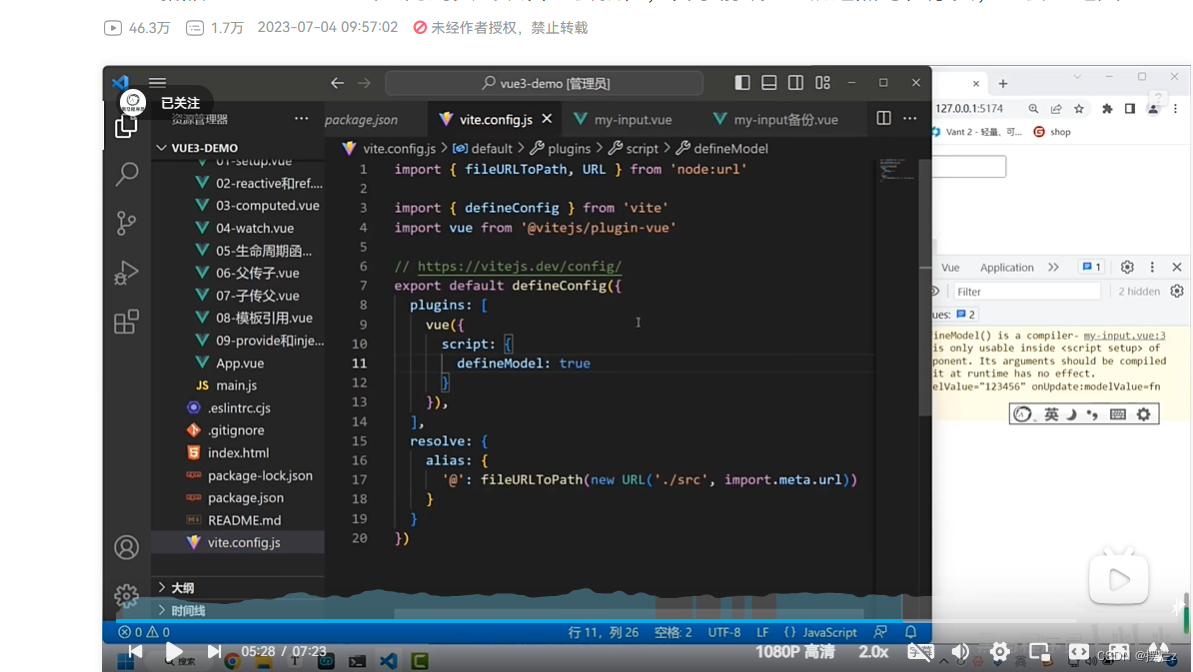
- 重启vue项目
十二、pinia(替代vuex)
1、pinia是什么
官网
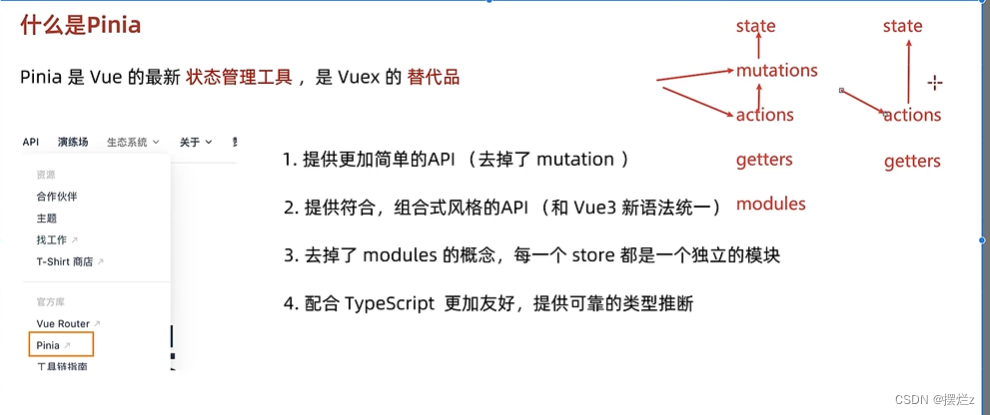
2、变量和函数和计算
安装
npm install pinia
导包
import { createApp } from 'vue'
import App from './App.vue'
//1、导入
import { createPinia } from 'pinia'
//2、.use(createPinia())
createApp(App).use(createPinia()).mount('#app')
使用
新建目录store,新建counter.js
import { defineStore } from "pinia";
import { ref,computed } from "vue";

export const useCounterStore = defineStore('counter', () => {
    //声明变量
    const count = ref(100)

    //声明函数action
    const addCount = () => count.value++
    const subCount = () => {
        count.value--
    }

    //计算属性getters(computed)
    const double = computed(() => count.value * 2)

    //声明变量
    const msg = ref('hello')

    return {
        addCount,
        subCount,
        count,
        msg,
        double
    }

})
App.vue
<script setup>
import Son1Com from '@/components/Son1Com.vue';
import Son2Com from '@/components/Son2Com.vue';


</script>

<template>
  <Son1Com></Son1Com>
  <Son2Com></Son2Com>


</template>
Son1Com
<script setup>
import { useCounterStore } from '@/store/counter'


const counterStore = useCounterStore()

</script>
<template>
    <h1>{{ counterStore.count }}</h1>
    <div>我是Son1</div>
    <button @click="counterStore.addCount">+</button>

    <h3>{{counterStore.double}}</h3>
</template>
Son2Com
<script setup>
import { useCounterStore } from '@/store/counter'
const counterStore = useCounterStore()
</script>
<template>

    <h1>{{ counterStore.count }}</h1>
    <div>我是Son2</div>
    <button @click="counterStore.subCount">-</button>
</template>
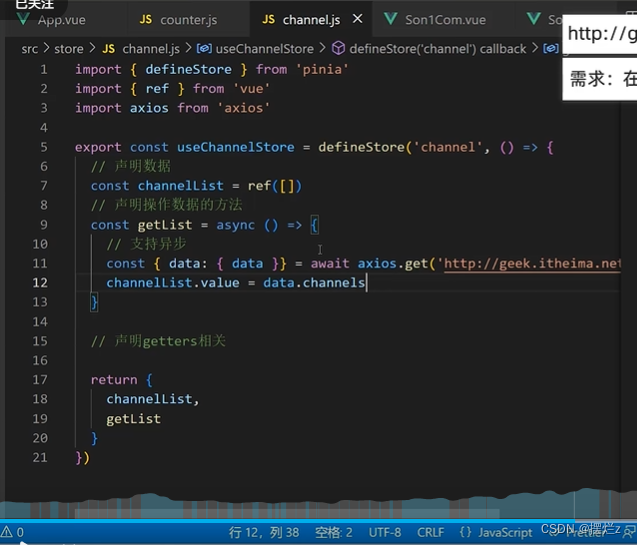
3、异步函数
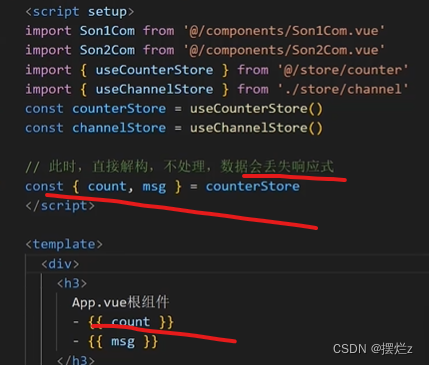
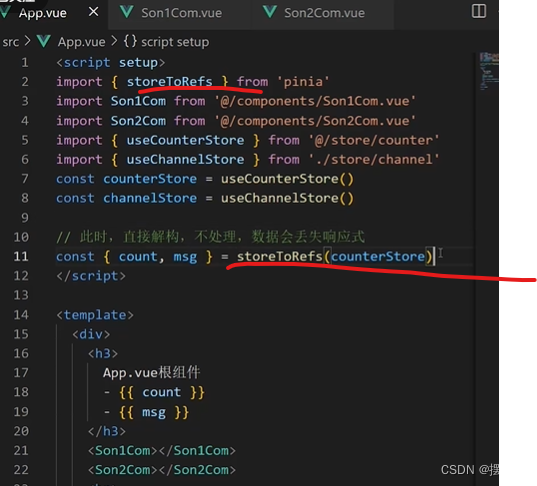
4、storeRefs方法
注意直接解构不会响应式
如何变成响应式
5、持久化persistedstate插件
官网
使用
安装
npm i pinia-plugin-persistedstate
将插件添加到 pinia 实例上在main.js当中
import { createApp } from 'vue'
import { createPinia } from 'pinia'
import piniaPluginPersistedstate from 'pinia-plugin-persistedstate'

const pinia = createPinia()
pinia.use(piniaPluginPersistedstate)
createApp(App).use(pinia).mount('#app')
使用在counter.js中
import { defineStore } from "pinia";
import { ref,computed } from "vue";
export const useCounterStore = defineStore('counter', () => {
    //声明变量
    const count = ref(100)
    return {
        count
    }
},{
    // 开启持久化
    persist: true,
})
持久化参数
import { defineStore } from "pinia";
import { ref,computed } from "vue";
export const useCounterStore = defineStore('counter', () => {
    //声明变量
    const count = ref(100)
    return {
        count
    }
},{
    // 开启持久化
    persist: {
	//看文档
	}
})
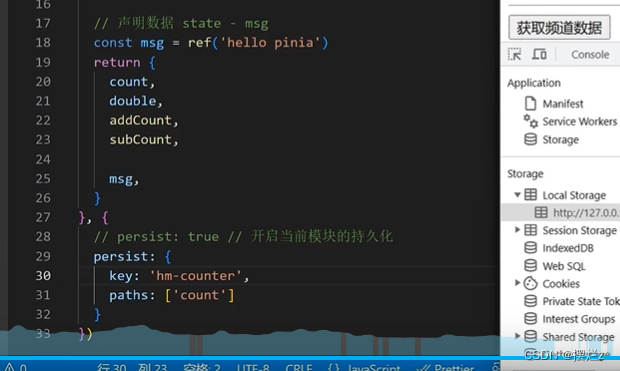
其中paths持久存储哪些值
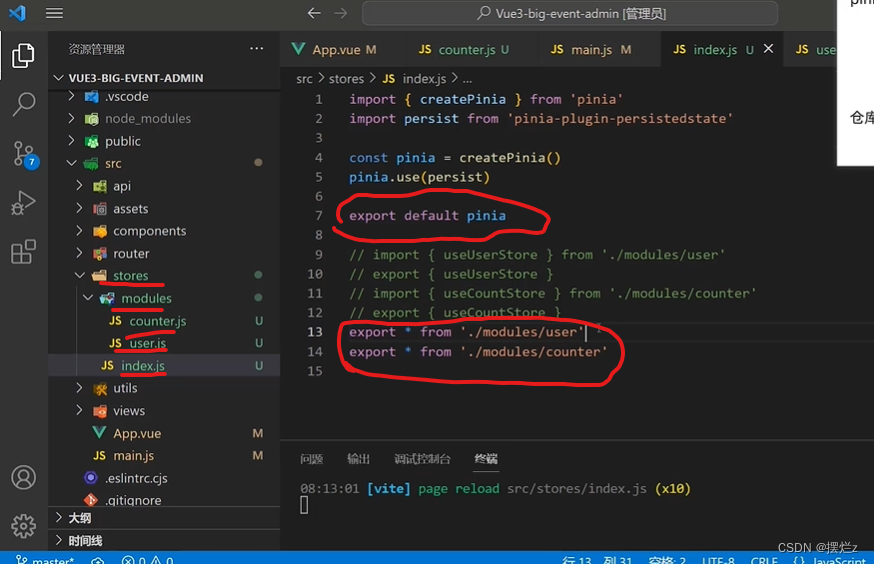
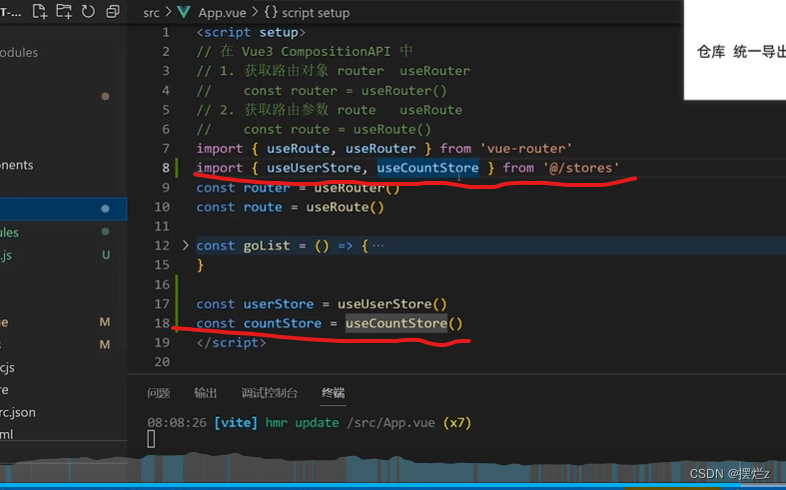
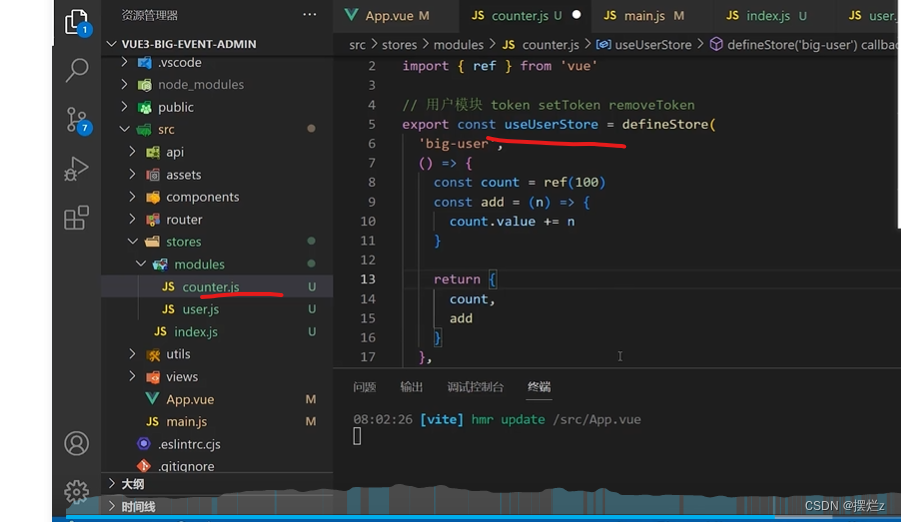
6、封装
记得在main.js中vue实体记得use一下pinia
使用
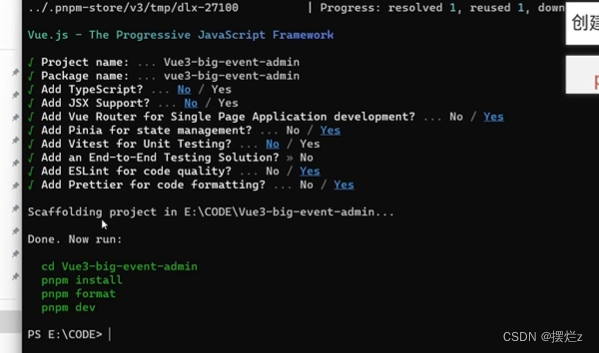
十三、pnpm创建项目
命令
npm install -g pnpm
pnpm create vue
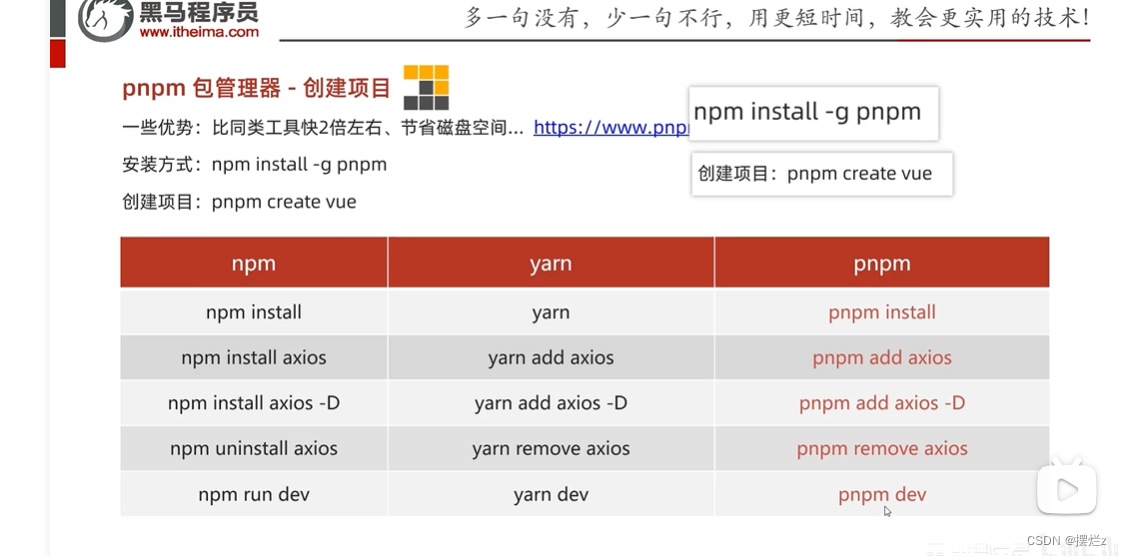
项目创建
十四、eslint和prettier配置代码风格
1、下载插件
vscode中prettier插件卸载
安装ESLint插件
2、配置.eslint.cjs文件
/* eslint-env node */
require('@rushstack/eslint-patch/modern-module-resolution')

module.exports = {
  root: true,
  extends: [
    'plugin:vue/vue3-essential',
    'eslint:recommended',
    '@vue/eslint-config-prettier/skip-formatting'
  ],
  parserOptions: {
    ecmaVersion: 'latest'
  },


//此处开始配置
  rules: {
    'prettier/prettier': [
      'warn',
      {
        singleQuote: true, //单引号
        semi: false, //无分号
        printWith: 80, //行宽
        trailingComma: 'none', //不加对象|数组最后的逗号
        endOfLine: 'auto' // 换行符号不限
      }
    ],
    //ESLint关注代码规范
    'vue/multi-word-component-names': [
      'warn',
      {
        ignores: ['index'] //vue组件名称多单词组成(忽略index.vue)
      }
    ],
    'vue/no-setup-props-destructure': ['off'], //关闭prop结构的校验(props结构丢失响应式)
    //变量未定义报错
    'no-undef': 'error'
  }
}
3、打开设置(左下角)
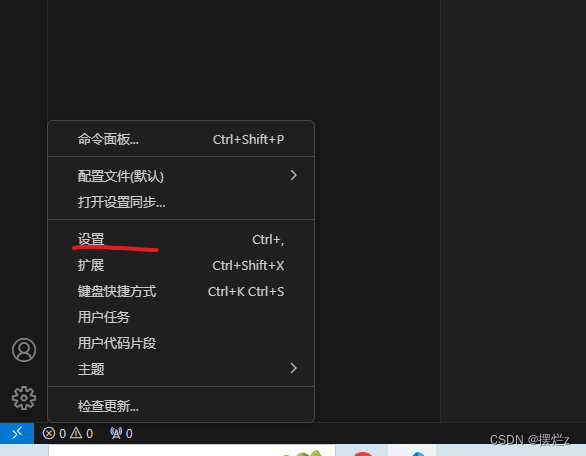

1和2加上去
{
    "explorer.confirmDelete": false,
    "security.workspace.trust.untrustedFiles": "open",
    "workbench.editorAssociations": {
        "*.dll": "default"
    },

    // 1保存自动修复
    "editor.codeActionsOnSave": {
        "source.fixAll": true
    },
    // 2关闭保存自动格式化
    "editor.formatOnSave": false
}
十五、路由
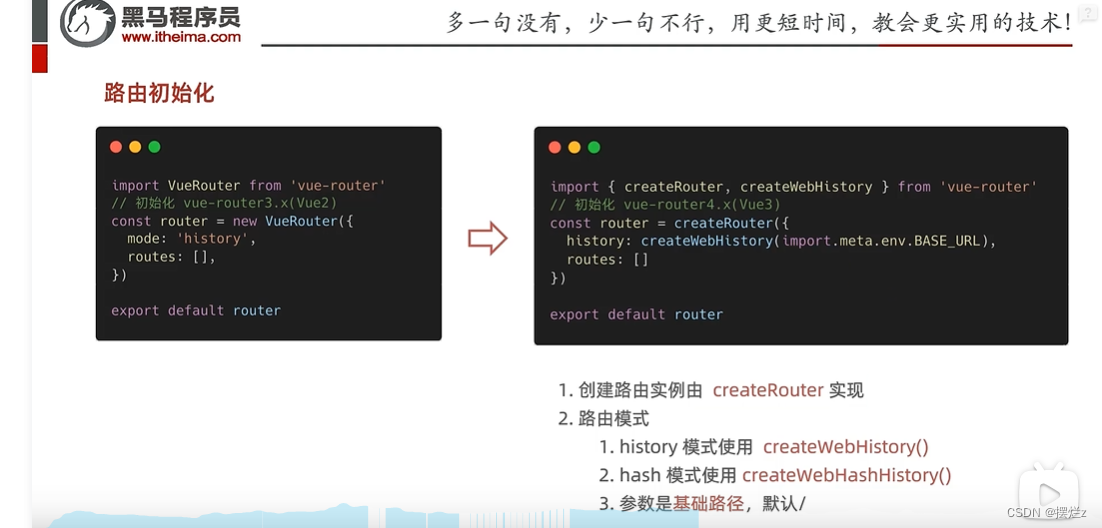
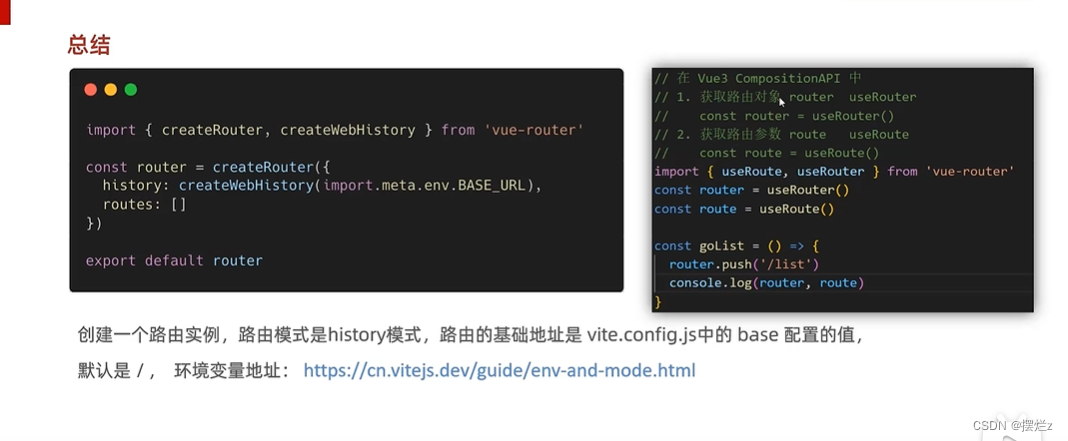
简单介绍
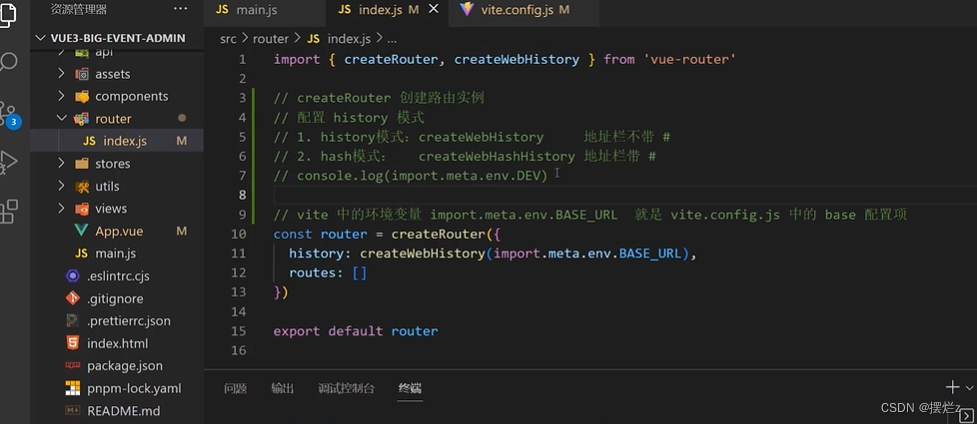
其中这个文件是router文件夹下的index.js文件
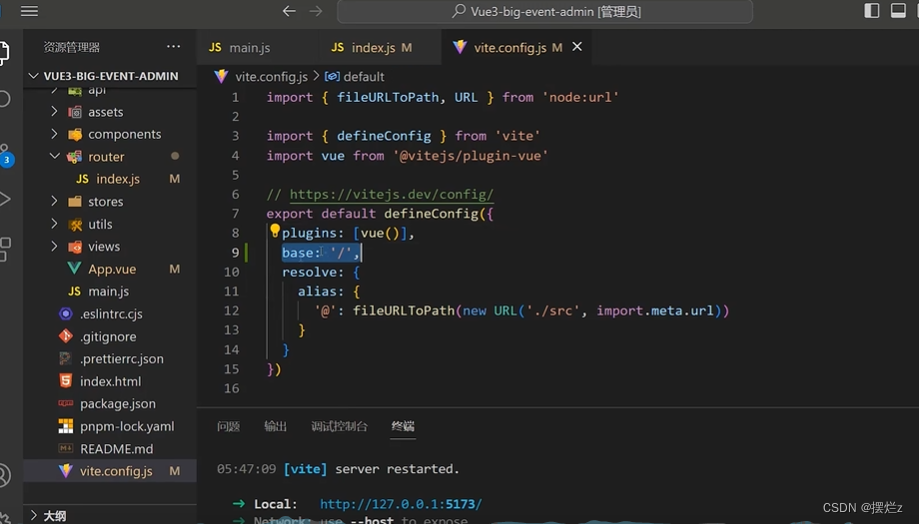
import.meta.env.BASE_URL这个是比如使用了hash模式,其中那个#号可以在这通过变量传来,变量在vite.config.js文件中
语法
支持vue2的用法直接在模板中进行$xxx.push
十六、axios
pnpm add axios
封装跟vue2差不多,你自己看着找找
十七、路由守卫
唯一不同的就是next换成了
//全局前置路由,配合浏览器localStorage进行鉴权操作
const urls = ['/pay','/myOrder']
router.beforeEach((to, from, next) =>{

    // console.log(to, from);

    if(!urls.incloudes(to.path)){

     	return true
    }
    //如果没有token并且还是鉴权路径
    return '/login'
})

// 全局后置路由,简单写一个弹窗,在进入每一个路由组件后弹出一句话
router.afterEach(() =>{
    alert('欢迎你!!');
})
