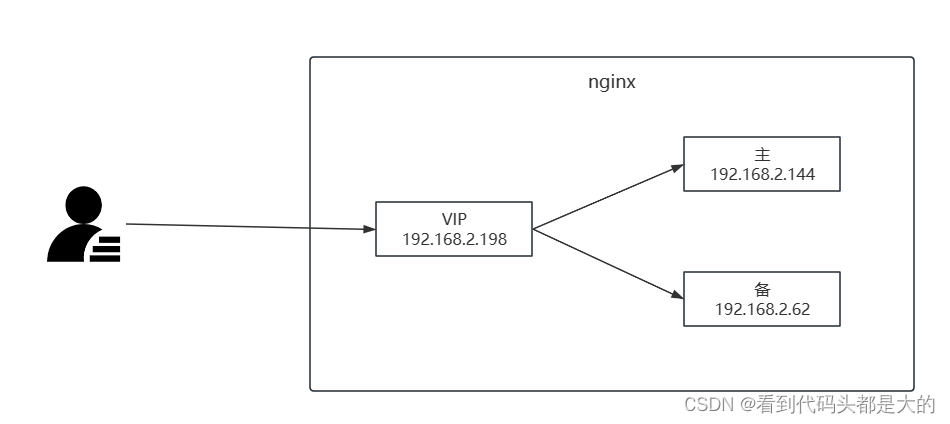
1. nginx部署
单机部署可参考:https://blog.csdn.net/ym5209999/article/details/119897237
2. keepalived安装
[root@nginx1 ~]# yum -y install keepalived
3. keepalived配置
3.1 安装完成后,默认配置文件位于:/etc/keepalived,默认配置如下:
keepalived.conf
! Configuration File for keepalived

global_defs {
   notification_email {
     acassen@firewall.loc
     failover@firewall.loc
     sysadmin@firewall.loc
   }
   notification_email_from Alexandre.Cassen@firewall.loc
   smtp_server 192.168.200.1
   smtp_connect_timeout 30
   router_id LVS_DEVEL
   vrrp_skip_check_adv_addr
   vrrp_strict
   vrrp_garp_interval 0
   vrrp_gna_interval 0
}

vrrp_instance VI_1 {
    state MASTER
    interface eth0
    virtual_router_id 51
    priority 100
    advert_int 1
    authentication {
        auth_type PASS
        auth_pass 1111
    }
    virtual_ipaddress {
        192.168.200.16
        192.168.200.17
        192.168.200.18
    }
}

virtual_server 192.168.200.100 443 {
    delay_loop 6
    lb_algo rr
    lb_kind NAT
    persistence_timeout 50
    protocol TCP

    real_server 192.168.201.100 443 {
        weight 1
        SSL_GET {
            url {
              path /
              digest ff20ad2481f97b1754ef3e12ecd3a9cc
            }
            url {
              path /mrtg/
              digest 9b3a0c85a887a256d6939da88aabd8cd
            }
            connect_timeout 3
            nb_get_retry 3
            delay_before_retry 3
        }
    }
}

virtual_server 10.10.10.2 1358 {
    delay_loop 6
    lb_algo rr
    lb_kind NAT
    persistence_timeout 50
    protocol TCP

    sorry_server 192.168.200.200 1358

    real_server 192.168.200.2 1358 {
        weight 1
        HTTP_GET {
            url {
              path /testurl/test.jsp
              digest 640205b7b0fc66c1ea91c463fac6334d
            }
            url {
              path /testurl2/test.jsp
              digest 640205b7b0fc66c1ea91c463fac6334d
            }
            url {
              path /testurl3/test.jsp
              digest 640205b7b0fc66c1ea91c463fac6334d
            }
            connect_timeout 3
            nb_get_retry 3
            delay_before_retry 3
        }
    }

    real_server 192.168.200.3 1358 {
        weight 1
        HTTP_GET {
            url {
              path /testurl/test.jsp
              digest 640205b7b0fc66c1ea91c463fac6334c
            }
            url {
              path /testurl2/test.jsp
              digest 640205b7b0fc66c1ea91c463fac6334c
            }
            connect_timeout 3
            nb_get_retry 3
            delay_before_retry 3
        }
    }
}

virtual_server 10.10.10.3 1358 {
    delay_loop 3
    lb_algo rr
    lb_kind NAT
    persistence_timeout 50
    protocol TCP

    real_server 192.168.200.4 1358 {
        weight 1
        HTTP_GET {
            url {
              path /testurl/test.jsp
              digest 640205b7b0fc66c1ea91c463fac6334d
            }
            url {
              path /testurl2/test.jsp
              digest 640205b7b0fc66c1ea91c463fac6334d
            }
            url {
              path /testurl3/test.jsp
              digest 640205b7b0fc66c1ea91c463fac6334d
            }
            connect_timeout 3
            nb_get_retry 3
            delay_before_retry 3
        }
    }

    real_server 192.168.200.5 1358 {
        weight 1
        HTTP_GET {
            url {
              path /testurl/test.jsp
              digest 640205b7b0fc66c1ea91c463fac6334d
            }
            url {
              path /testurl2/test.jsp
              digest 640205b7b0fc66c1ea91c463fac6334d
            }
            url {
              path /testurl3/test.jsp
              digest 640205b7b0fc66c1ea91c463fac6334d
            }
            connect_timeout 3
            nb_get_retry 3
            delay_before_retry 3
        }
    }
}
3.2 按实际情况修改keepalived.conf
主
! Configuration File for keepalived

global_defs {
	# 路由ID,当前主机标识,必须唯一
   router_id LVS_DEVEL_144
   script_user root
   enable_script_security
}

vrrp_instance VI_1 {
	# 状态,可配置内容为:MASTER/BACKUP
    state MASTER
	# 网卡名称
    interface ens192
	# 主备节点需保持一致
    virtual_router_id 51
	# 优先级,当主节点宕机后,优先级最高的成为主节点
    priority 100
	# 主备同步时间间隔
    advert_int 1
	# 认证授权密码
    authentication {
        auth_type PASS
        auth_pass 1111
    }
    virtual_ipaddress {
        192.168.2.198 # 虚拟IP
    }
}
备
! Configuration File for keepalived

global_defs {
	# 路由ID,当前主机标识,必须唯一
   router_id LVS_DEVEL_62
   script_user root
   enable_script_security
}

vrrp_instance VI_1 {
	# 状态,可配置内容为:MASTER/BACKUP
    state BACKUP
	# 网卡名称
    interface ens192
	# 主备节点需保持一致
    virtual_router_id 51
	# 优先级,当主节点宕机后,优先级最高的成为主节点
    priority 80
	# 主备同步时间间隔
    advert_int 1
	# 认证授权密码
    authentication {
        auth_type PASS
        auth_pass 1111
    }
    virtual_ipaddress {
        192.168.2.198 # 虚拟IP
    }
}
4. 启动验证
# 启动nginx
[root@nginx1 ~]# /apps/nginx/sbin/nginx –c /apps/nginx/conf/nginx.conf

# 启动keepalived
[root@nginx1 ~]# systemctl start keepalived
1)启动完成后,查看主节点IP地址,在ens192下生成虚拟IP后,即可访问:192.168.2.198查看效果(在配置文件中,主节点priority 值大于备节点,故会生成在主节点);
2)将主节点keepalived服务结束后,再次访问192.168.2.198,会自动切换到备节点
5. 优化
当nginx服务器挂掉之后,由于keepalived服务保持正常,故VIP依旧保留在进程异常的服务器上,导致前端无法自动切换,故需要对配置进行优化。
优化点:定期检测nginx进程活性,若nginx服务不存在,则重启nginx服务,若无法启动,则将keepalived进程结束,使之正常切换到正常的keepalived。
nginx活性检测脚本:
nginx_check.sh
#!/bin/bash
A=`ps -C nginx --no-header |wc -l`   #查看是否有进程,把值赋给变量A
if [ $A -eq 0 ];then    #如果没有进程值则为0
   /apps/nginx/sbin/nginx –c /apps/nginx/conf/nginx.conf  #nginx的启动路径
    sleep 5   #尝试启动nginx等待5秒
	B=`ps -C nginx --no-header |wc -l`
    if [ $B -eq 0 ];then    #在查看一下是否有进程,没有则结束,杀掉keepalived
        systemctl stop keepalived
    fi
fi
将脚本上传至主、备服务器:/etc/keepalived/目录下,并授权(不能授权为777!!!)
chmod -R 755 nginx_check.sh
建议在启动验证的时候,打印系统日志,同步查看:tail -f /var/log/messages
主
! Configuration File for keepalived

global_defs {
	# 路由ID,当前主机标识,必须唯一
   router_id LVS_DEVEL_144
   script_user root
   enable_script_security
}

# ----------------------- 新增点 ------------------------
vrrp_script nginxcheck {
   script "/etc/keepalived/nginx_check.sh"
   interval 10
}
# ----------------------- 新增点 ------------------------

vrrp_instance VI_1 {
	# 状态,可配置内容为:MASTER/BACKUP
    state MASTER
	# 网卡名称
    interface ens192
	# 主备节点需保持一致
    virtual_router_id 51
	# 优先级,当主节点宕机后,优先级最高的成为主节点
    priority 100
	# 主备同步时间间隔
    advert_int 1
	# 认证授权密码
    authentication {
        auth_type PASS
        auth_pass 1111
    }
    virtual_ipaddress {
        192.168.2.198
    }
    # ----------------------- 新增点 ------------------------
	track_script {
		nginxcheck
	}
	# ----------------------- 新增点 ------------------------
}
备
! Configuration File for keepalived

global_defs {
	# 路由ID,当前主机标识,必须唯一
   router_id LVS_DEVEL_62
   script_user root
   enable_script_security
}

# ----------------------- 新增点 ------------------------
vrrp_script nginxcheck {
   script "/etc/keepalived/nginx_check.sh"
   interval 10
}
# ----------------------- 新增点 ------------------------

vrrp_instance VI_1 {
	# 状态,可配置内容为:MASTER/BACKUP
    state BACKUP
	# 网卡名称
    interface ens192
	# 主备节点需保持一致
    virtual_router_id 51
	# 优先级,当主节点宕机后,优先级最高的成为主节点
    priority 80
	# 主备同步时间间隔
    advert_int 1
	# 认证授权密码
    authentication {
        auth_type PASS
        auth_pass 1111
    }
    virtual_ipaddress {
        192.168.2.198
    }
    # ----------------------- 新增点 ------------------------
	track_script {
		nginxcheck
	}
	# ----------------------- 新增点 ------------------------
}
6. 验证
1)按上述配置完成后,重启keepalived,验证是否能把nginx进程自动拉起;
2)手动结束nginx进程,并故意将nginx_check.sh中nginx启动命令调整为错误命令,尝试是否会将对应节点keepalived进程自动结束。

