- 💂 个人主页:风间琉璃
- 🤟 版权: 本文由【风间琉璃】原创、在CSDN首发、需要转载请联系博主
- 💬 如果文章对你有帮助、欢迎关注、点赞、收藏(一键三连)和订阅专栏哦
前言
Fully Convolutional Network(FCN)是一种深度学习架构,主要用于图像分割任务。FCN 架构的典型应用包括语义分割、实例分割、物体检测等图像分析任务。它已经成为了计算机视觉领域图像分割任务的重要工具,并在许多竞赛和实际应用中取得了出色的成绩。
一、FCN简介
通常CNN网络在卷积层之后会接上若干个全连接层, 将卷积层产生的特征图(feature map)映射成一个固定长度的特征向量。
以AlexNet为代表的经典CNN结构适合于图像级的分类和回归任务,因为它们最后都期望得到整个输入图像的一个数值描述(概率),比如AlexNet的ImageNet模型输出一个1000维的向量表示输入图像属于每一类的概率(softmax归一化)。
下图中的猫, 输入AlexNet, 得到一个长为1000的输出向量, 表示输入图像属于每一类的概率, 其中在“tabby cat”这一类统计概率最高。

FCN对图像进行像素级的分类,从而解决了语义级别的图像分割(semantic segmentation)问题。与经典的CNN在卷积层之后使用全连接层得到固定长度的特征向量进行分类(全联接层+softmax输出)不同,FCN可以接受任意尺寸的输入图像,采用反卷积层对最后一个卷积层的feature map进行上采样, 使它恢复到输入图像相同的尺寸,从而可以对每个像素都产生了一个预测, 同时保留了原始输入图像中的空间信息, 最后在上采样的特征图上进行逐像素分类。
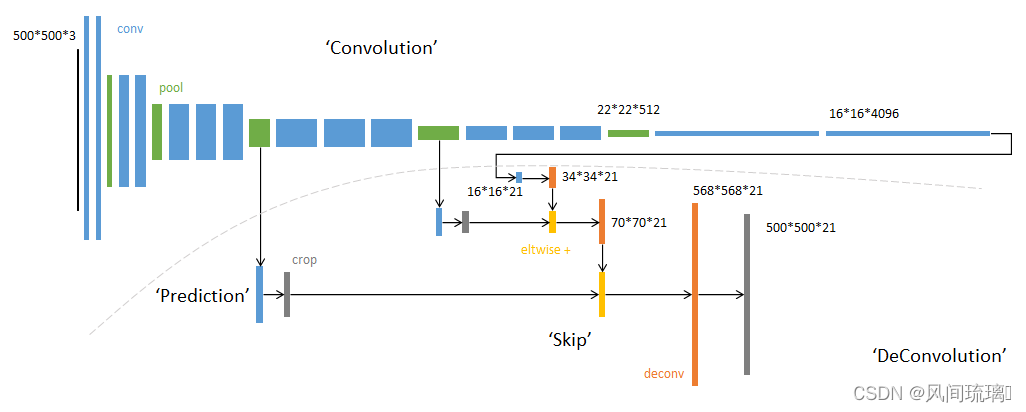
最后逐个像素计算softmax分类的损失, 相当于每一个像素对应一个训练样本。下图是Longjon用于语义分割所采用的全卷积网络(FCN)的结构示意图:
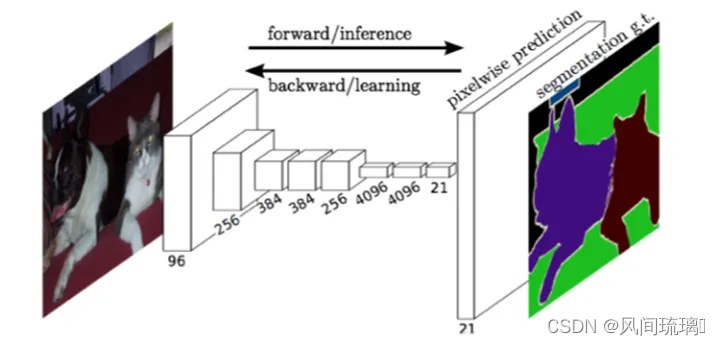
所以,FCN与CNN的区域在把于CNN最后的全连接层换成卷积层,输出的是一张已经Label好的图片。
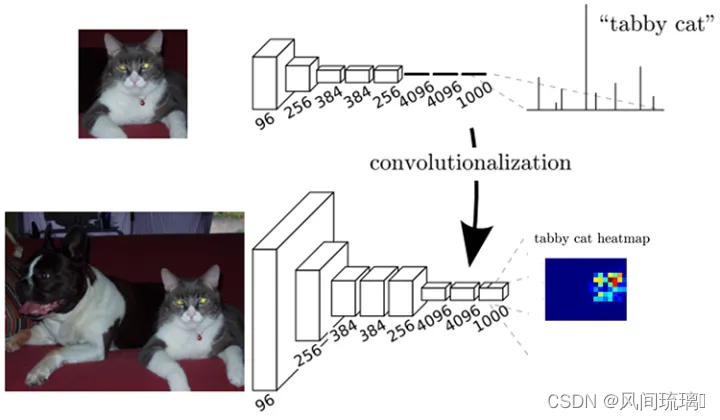
FCN原理: FCN将传统卷积网络后面的全连接层换成卷积层,这样网络输出不再是类别而是heatmap,同时为了解决因为卷积和池化对图像尺寸的影响,提出使用上采样的方式恢复。
核心思想:
- - 不含全连接层(fc)的全卷积(fully conv)网络。可适应任意尺寸输入。
- - 增大数据尺寸的反卷积(deconv)层。能够输出精细的结果。
- - 结合不同深度层结果的跳级(skip)结构。同时确保鲁棒性和精确性。
网络结构详图如下,输入可为任意尺寸图像彩色图像,输出与输入尺寸相同,深度为:20类目标+背景=21。
二、加载网络模型
这里使用Caffe深度学习框架中已经预训练好的FCN网络,需要相应的模型权重文件(.caffemodel)以及模型配置文件(.prototxt)。
加载模型和配置文件如下所示:
String model = "F:/data/CQU/VS/FCN_Segment/fcn8s-heavy-pascal.caffemodel";
String config = "F:/data/CQU/VS/FCN_Segment/fcn8s-heavy-pascal.prototxt";


//加载网络
Net net = readNetFromCaffe(config, model);
使用 CUDA进行加速添加下面两行代码:
//使用cuda加速
net.setPreferableBackend(cv::dnn::DNN_BACKEND_CUDA);
net.setPreferableTarget(cv::dnn::DNN_TARGET_CUDA_FP16);
三、预处理
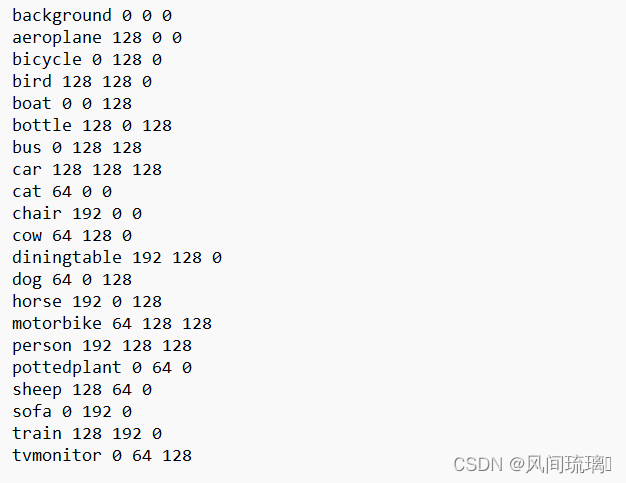
将FCN网络对应的目标检测分类标签(20个类别)以及对应颜色调入内存这样便于访问它们,通常这些类别信息存储在txt文件中。
String label = "F:/data/CQU/VS/FCN_Segment/pascal-classes.txt";

//读取分割对象颜色
vector<Vec3b> readColor(String labelpath)
{
    vector<Vec3b> colors;
    ifstream fp(labelpath);
    if (!fp.is_open())
    {
        printf("could not open the file...\n");
        exit(-1);
    }
	string line;
	while (!fp.eof())
	{
		//读取每一行
		getline(fp, line);
		if (line.length())
		{
			stringstream ss(line);
			string name;
			ss >> name;   //分割对象
			int temp;
			Vec3b color;  //依次读取三个通道的颜色值大小
			ss >> temp;
			color[0] = (uchar)temp;
			ss >> temp;
			color[1] = (uchar)temp;
			ss >> temp;
			color[2] = (uchar)temp;
			colors.push_back(color);
		}
	}
	return colors;
}

//读取标签颜色
vector<Vec3b> colors = readColor(label);
然后需要对输入图像进行预处理,主要要使输入图像尺寸满足网络输入的大小,网络输入的大小可以在配置文件prototxt中查看。

//图像预处理
resize(frame, frame, Size(500, 500));
Mat blobImage = blobFromImage(frame);
四、执行推理
图片预处理完成,就可以利用网络进行预测,这个过程也是把输入图像在网络各层中前向进行传播。
//构建输入
net.setInput(blobImage, "data");
//执行推理
Mat score = net.forward("score");
data和score是网络模型输入层和输出层的名称,可以网络配置文件prototxt中查看。
五、解析输出
在score中存储着网络的所有输出,还需要对score进行后处理,然后将分割结果显示。
//分割并显示
const int chns = score.size[1];
const int rows = score.size[2];
const int cols = score.size[3];
//每个像素的最大类别(通道)
Mat maxCl(rows, cols, CV_8UC1);
//每个像素的最大值
Mat maxVal(rows, cols, CV_32FC1);

//LUT查找
for(int c = 0; c < chns; c++)
{
	for(int row = 0; row < rows; row++)
	{
		//获取每个分割对象的置信度
		const float* ptrScore = score.ptr<float>(0, c, row);
		uchar* ptrMaxCl = maxCl.ptr<uchar>(row);
		float* ptrMaxVal = maxVal.ptr<float>(row);
		for(int col = 0; col < cols; col++)
		{
			//分割结果大于最大值
			if (ptrScore[col] > ptrMaxVal[col])
			{
				ptrMaxVal[col] = ptrScore[col];
				ptrMaxCl[col] = (uchar)c;
			}
		}
	}
}

//为每个像素分配一个对应的颜色,并将结果存储在result矩阵
Mat result = Mat::zeros(rows, cols, CV_8UC3);
for (int row = 0; row < rows; row++)
{
	const uchar* ptrMaxCl = maxCl.ptr<uchar>(row);
	Vec3b* ptrColor = result.ptr<Vec3b>(row);
	for (int col = 0; col < cols; col++)
	{
		ptrColor[col] = colors[ptrMaxCl[col]];
	}
}
Mat dst;
imshow("FCN", result);
//将两个图像按照一定的权重进行线性叠加,加入背景
//frame,result尺寸要相同
addWeighted(frame, 0.3, result, 0.7, 0, dst);
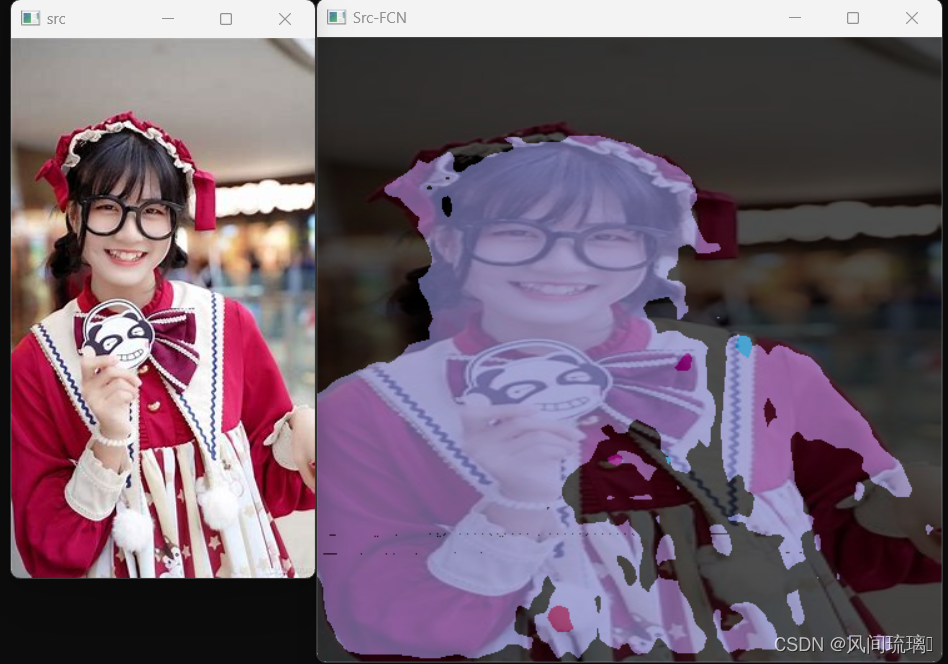
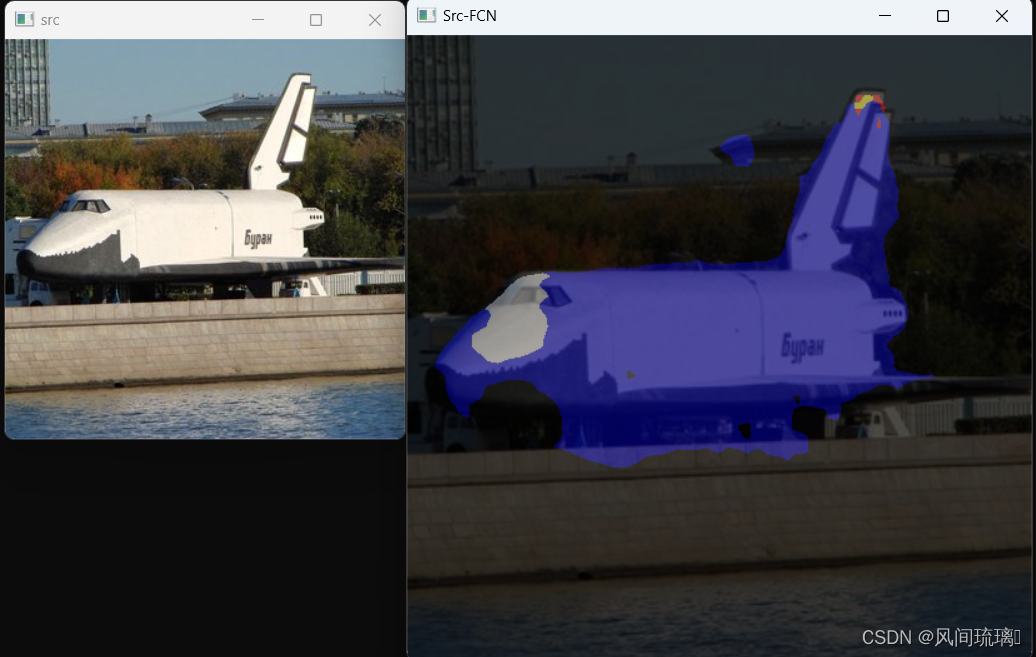
imshow("Src-FCN", dst);
运行结果:
源码:资源下载:OpenCVFCN图像分割资源-CSDN文库
// FCN_Segment.cpp : 此文件包含 "main" 函数。程序执行将在此处开始并结束。
//

#include <iostream>
#include <opencv2/opencv.hpp>
#include <opencv2/dnn.hpp>
#include <opencv2/highgui/highgui_c.h>
#include <vector>
#include <fstream>

using namespace cv;
using namespace cv::dnn;
using namespace std;


const size_t width = 500;
const size_t height = 500;
String label = "F:/data/CQU/VS/FCN_Segment/pascal-classes.txt";
String model = "F:/data/CQU/VS/FCN_Segment/fcn8s-heavy-pascal.caffemodel";
String config = "F:/data/CQU/VS/FCN_Segment/fcn8s-heavy-pascal.prototxt";

//读取分割对象颜色
vector<Vec3b> readColor(String labelpath)
{
    vector<Vec3b> colors;
    ifstream fp(labelpath);
    if (!fp.is_open())
    {
        printf("could not open the file...\n");
        exit(-1);
    }
	string line;
	while (!fp.eof())
	{
		//读取每一行
		getline(fp, line);
		if (line.length())
		{
			stringstream ss(line);
			string name;
			ss >> name;   //分割对象
			int temp;
			Vec3b color;  //依次读取三个通道的颜色值大小
			ss >> temp;
			color[0] = (uchar)temp;
			ss >> temp;
			color[1] = (uchar)temp;
			ss >> temp;
			color[2] = (uchar)temp;
			colors.push_back(color);
		}
	}
	return colors;
}


int main()
{
	Mat frame = imread("F:/data/CQU/VS/FCN_Segment/luo.jpg");
	if (frame.empty())
	{
		printf("could not load image...\n");
		return -1;
	}
	namedWindow("src", CV_WINDOW_AUTOSIZE);
	imshow("src", frame);

	//图像预处理
	resize(frame, frame, Size(500, 500));
	Mat blobImage = blobFromImage(frame);

	//读取标签颜色
	vector<Vec3b> colors = readColor(label);

	//加载网络
	Net net = readNetFromCaffe(config, model);
	//使用cuda加速
	net.setPreferableBackend(cv::dnn::DNN_BACKEND_CUDA);
	net.setPreferableTarget(cv::dnn::DNN_TARGET_CUDA_FP16);
	//构建输入
	net.setInput(blobImage, "data");
	//执行推理
	Mat score = net.forward("score");

	//分割并显示
	const int chns = score.size[1];
	const int rows = score.size[2];
	const int cols = score.size[3];
	//每个像素的最大类别(通道)
	Mat maxCl(rows, cols, CV_8UC1);
	//每个像素的最大值
	Mat maxVal(rows, cols, CV_32FC1);

	//LUT查找
	for(int c = 0; c < chns; c++)
	{
		for(int row = 0; row < rows; row++)
		{
			//获取每个分割对象的置信度
			const float* ptrScore = score.ptr<float>(0, c, row);
			uchar* ptrMaxCl = maxCl.ptr<uchar>(row);
			float* ptrMaxVal = maxVal.ptr<float>(row);
			for(int col = 0; col < cols; col++)
			{
				//分割结果大于最大值
				if (ptrScore[col] > ptrMaxVal[col])
				{
					ptrMaxVal[col] = ptrScore[col];
					ptrMaxCl[col] = (uchar)c;
				}
			}
		}
	}

	//为每个像素分配一个对应的颜色,并将结果存储在result矩阵
	Mat result = Mat::zeros(rows, cols, CV_8UC3);
	for (int row = 0; row < rows; row++)
	{
		const uchar* ptrMaxCl = maxCl.ptr<uchar>(row);
		Vec3b* ptrColor = result.ptr<Vec3b>(row);
		for (int col = 0; col < cols; col++)
		{
			ptrColor[col] = colors[ptrMaxCl[col]];
		}
	}
	Mat dst;
	imshow("FCN", result);
	//将两个图像按照一定的权重进行线性叠加,加入背景
	//frame,result尺寸要相同
	addWeighted(frame, 0.3, result, 0.7, 0, dst);
	imshow("Src-FCN", dst);

	waitKey(0);

	return 0;
}
结束语
感谢你观看我的文章呐~本次航班到这里就结束啦 🛬
希望本篇文章有对你带来帮助 🎉,有学习到一点知识~
躲起来的星星🍥也在努力发光,你也要努力加油(让我们一起努力叭)。
最后,博主要一下你们的三连呀(点赞、评论、收藏),不要钱的还是可以搞一搞的嘛~
不知道评论啥的,即使扣个666也是对博主的鼓舞吖 💞 感谢 💐

![buu web [强网杯 2019]随便注](https://img-blog.csdnimg.cn/538b12bc39e6446b8919b0d14a9e84fd.png)


![[译] MySQL-恢复被删除的Performance Schema 数据库](https://img-blog.csdnimg.cn/img_convert/ef91a3bb41862ad3a3ac9c3396db673d.png)


![[NCTF2019]Fake XML cookbook XML注入](https://img-blog.csdnimg.cn/db68ffdf81a44beda5a319dea035be65.png)
