Boost 库下载和安装
Boost 官网地址:https://www.boost.org/ ,首先进入官网下载对应版本的 Boost 库文件。点击下图所示绿框中的 Download 进入下载页面。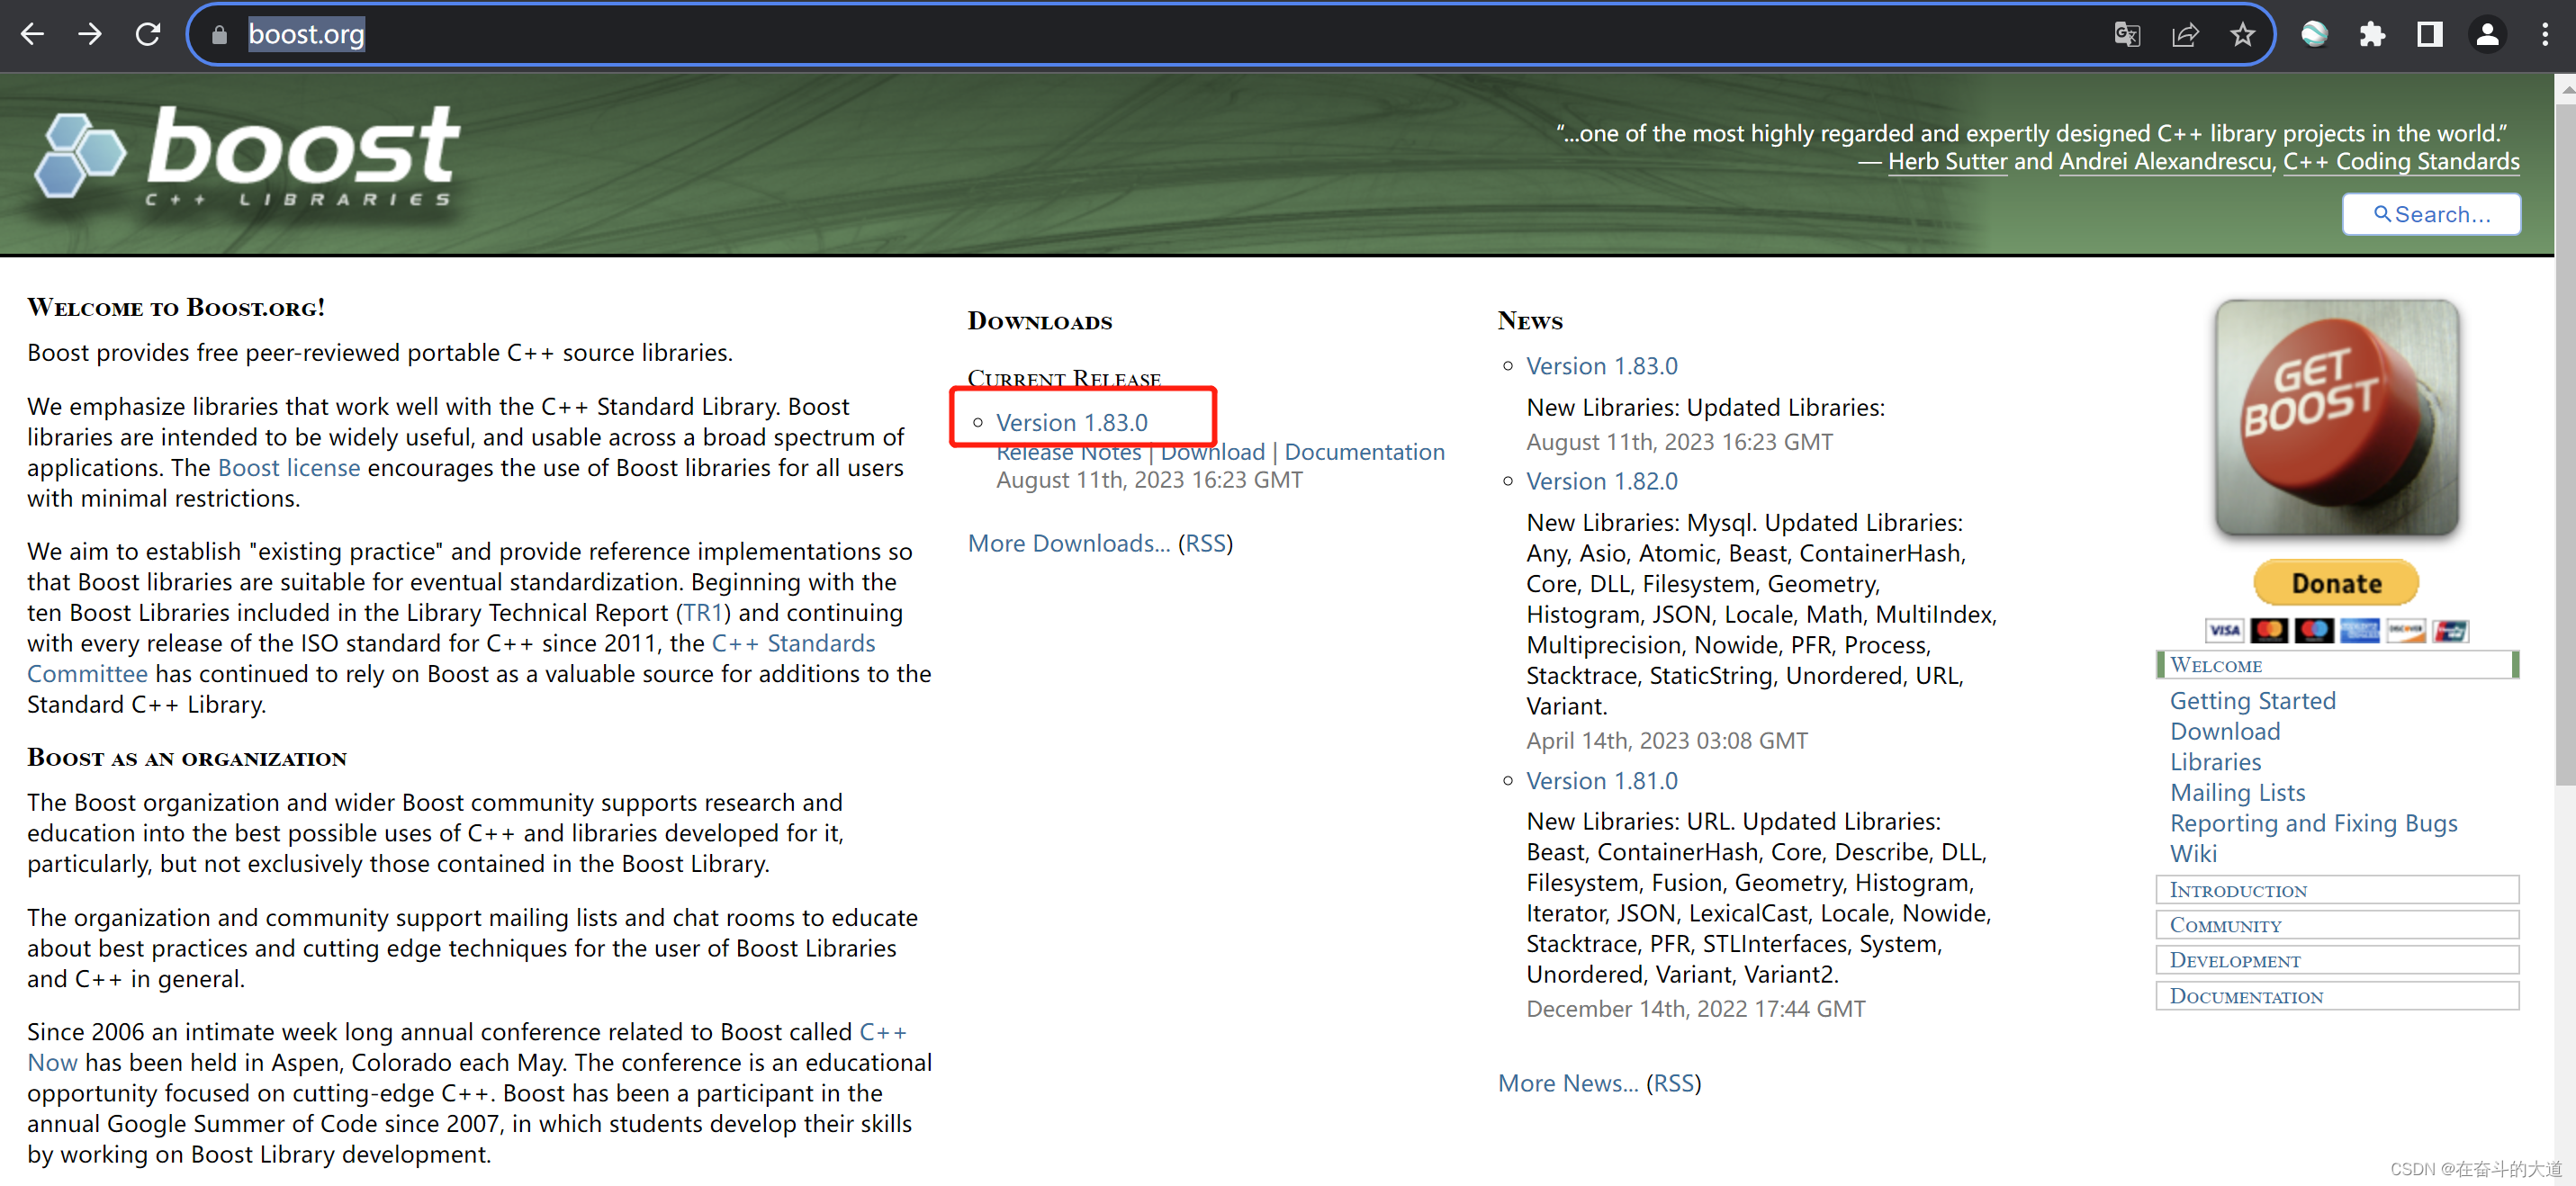
进入下载页面,下载所需要的版本,我现在下载的版本为1.83.0,下载的是windows 版本boost_1_83_0.7z。

Boost 库安装
下载的文件包解压之后如下图所示:

知识拓展:Windows PowerShell 概念和用途
Windows PowerShell是一个由Microsoft发布的任务自动化和配置管理框架,包含了命令行外壳和脚本语言环境。它建立在.NET Framework上,接受和返回.NET对象。
用途包括:
1. 系统管理:PowerShell 脚本可以用来自动化系统日常的管理和配置任务。
2. 网络管理:比如可以使用 PowerShell 脚本来管理网络设置,包括网络适配器的设置,IP 地址的配置等等。
3. 文件操作:PowerShell 脚本可以用来自动化文件操作,比如复制文件,删除文件,重命名文件等等。
4. 数据处理:PowerShell 可以处理文本,XML,CSV 等各种数据,并且有丰富的数据处理命令。
5. 系统监控:PowerShell 脚本可以用来监控系统的运行状态,比如 CPU 的使用率,内存的使用情况,硬盘的使用情况等等。
6. 软件开发和测试:PowerShell 功能强大,适合于软件开发和测试工作,比如可以使用 PowerShell 来自动化编译,测试,打包,部署等工作。
7. 服务器管理:PowerShell提供了丰富的命令来管理Windows Server的各项功能,包括AD(Active Directory),IIS,Exchange Server,SQL Server等。
Windows 安装Boost 库,为什么使用PowerShell ?
开发Boost程序需要配置Boost头文件和Boost链接库的位置 , Windows 管理程序的编译、打包、部署工具就是PowerShell。
第一步:打开PowerShell 窗口
打开cmd 窗口,并输入powershell 指令。
第二步:切换至Boost 解压目录,执行如下命令。
Windows PowerShell
版权所有(C) Microsoft Corporation。保留所有权利。

安装最新的 PowerShell,了解新功能和改进!https://aka.ms/PSWindows

PS C:\Users\zzg> cd D:\Boost\boost_1_83_0
PS D:\Boost\boost_1_83_0> .\bootstrap.bat
Building Boost.Build engine
LOCALAPPDATA=C:\Users\zzg\AppData\Local
Found with vswhere C:\Program Files\Microsoft Visual Studio\2022\Community
Found with vswhere C:\Program Files\Microsoft Visual Studio\2022\Community
Call_If_Exists "C:\Program Files\Microsoft Visual Studio\2022\Community\Common7\Tools\..\..\VC\Auxiliary\Build\vcvarsall.bat"  AMD64
**********************************************************************
** Visual Studio 2022 Developer Command Prompt v17.5.5
** Copyright (c) 2022 Microsoft Corporation
**********************************************************************
[vcvarsall.bat] Environment initialized for: 'x64'
###
### Using 'vc143' toolset.
###
第三步:.\bootstrap.bat· 运行完成之后,结果如下图所示,会多出几个文件用于库的构建和编译:
 拓展:
拓展:.\b2 --help 了解一下有哪些参数可以配置
PS D:\Boost\boost_1_83_0> .\b2 --help
B2 4.10-git

Project-specific help:

  Project has jamfile at Jamroot

Usage:

  b2 [options] [properties] [install|stage]

  Builds and installs Boost.

Targets and Related Options:

  install                 Install headers and compiled library files to the
  =======                 configured locations (below).

  --prefix=<PREFIX>       Install architecture independent files here.
                          Default: C:\Boost on Windows
                          Default: /usr/local on Unix, Linux, etc.

  --exec-prefix=<EPREFIX> Install architecture dependent files here.
                          Default: <PREFIX>

  --libdir=<LIBDIR>       Install library files here.
                          Default: <EPREFIX>/lib

  --includedir=<HDRDIR>   Install header files here.
                          Default: <PREFIX>/include

  --cmakedir=<CMAKEDIR>   Install CMake configuration files here.
                          Default: <LIBDIR>/cmake

  --no-cmake-config       Do not install CMake configuration files.

  stage                   Build and install only compiled library files to the
  =====                   stage directory.

  --stagedir=<STAGEDIR>   Install library files here
                          Default: ./stage

Other Options:

  --build-type=<type>     Build the specified pre-defined set of variations of
                          the libraries. Note, that which variants get built
                          depends on what each library supports.

                              -- minimal -- (default) Builds a minimal set of
                              variants. On Windows, these are static
                              multithreaded libraries in debug and release
                              modes, using shared runtime. On Linux, these are
                              static and shared multithreaded libraries in
                              release mode.

                              -- complete -- Build all possible variations.

  --build-dir=DIR         Build in this location instead of building within
                          the distribution tree. Recommended!

  --show-libraries        Display the list of Boost libraries that require
                          build and installation steps, and then exit.

  --layout=<layout>       Determine whether to choose library names and header
                          locations such that multiple versions of Boost or
                          multiple compilers can be used on the same system.

                              -- versioned -- Names of boost binaries include
                              the Boost version number, name and version of
                              the compiler and encoded build properties. Boost
                              headers are installed in a subdirectory of
                              <HDRDIR> whose name contains the Boost version
                              number.

                              -- tagged -- Names of boost binaries include the
                              encoded build properties such as variant and
                              threading, but do not including compiler name
                              and version, or Boost version. This option is
                              useful if you build several variants of Boost,
                              using the same compiler.

                              -- system -- Binaries names do not include the
                              Boost version number or the name and version
                              number of the compiler. Boost headers are
                              installed directly into <HDRDIR>. This option is
                              intended for system integrators building
                              distribution packages.

                          The default value is 'versioned' on Windows, and
                          'system' on Unix.

  --buildid=ID            Add the specified ID to the name of built libraries.
                          The default is to not add anything.

  --python-buildid=ID     Add the specified ID to the name of built libraries
                          that depend on Python. The default is to not add
                          anything. This ID is added in addition to --buildid.

  --help                  This message.

  --with-<library>        Build and install the specified <library>. If this
                          option is used, only libraries specified using this
                          option will be built.

  --without-<library>     Do not build, stage, or install the specified
                          <library>. By default, all libraries are built.

Properties:

  toolset=toolset         Indicate the toolset to build with.

  variant=debug|release   Select the build variant

  link=static|shared      Whether to build static or shared libraries

  threading=single|multi  Whether to build single or multithreaded binaries

  runtime-link=static|shared
                          Whether to link to static or shared C and C++
                          runtime.


General command line usage:

    b2 [options] [properties] [targets]

  Options, properties and targets can be specified in any order.

Important Options:

  * --clean Remove targets instead of building
  * -a Rebuild everything
  * -n Don't execute the commands, only print them
  * -d+2 Show commands as they are executed
  * -d0 Suppress all informational messages
  * -q Stop at first error
  * --reconfigure Rerun all configuration checks
  * --durations[=N] Report top N targets by execution time
  * --debug-configuration Diagnose configuration
  * --debug-building Report which targets are built with what properties
  * --debug-generator Diagnose generator search/execution

Further Help:

  The following options can be used to obtain additional documentation.

  * --help-options Print more obscure command line options.
  * --help-internal B2 implementation details.
  * --help-doc-options Implementation details doc formatting.

...found 1 target...
第四步:根据功能的需要,输入安装指令,配置对应参数,等待其安装完成。
示例:我不需要 python, wave 等库 ,并且将编译文件存放值VS2022 文件夹中。
.\b2 stage --without-python --without-mpi --without-wave --stagedir="D:\Boost\boost_1_83_0\VS2022"
回车,等待其安装完成。
PS D:\Boost\boost_1_83_0> .\b2 stage --without-python --without-mpi --without-wave --stagedir="D:\Boost\boost_1_83_0\VS2
022"
Performing configuration checks

    - default address-model    : 64-bit [1]
    - default architecture     : x86 [1]
    - compiler supports SSE2   : yes [2]
    - compiler supports SSE4.1 : yes [2]
    - has synchronization.lib  : yes [2]
    - has std::atomic_ref      : no [2]
    - has statx                : no [2]
    - has statx syscall        : no [2]
    - has BCrypt API           : yes [2]
    - has init_priority attribute : no [2]
    - has stat::st_blksize     : no [2]
    - has stat::st_mtim        : no [2]
    - has stat::st_mtimensec   : no [2]
    - has stat::st_mtimespec   : no [2]
    - has stat::st_birthtim    : no [2]
    - has stat::st_birthtimensec : no [2]
    - has stat::st_birthtimespec : no [2]
    - has fdopendir(O_NOFOLLOW) : no [2]
    - has dirent::d_type       : no [2]
    - has POSIX *at APIs       : no [2]
    - cxx11_auto_declarations  : yes [2]
    - cxx11_constexpr          : yes [2]
    - cxx11_defaulted_functions : yes [2]
    - cxx11_final              : yes [2]
    - cxx11_hdr_mutex          : yes [2]
    - cxx11_hdr_tuple          : yes [2]
    - cxx11_lambdas            : yes [2]
    - cxx11_noexcept           : yes [2]
    - cxx11_nullptr            : yes [2]
    - cxx11_rvalue_references  : yes [2]
    - cxx11_template_aliases   : yes [2]
    - cxx11_thread_local       : yes [2]
    - cxx11_variadic_templates : yes [2]
    - has_icu builds           : no [2]
******
Visual Studio 2022 集成Boost 快速入门
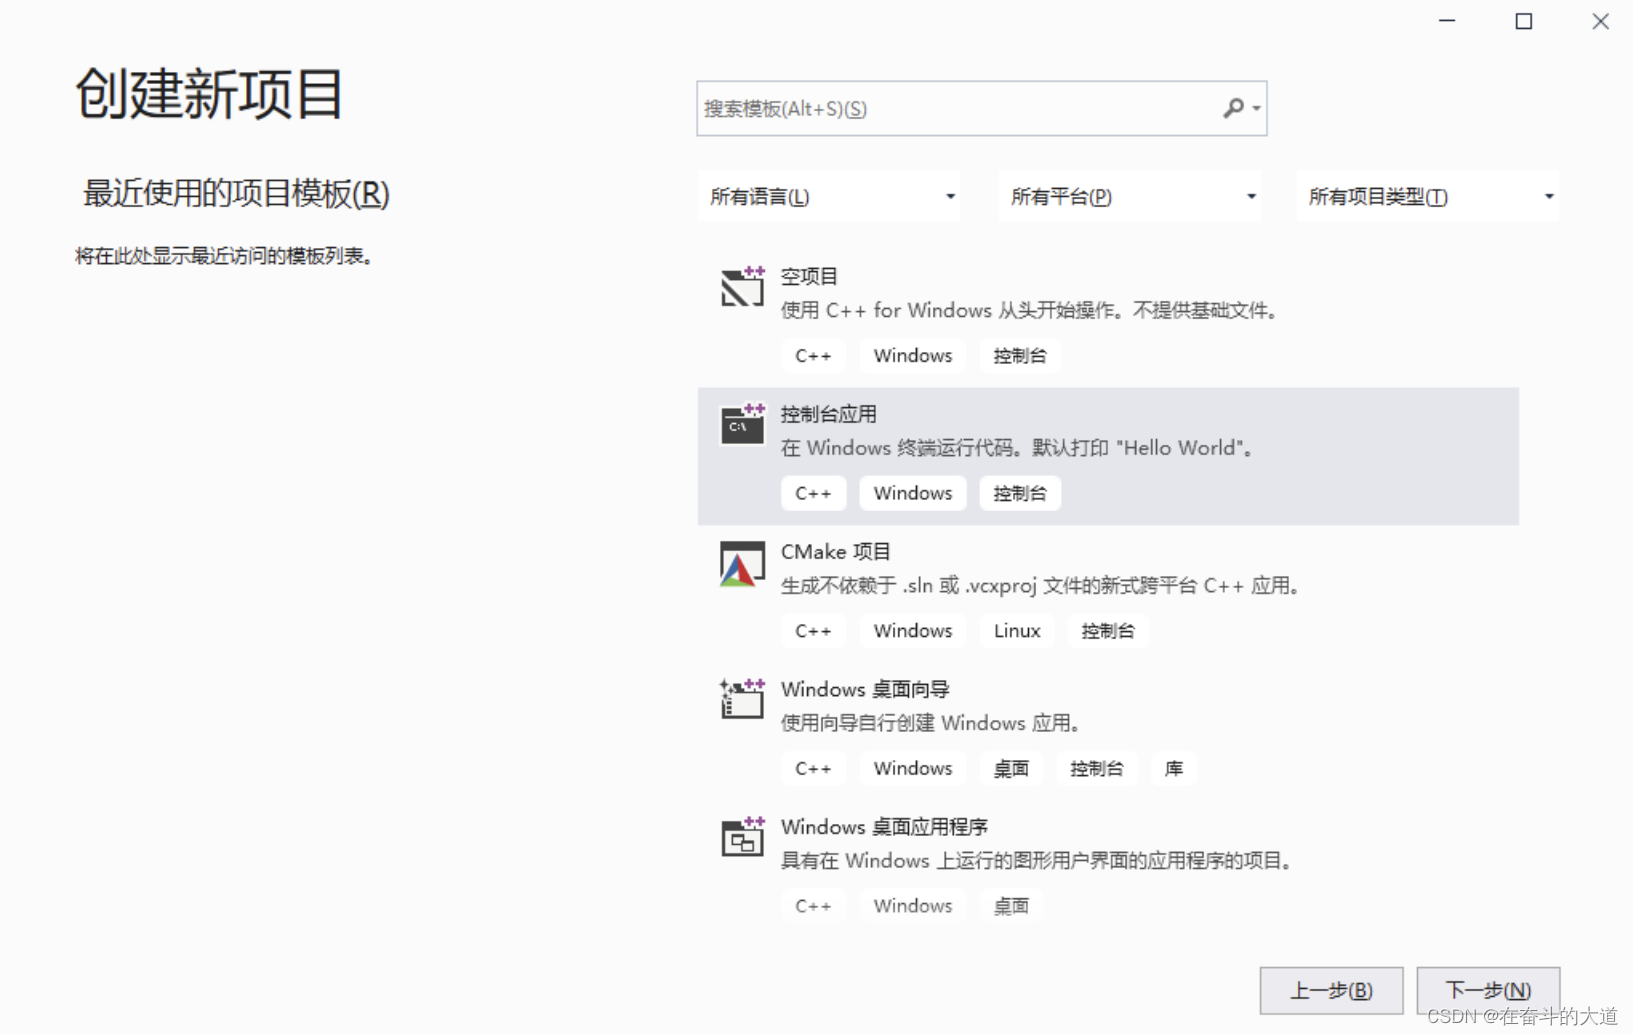
第一步:创建一个空项目
第二步:配置项目属性
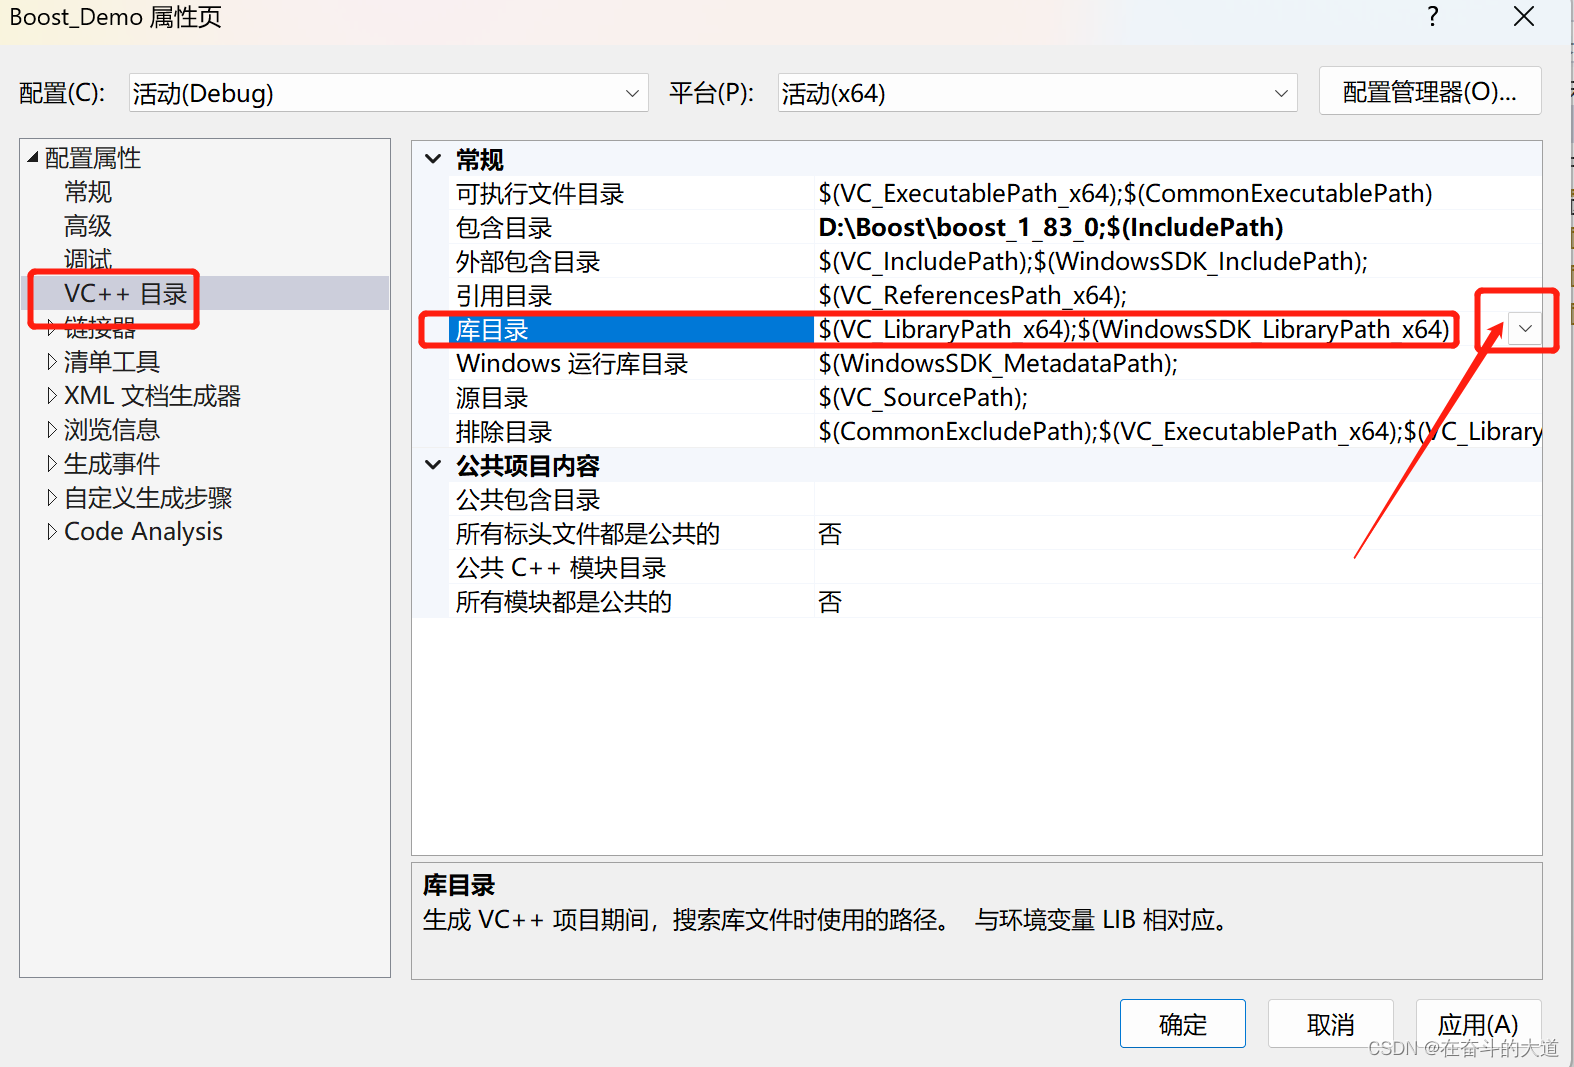
项目配置中需要配置 包含目录 与 库目录


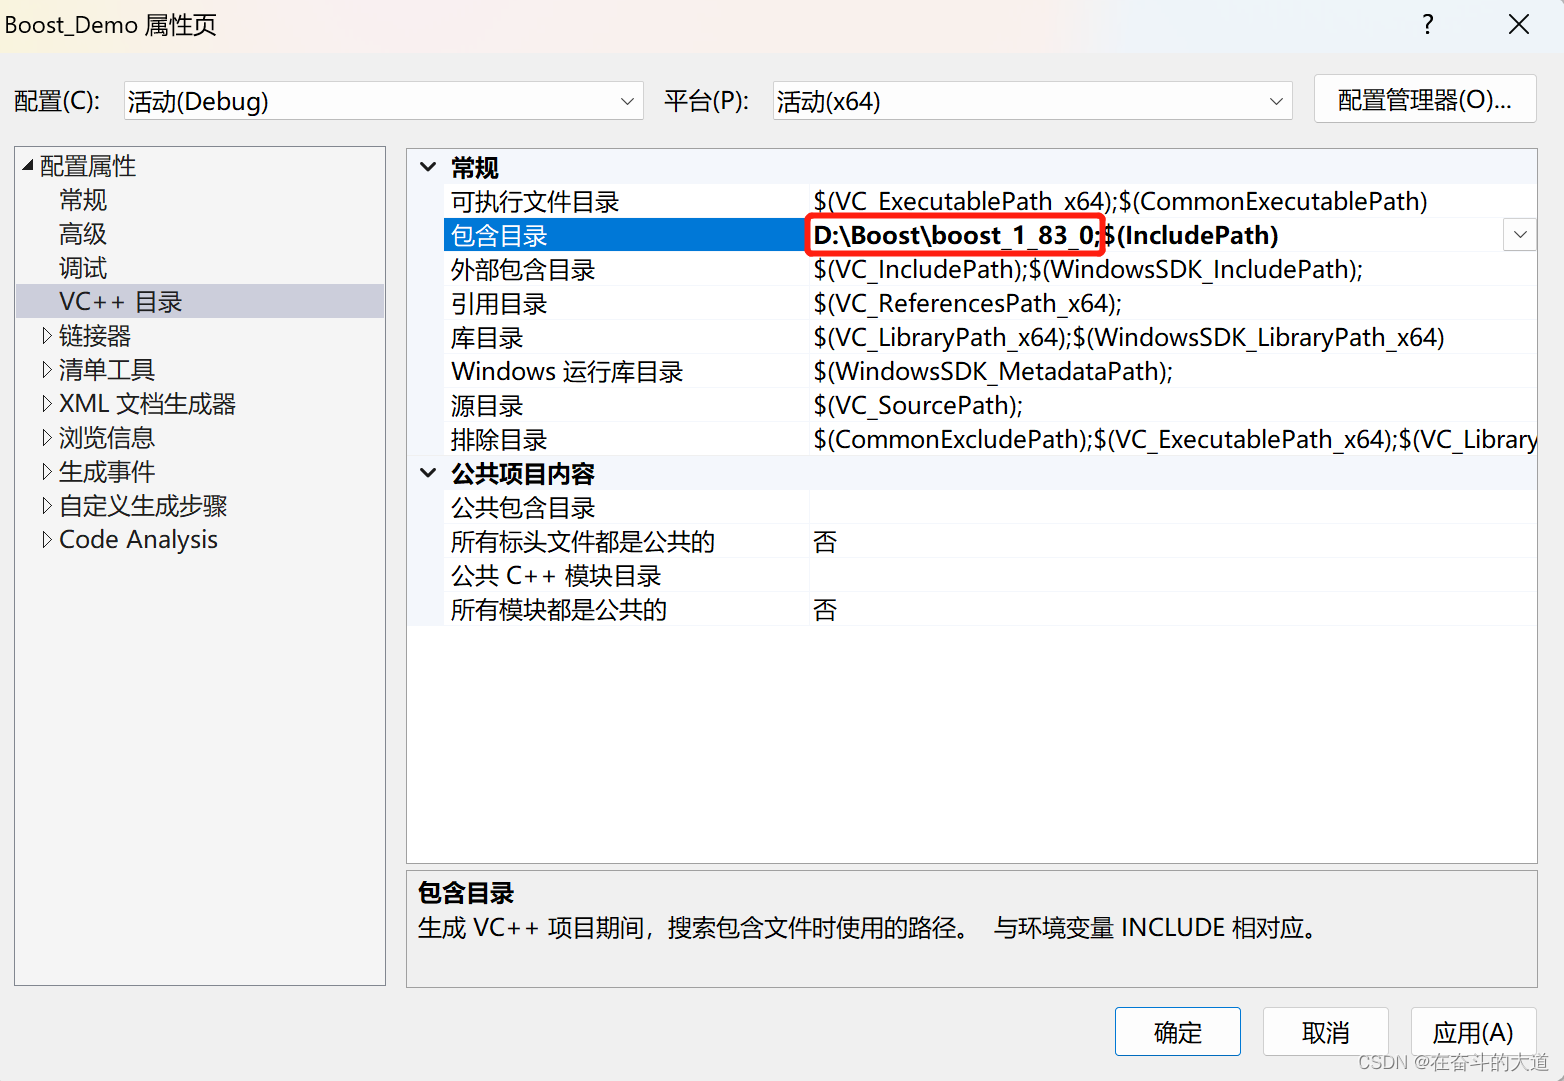
其次配置 与 库目录 如下图所示:


Boost 库快速入门
智能指针
#include <boost/scoped_ptr.hpp>
#include <iostream>

using namespace boost;
using namespace std;

class MyClass {
public:
    MyClass() {
        cout << "MyClass constructor"; }
    ~MyClass() {
         cout << "MyClass destructor"; }
};

int main() {
    // 声明智能指针
    scoped_ptr<MyClass> ptr(new MyClass);

    // 现在我们可以像使用常规指针一样使用 scoped_ptr
   // ...

   // 当 ptr 超出作用域时,MyClass 对象将被删除
    return 0;
}
温馨提示:scoped_ptr 的基本功能:自动释放其管理的资源。
知识拓展:在Boost库中,智能指针是一种非常有用的资源管理工具。
智能指针的“智能”是因为它们自动管理分配的对象,当不再需要这个对象时,智能指针会自动释放它。这种自动管理的特性可以帮助避免内存泄漏和去除手动释放内存的麻烦。
Boost库中的智能指针分为如下几大类:
1. boost::scoped_ptr:这是一种简单的智能指针,它保证在其作用域结束时删除对象。它不支持指针的共享,也不能把它放入C++标准库的容器类中。
2. boost::shared_ptr:这是一种引用计数的智能指针,支持复制操作以及与其它shared_ptr共享对象所有权。当最后一个引用的shared_ptr被销毁或者释放时,其所指向的对象会被删除。
3. boost::weak_ptr:这是一种辅助shared_ptr的智能指针,它观察shared_ptr但不会增加其引用计数。主要用于解决由shared_ptr引起的循环引用问题。
4. boost::unique_ptr:这是C++11标准中添加的一个智能指针,它代表独占所有权的语义。
5. boost::intrusive_ptr:对于那些引用计数是内嵌在用户对象中的情况,使用这种智能指针可以减少内存开销。
函数对象
什么是函数对象?
在C++中,函数对象(又称为functors)是一种行为类似函数的对象。它们是一种通过类的实例来模拟函数的功能的方式。
优点:相比于普通函数,它可以包含局部状态信息。
Boost 对于函数对象拓展
Boost库中的函数对象包括一些通用的函数对象(如boost::bind,用于将函数或函数对象与其参数绑定),以及对STL中函数对象的扩展和补充。例如,Boost.Function库提供了函数包装器,可以存储任何可调用的目标(也就是可以用"()"调用的对象),这包括函数、函数指针和函数对象。
#include <boost/function.hpp>
#include <iostream>

using namespace std;
void print_num(int x) {
	cout << "int is:" << x <<endl;
}

int main() {
	boost::function<void(int)> f = print_num;
	f(5);
	return 0;
}
事件处理
事件处理涉及到创建和管理一个事件循环,监听输入或者触发事件,以及在事件发生时采取适当的行动。
Boost库中的主要工具是 Boost.Asio,你可以使用它来编写异步IO操作(如网络或定时器操作)。Boost.Asio 支持多线程处理和并发连接,以及包括超时、取消和sigaction行为的等待/通知。
下面是一个 Boost.Asio 的基本示例,展示如何使用它创建一个定时器:
#include <iostream>
#include <boost/asio.hpp>
#include <boost/bind.hpp>
#include <boost/date_time/posix_time/posix_time.hpp>

void print(const boost::system::error_code& /*e*/)
{
	std::cout << "Hello, world!" << std::endl;
}

int main()
{
	boost::asio::io_service io;
	boost::asio::deadline_timer timer(io, boost::posix_time::seconds(5));
	timer.async_wait(&print);
	io.run();

	return 0;
}
说明: 先创建了一个io_service和一个定时器。然后我们设定了定时器在5秒后触发,并且注册了一个可调用对象 (在这个例子里是print函数) 来作为事件处理器。然后我们启动了io_service的事件循环,当定时器到期时,print函数将被调用,输出 "Hello, world!"。
可以使用 Boost.Asio 实现更加复杂的事件处理操作,包括 Socket 编程、串行端口操作、信号处理,以及 Coroutines、Futures、Threads 等等。
字符串处理
Boost C++库提供了对字符串操作的强大支持,包括普通的字符串处理,采用可变参数模板实现的格式化字符串,正则表达式匹配和替换,以及UNICODE字符串的转换等。
#include <boost/algorithm/string.hpp>
#include <boost/format.hpp>
#include <boost/regex.hpp>
#include <boost/lexical_cast.hpp>
#include <boost/locale.hpp>
#include <iostream>

using namespace std;


int main() {
	string str = " hello, world! ";
	cout << "str is:" << str << endl;
	// 字符串大写转换
	boost::to_upper(str);
	cout << "str is:" << str << endl;

	// 字符串格式化
	cout << boost::format("%1% %2% %3%") % 1 % 2 % 3;

	// 字符串正则表达式
	string s = "Boost Libraries";
	boost::regex expr{ "\\w+\\s\\w+" };
	cout << std::boolalpha << boost::regex_match(s, expr) << '\n';

	// 类型转换
	int x = boost::lexical_cast<int>("123");
	string s1 = boost::lexical_cast<string>(123);

	cout << "x is:" << x << endl;
	cout << "s1 is:" << s1 << endl;

	// unicode 编码
	std::locale loc = boost::locale::generator().generate("");

	std::string original = "é";
	std::cout << "Size: " << original.size() << std::endl;

	std::string normalized = boost::locale::normalize(original, boost::locale::norm_nfc, loc);
	std::cout << "Normalized Size: " << normalized.size() << std::endl;
	return 0;
}
1. Boost.StringAlgo库:Boost.StringAlgo库是一个字符串算法库,提供了非常强大的字符串处理功能,包括查找、比较、转换、修剪空格、分割、合并等操作。例如,你可以用trim函数去除字符串头尾的空格,split函数可以非常方便地切割字符串。
```cpp
std::string str=" hello, world! ";
boost::trim(str);
```
2. Boost.Format库:Boost.Format库提供了一个类似printf的可以带参数的字符串格式化函数。与printf的写法相比,Boost.Format的写法更直观,而且类型安全。
```cpp
std::cout << boost::format("%1% %2% %3%") %1 %2 %3;
```
3. Boost.Regex库:Boost.Regex库提供了正则表达式的支持,你可以用它执行复杂的字符串匹配和替换操作。比如你可以很方便地使用正则表达式判断一个字符串是否是Email地址,或者从一段文本中提取所有的URL等。
```cpp
boost::regex reg("(http|https)://[^/]*");
```
4. Boost.Lexical_Cast库:Boost.Lexical_Cast库可以将字符串转换为其他类型,或者将其他类型转换为字符串。它支持所有标准的C++类型,而且类型的转换是类型安全的。
```cpp
int x = boost::lexical_cast<int>("123");
std::string s = boost::lexical_cast<std::string>(123);
```
5. Boost.String库:Boost.String库是一个用于对std::string进行操作的库,它提供的功能包括分割、去除空格、替换、查找等。
```cpp
std::string s = "Hello, World!";
boost::to_upper(s);
```
6. Boost.Unicode库:Boost.Unicode库提供了对UNICODE字符串的操作,包括字符串的转换、大小写变换、比较和查找等。
```cpp
boost::locale::generator gen;
std::locale loc=gen("en_US.UTF-8");
std::locale::global(loc);
```
多线程
Boost 是一个用于 C++ 的可移植和高质量的库集合。Boost 提供了一系列用于多线程编程的库,包括 boost.thread、boost.asio等。
1. Boost.Thread:提供了一套用于多线程编程的通用框架,允许开发者创建和控制线程、互斥器、条件变量等。
2. Boost.Asio:用于网络和低级 I/O 编程,例如,开发者可以使用它创建多线程的服务器或客户端。
Boost中的多线程库主要关注提供低级线程处理功能,比如创建线程、同步、互斥等等。相比较于编程语言本身支持的多线程特性,Boost的多线程库提供了更多的细节控制,能够帮助开发者更好地构建复杂的多线程应用。
使用Boost进行多线程编程,可以大大简化代码并提高代码的稳定性和可移植性。但同样也需要开发者对多线程的原理和使用方式有一定的熟悉和理解,否则也可能引发一些难以排查的问题,如死锁、资源抢占等。
#include <boost/thread.hpp>
#include <iostream>

void workerFunc()
{
    boost::this_thread::sleep(boost::posix_time::seconds(1));
    std::cout << "Worker thread is executing." << std::endl;
}

int main(int argc, char* argv[])
{
    std::cout << "Main thread is running." << std::endl;

    // 创建并运行新的工作线程
    boost::thread workerThread(workerFunc);

    // 等待工作线程完成
    workerThread.join();

    std::cout << "Main thread is done." << std::endl;

    return 0;
}
说明:程序有主线程和一个工作线程,在运行时工作线程会延时一秒钟后打印输出,然后在它完成后,主线程会打印完成信息。
